La instalación de OpenBSD en CBSD es algo complicada debido a un bug que detecta de forma incorrecta las pulsaciones de teclado haciendo imposible la instalación del sistema operativo, en este artículo habilitaremos la salida por el puerto COM para realizar la instalación desde este. En un artículo anterior ya se hizo algo parecido bajo Linux
Debemos tener en cuenta que en versiones modernas de CBSD parece no haber problema alguno, podemos ver en este video una instalación de OpenBSD, pero si utilizamos la versión de FreeBSD RELEASE Production nos instalará desde paquetes binarios la versión cbsd-12.1.13 la cual si que se ve afectada por el bug.
Si instalamos software desde ports en la misma versión de FreeBSD obtendremos una versión mas reciente Port: cbsd-12.1.16
Otra opción podría ser compilar CBSD desde las fuentes del repositorio de Git e instalar manualmente.
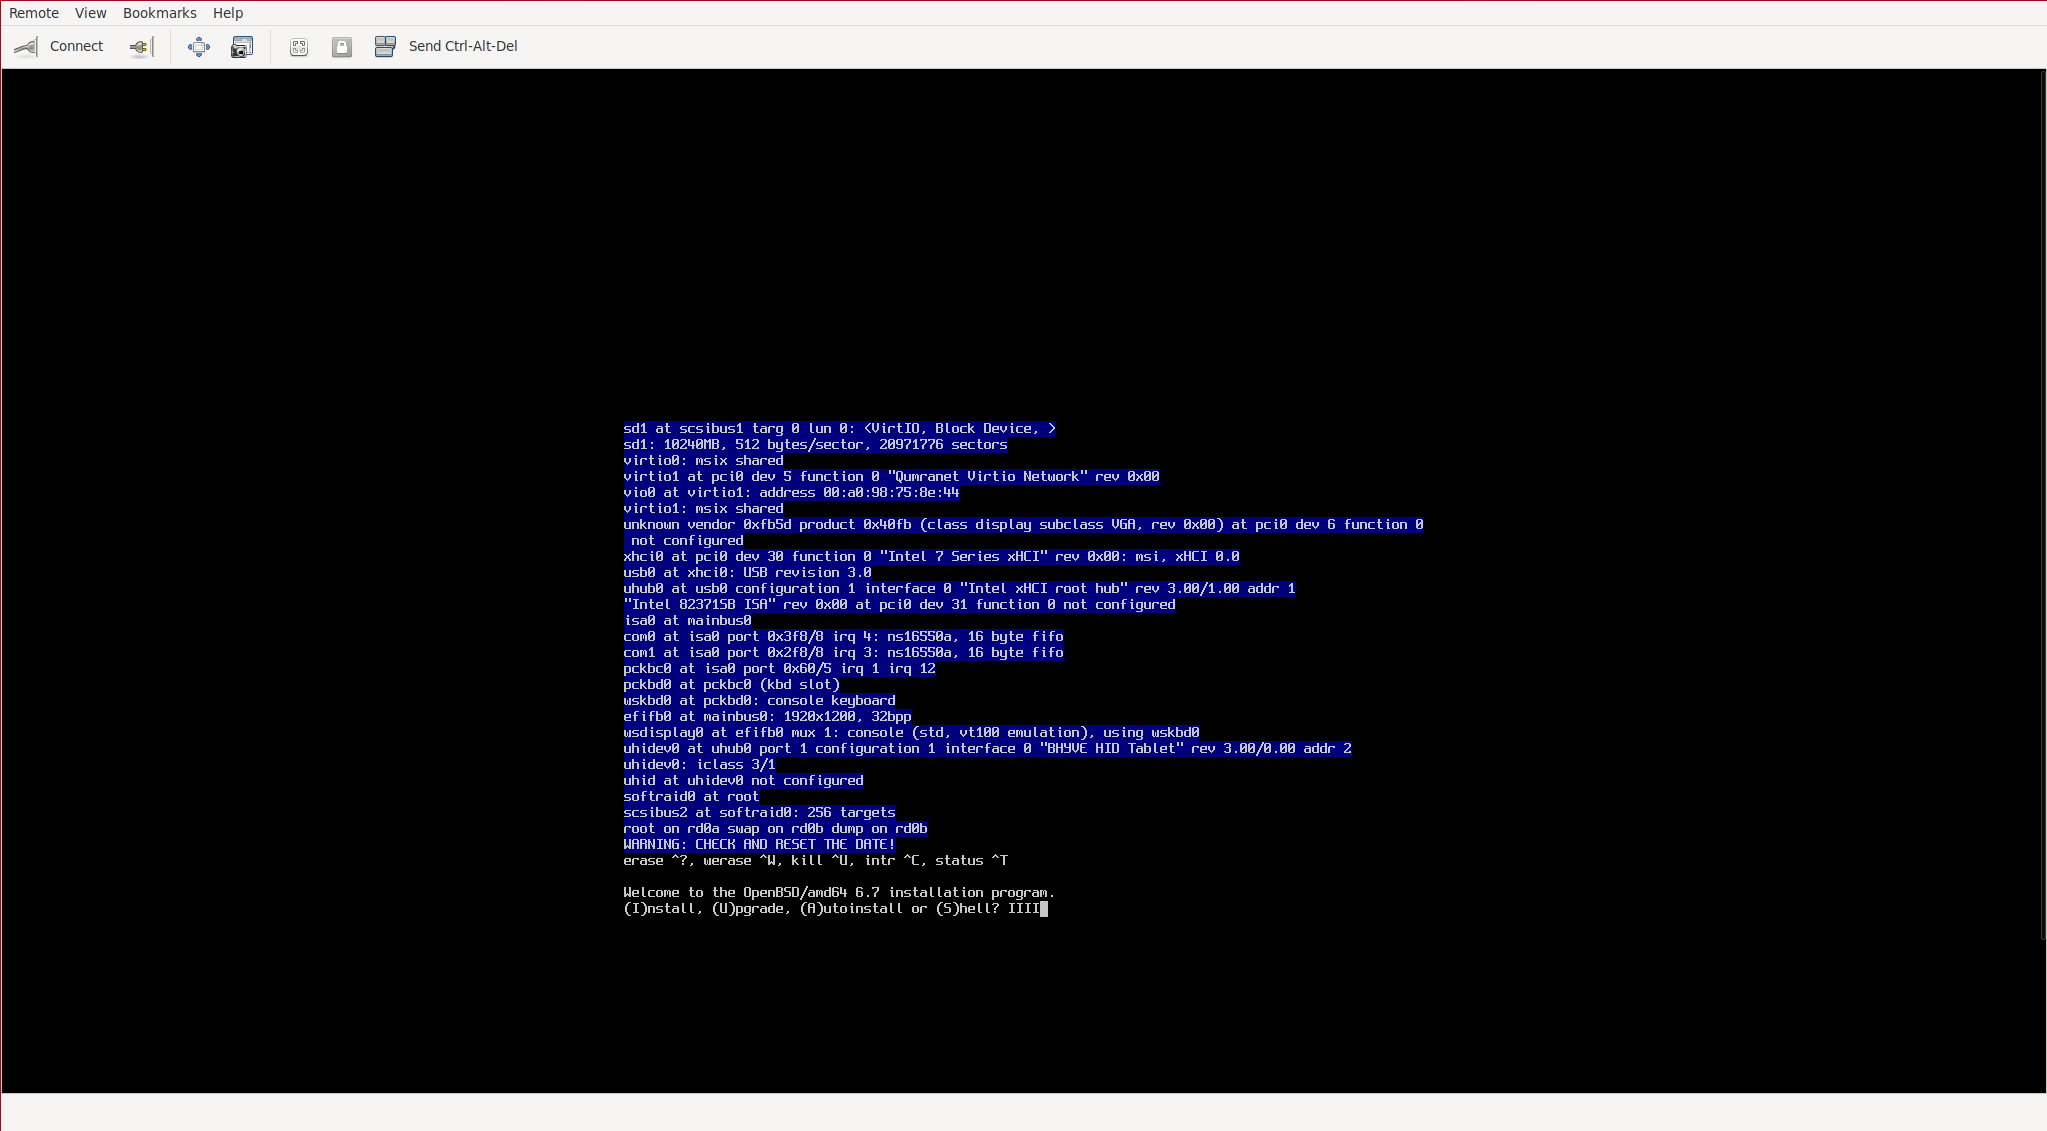
El bug en cuestión puede verse en la siguiente captura de pantalla intentando escribir la letra I para iniciar la instalación:
Según la documentación de Bhyve este nos permite configurar dos puertos serie COM:
-l [help|lpcdev[,conf]]
                 Allow devices behind the LPC PCI-ISA bridge to be configured.
                 The only supported devices are the TTY-class devices com1 and
                 com2 and the boot ROM device bootrom.
Visualizamos los puertos con el siguiente comando:
bootrom
COM1
COM2
NOTA: Bhyve siempre utiliza COM1 para la salida stdio, por lo tanto solo podremos configurar COM2.
Mediante un nullmodem( 1 , 2 ) podremos acceder a la consola de la VM y realizar la instalación desde esta.
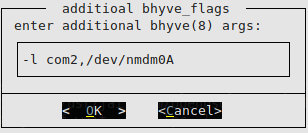
Añadimos flags al arranque del proceso Bhyve mediante el asistente de configuración de CBSD:
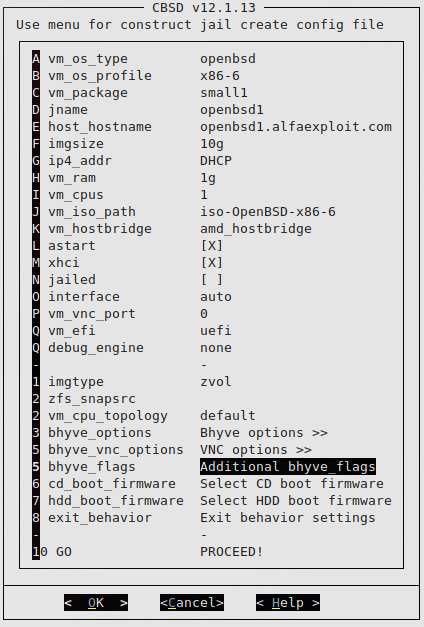
Asignamos las flags adicionales:
Si tenemos varias VMs por acceso null modem debemos elegir un nombre de dispositivo que no se esté utilizando en una VM previa, comprobamos los existentes grepeando la configuración de las VMs:
/usr/jails/jails-system/openbsd1/bhyve.conf:bhyve_flags='-l com2,/dev/nmdm0A'
En este caso vemos que nmdm0 ya está siendo utilizado por la VM openbsd1.
Arrancamos la VM:
Comprobamos los parámetros con los que se ha arrancado el proceso de Bhyve:
root 25961 0.0 0.2 1092620 26404 9 IN+ 20:00 0:00.01 /usr/sbin/bhyve -l com2,/dev/nmdm0A -c 1 -m 1073741824 -H -A -w -U 0f1bcf08-02fb-11eb-9d5a-3497f636bf45 -s 0,amd_hostbridge -s 4,virtio-blk,/usr/jails/vm/openbsd1/dsk1.vhd,sectorsize=512/4096 -s 3,ahci-hd,/usr/jails/src/iso/cbsd-iso-install67.fs,ro -s 5,virtio-net,tap4,mac=00:a0:98:84:f2:ec -s 6,fbuf,tcp=127.0.0.1:5902,w=1024,h=768,vga=off,wait -s 30,xhci,tablet -s 31,lpc -l com1,stdio -l bootrom,/usr/local/cbsd/upgrade/patch/efi.fd openbsd1
Podemos ver como la VM tiene los dos puertos COM configurados:
-l com2,/dev/nmdm0A
-l com1,stdio
Dejamos un Screen a la escucha en nuestro null modem:
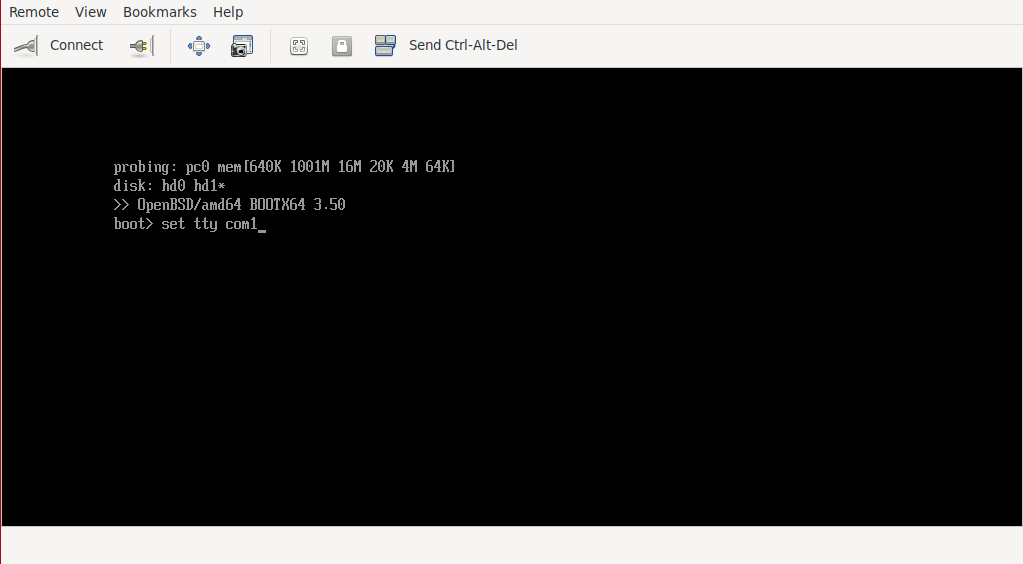
Accedemos a la VM mediante VNC para habilitar la instalación mediante TTY:
boot> set tty com1
En la consola donde tenemos el Screen arrancado obtendremos el asistente de instalación, iniciamos la instalación mediante la orden boot:
Welcome to the OpenBSD/amd64 6.7 installation program.
(I)nstall, (U)pgrade, (A)utoinstall or (S)hell? I

Terminal type? [vt220]
System hostname? (short form, e.g. 'foo') openbsd1

Available network interfaces are: vio0 vlan0.
Which network interface do you wish to configure? (or 'done') [vio0]
IPv4 address for vio0? (or 'dhcp' or 'none') [dhcp]
vio0: 192.168.69.206 lease accepted from 192.168.69.200 (d4:63:fe:b0:3e:10)
IPv6 address for vio0? (or 'autoconf' or 'none') [none]
Available network interfaces are: vio0 vlan0.
Which network interface do you wish to configure? (or 'done') [done]
DNS domain name? (e.g. 'example.com') [my.domain] alfaexploit.com
Using DNS nameservers at 192.168.69.200

stty: tcsetattr: Invalid argument
Password for root account? (will not echo) XXXXXX
stty: tcsetattr: Invalid argument

stty: tcsetattr: Invalid argument
Password for root account? (again) XXXXXX
stty: tcsetattr: Invalid argument

Start sshd(8) by default? [yes]
Do you want the X Window System to be started by xenodm(1)? [no]
Change the default console to com0? [yes]
Available speeds are: 9600 19200 38400 57600 115200.
Which speed should com1 use? (or 'done') [-1] 9600
Setup a user? (enter a lower-case loginname, or 'no') [no]
Since no user was setup, root logins via sshd(8) might be useful.
WARNING: root is targeted by password guessing attacks, pubkeys are safer.
Allow root ssh login? (yes, no, prohibit-password) [no] yes
What timezone are you in? ('?' for list) [Europe/Madrid]

Available disks are: sd0 sd1.
Which disk is the root disk? ('?' for details) [sd0] ?
sd0: ATA, BHYVE SATA DISK, 001  (0.4G)
sd1: VirtIO, Block Device  (10.0G)
Available disks are: sd0 sd1.
Which disk is the root disk? ('?' for details) [sd0] sd1
No valid MBR or GPT.
Use (W)hole disk MBR, whole disk (G)PT or (E)dit? [gpt] G
Setting OpenBSD GPT partition to whole sd1...done.
The auto-allocated layout for sd1 is:
#                size           offset  fstype [fsize bsize   cpg]
  a:       1218736.0K             1024  4.2BSD   2048 16384     1 # /
  b:        262144.0K          2438496    swap
  c:      10485888.0K                0  unused
  d:       3145728.0K          2962784  4.2BSD   2048 16384     1 # /usr
  e:       2097152.0K          9254240  4.2BSD   2048 16384     1 # /home
  i:           480.0K               64   MSDOS
Use (A)uto layout, (E)dit auto layout, or create (C)ustom layout? [a] A
/dev/rsd1a: 1190.2MB in 2437472 sectors of 512 bytes
6 cylinder groups of 202.50MB, 12960 blocks, 25920 inodes each
/dev/rsd1e: 2048.0MB in 4194304 sectors of 512 bytes
11 cylinder groups of 202.50MB, 12960 blocks, 25920 inodes each
/dev/rsd1d: 3072.0MB in 6291456 sectors of 512 bytes
16 cylinder groups of 202.50MB, 12960 blocks, 25920 inodes each
Available disks are: sd0.
Which disk do you wish to initialize? (or 'done') [done]
/dev/sd1a (476db13b9099d424.a) on /mnt type ffs (rw, asynchronous, local)
/dev/sd1e (476db13b9099d424.e) on /mnt/home type ffs (rw, asynchronous, local, nodev, nosuid)
/dev/sd1d (476db13b9099d424.d) on /mnt/usr type ffs (rw, asynchronous, local, nodev)

Let's install the sets!
Location of sets? (disk http nfs or 'done') [http]
HTTP proxy URL? (e.g. 'http://proxy:8080', or 'none') [none]
HTTP Server? (hostname, list#, 'done' or '?') ftp.fr.openbsd.org
Server directory? [pub/OpenBSD/6.7/amd64]

Select sets by entering a set name, a file name pattern or 'all'. De-select
sets by prepending a '-', e.g.: '-game*'. Selected sets are labelled '[X]'.
    [X] bsd           [X] comp67.tgz    [X] xbase67.tgz   [X] xserv67.tgz
    [X] bsd.rd        [X] man67.tgz     [X] xshare67.tgz
    [X] base67.tgz    [X] game67.tgz    [X] xfont67.tgz
Set name(s)? (or 'abort' or 'done') [done]
Get/Verify SHA256.sig   100% |**************************|  2141       00:00
Signature Verified
Get/Verify bsd          100% |**************************| 18117 KB    00:06
Get/Verify bsd.rd       100% |**************************| 10109 KB    00:01
Get/Verify base67.tgz   100% |**************************|   238 MB    00:36
Get/Verify comp67.tgz   100% |**************************| 74451 KB    00:11
Get/Verify man67.tgz    100% |**************************|  7464 KB    00:01
Get/Verify game67.tgz   100% |**************************|  2745 KB    00:01
Get/Verify xbase67.tgz  100% |**************************| 22912 KB    00:03
Get/Verify xshare67.tgz 100% |**************************|  4499 KB    00:01
Get/Verify xfont67.tgz  100% |**************************| 39342 KB    00:03
Get/Verify xserv67.tgz  100% |**************************| 16767 KB    00:02
Installing bsd          100% |**************************| 18117 KB    00:00
Installing bsd.rd       100% |**************************| 10109 KB    00:00
Installing base67.tgz   100% |**************************|   238 MB    00:09
Extracting etc.tgz      100% |**************************|   261 KB    00:00
Installing comp67.tgz   100% |**************************| 74451 KB    00:03
Installing man67.tgz    100% |**************************|  7464 KB    00:00
Installing game67.tgz   100% |**************************|  2745 KB    00:00
Installing xbase67.tgz  100% |**************************| 22912 KB    00:01
Extracting xetc.tgz     100% |**************************|  7023       00:00
Installing xshare67.tgz 100% |**************************|  4499 KB    00:02
Installing xfont67.tgz  100% |**************************| 39342 KB    00:18
Installing xserv67.tgz  100% |**************************| 16767 KB    00:00
Location of sets? (disk http nfs or 'done') [done]
Time appears wrong.  Set to 'Tue Sep 29 20:43:12 CEST 2020'? [yes]
Saving configuration files... done.
Making all device nodes... done.
Relinking to create unique kernel... done.

CONGRATULATIONS! Your OpenBSD install has been successfully completed!

When you login to your new system the first time, please read your mail
using the 'mail' command.

Exit to (S)hell, (H)alt or (R)eboot? [reboot]
En la consola veremos el proceso de arranque del sistema operativo:
OpenBSD/amd64 (openbsd1.alfaexploit.com) (tty01)
login:
También podremos acceder mediante SSH:
root@192.168.69.206 ’s password:
OpenBSD 6.7 (GENERIC) #179: Thu May  7 21:02:37 MDT 2020

Welcome to OpenBSD: The proactively secure Unix-like operating system.

Please use the sendbug(1) utility to report bugs in the system.
Before reporting a bug, please try to reproduce it with the latest
version of the code.  With bug reports, please try to ensure that
enough information to reproduce the problem is enclosed, and if a
known fix for it exists, include that as well.

openbsd1#
Para poder hacer login de forma mas sencilla vamos a modificar el comando de login para esta VM:
login_cmd="screen /dev/nmdm0B"
Comprobamos que el comando login nos lanza la sesión de Screen mediante el null modem configurado:
root
Password:
Last login: Wed Sep 30 21:03:28 on tty01
OpenBSD 6.7 (GENERIC) #179: Thu May  7 21:05:37 MDT 2020

Welcome to OpenBSD: The proactively secure Unix-like operating system.

Please use the sendbug(1) utility to report bugs in the system.
Before reporting a bug, please try to reproduce it with the latest
version of the code.  With bug reports, please try to ensure that
enough information to reproduce the problem is enclosed, and if a
known fix for it exists, include that as well.

You have new mail.
openbsd1#
Debemos tener en cuenta que si nos dejamos algún Screen abierto, incluso con la VM apagada el null modem queda activo:
JNAME     JID    VM_RAM  VM_CURMEM  VM_CPUS  PCPU  VM_OS_TYPE  IP4_ADDR  STATUS  VNC
openbsd1  0      1024    0          1        0     openbsd     DHCP      Off     127.0.0.1:5902
crw-------  1 root  wheel  0xf4 Sep 29 20:09 /dev/nmdm0A
crw-------  1 root  wheel  0xf5 Sep 29 20:09 /dev/nmdm0B
root     screen     96110 ctty /dev        243 crw-------  nmdm0B rw
root     screen     96110    6 /dev        243 crw-------  nmdm0B rw
Matamos todas las sesiones de Screen o la que nos interese:
Este método tiene algunos inconvenientes, primero hemos perdido el acceso por VNC, si vamos a ejecutar aplicaciones gráficas puede ser un problema aunque siempre tendremos la posibilidad de habilitar el XForwarding de SSH o instalar un servidor VNC dentro de la propia VM, segundo el dispositivo null modem debe configurarse manualmente en la configuración de cada VM sin solapar previas configuraciones existentes y tercero no he encontrado el modo correcto de salir de la sesión Screen para que no queden sesiones abiertas.
Si fuese necesario cambiar algún parámetro mas del proceso Bhyve podríamos hacerlo modificando el script de arranque, pero estaríamos cambiándolo para todas las VMs(nada recomendable), la línea que determina como es lanzado el proceso es la siguiente:
bhyve_cmd_run="env LIB9P_LOGGING=${jailsysdir}/${jname}/cbsd_lib9p.log /usr/bin/nice -n ${nice} ${bhyve_cmd} ${bhyve_flags} -c ${vm_cpus} -m ${vm_ram} ${add_bhyve_opts} ${hostbridge_args} ${virtio_9p_args} ${uefi_boot_args} ${dsk_args} ${dsk_controller_args} ${cd_args} ${nic_args} ${nvme_args} ${virtiornd_args} ${pci_passthru_args} ${vnc_args} ${xhci_args} ${soundhw_args} ${lpc_args} ${console_args} ${efi_args} ${checkpoint_args} ${live_migration_args} ${jname}"
En próximas versiones se podrá cambiar el script wrapper de Bhyve por uno personalizado de forma mas granular por VM:
https://www.youtube.com/watch?v=4SbrjKOWJU0&feature=youtu.be