It is recommended to read the previous articles to better understand the current one:
- GameBoy Dev00
- GameBoy Dev01
- GameBoy Dev02
- GameBoy Dev03
- GameBoy Dev04
- GameBoy Dev05
- GameBoy Dev06
- GameBoy Dev07
- GameBoy Dev08
- GameBoy Dev09
In this article, we will learn how the GameBoy manages the different memory positions, what is the purpose of each region, and how it affects us in terms of ROM/RAM storage space according to the cartridge’s capabilities. Knowing this operation, we will be able to read from the ROM banks and read/write from the RAM banks of the cartridge, thus expanding the possibilities of our game.
We will divide the article into several sections for greater clarity:
Memory space
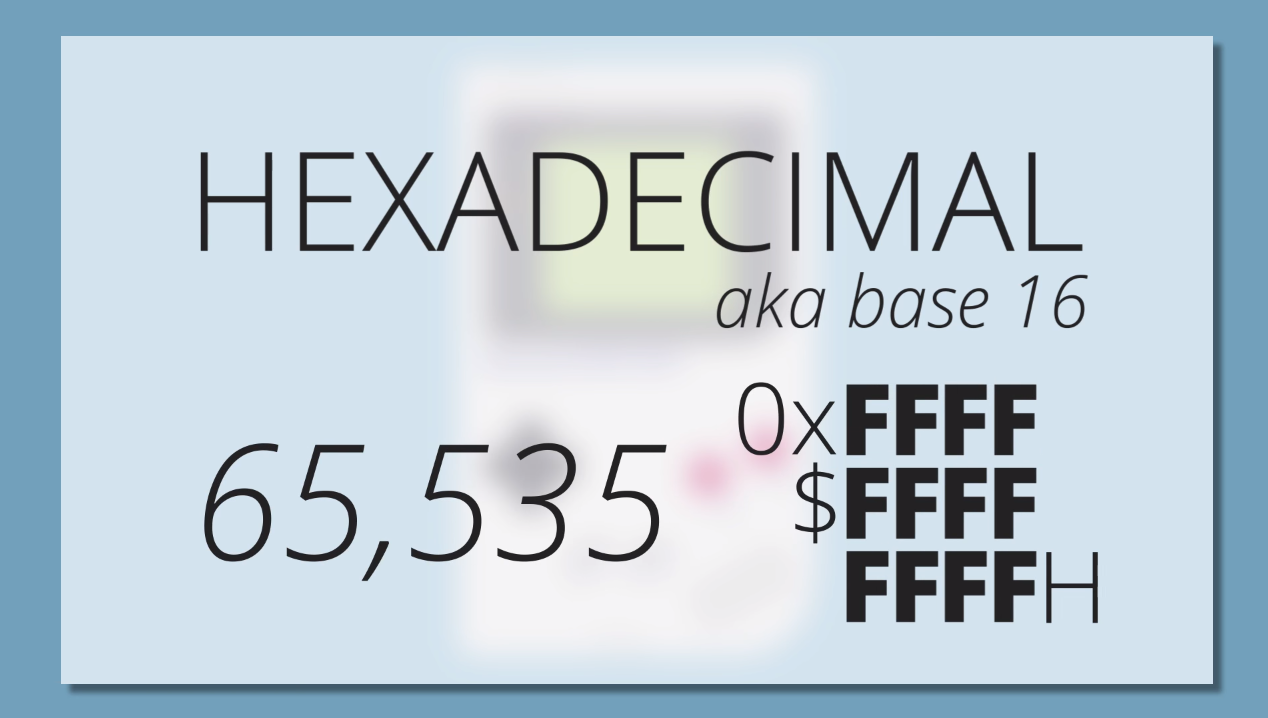
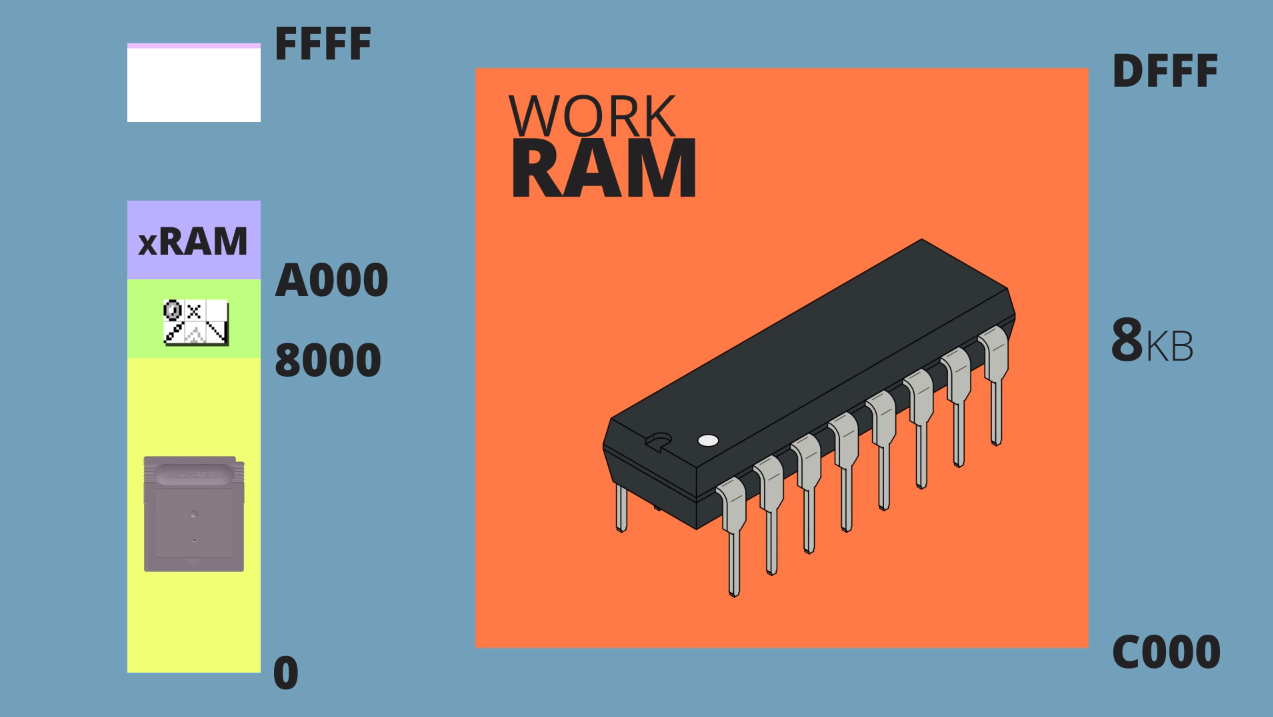
The GameBoy’s memory address space is 16 bits, which gives us 65535 positions of 8 bits each, which in kilobytes is equivalent to 64KB. The range of addresses starts at 0x0000 and ends at 0xFFFF.
This memory space is divided into several parts, each part reserved for a specific use.
|

|
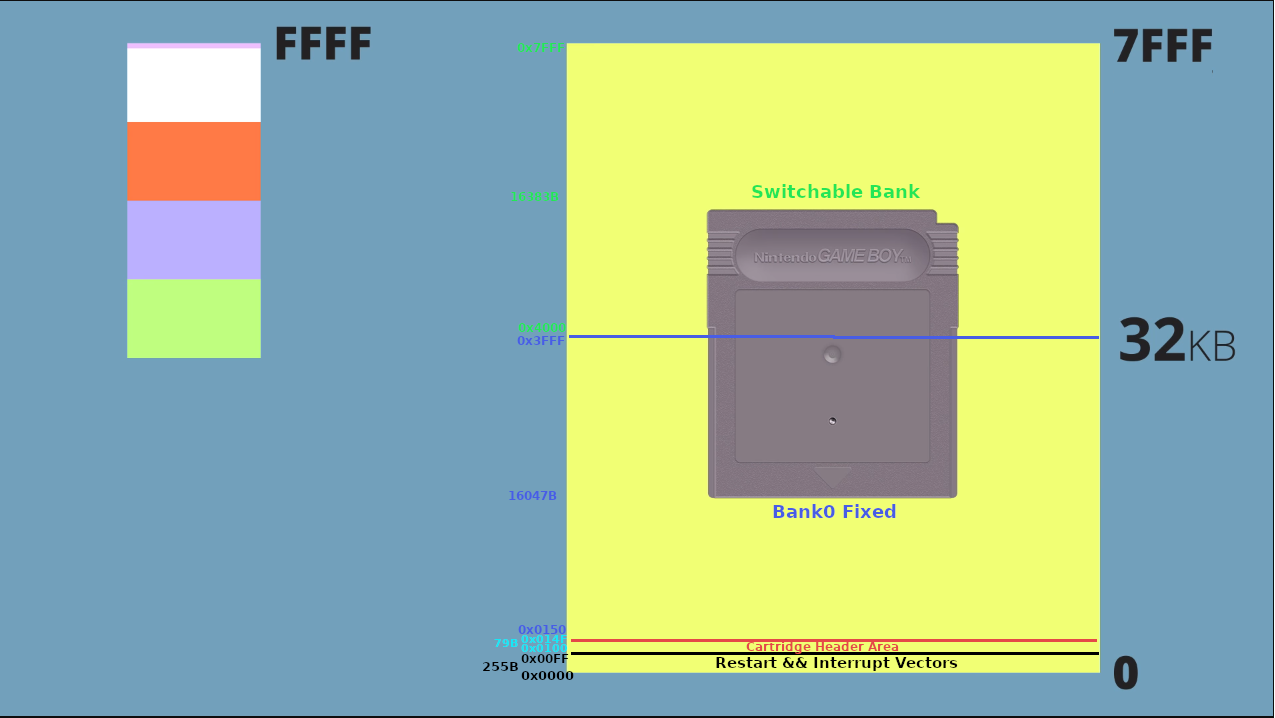
The basic GameBoy cartridge is limited to 32KB (2 banks of 16KB) of storage and the RAM to the console’s own 8KB. However, through a technique called Bank Switching, it is possible to select a different ROM/RAM bank and thus access its content. This greatly expands the possibilities of our games since the ROM storage limit rises to 8MB and the RAM limit to 128KB.
Bank switching has a limitation when managing access to ROM banks, and that is that the first cartridge bank is permanently assigned to the memory area: 0x0150-0x3FFF, with the other ROM banks only being able to be mapped in the area: 0x4000-0x7FFF.
| Cartridge ROM | VRAM |
|---|---|
|
|
| Cartridge RAM | Working RAM |
|---|---|
|
|
| Copy of Working RAM-512B | OAM/IO/HighRAM/Interrupts |
|---|---|
|
|
The images have been taken from a very interesting video which I recommend watching.
I also recommend this other video where the purpose of the RAM regions is explained and how through a bug, parts of the console’s memory can be explored and modified, knowing this and locating the part to modify, it is possible to modify the game’s execution flow.
And this other one with a lot of technical information about the GameBoy’s operation.
In the following table, we can quickly see the memory addresses of each area:
| Mem.Area | Function | Size |
|---|---|---|
| 0x0000 - 0x00FF | Start of the GB and interrupt vectors | 255 bytes |
| 0x0100 - 0x014F | Cartridge header | 79 bytes |
| 0x0150 - 0x3FFF | Entrypoint: Fixed ROM-Bank0 - Cartridge ROM | 16,047 bytes |
| 0x4000 - 0x7FFF | Selectable ROM - Cartridge ROM | 16,383 bytes |
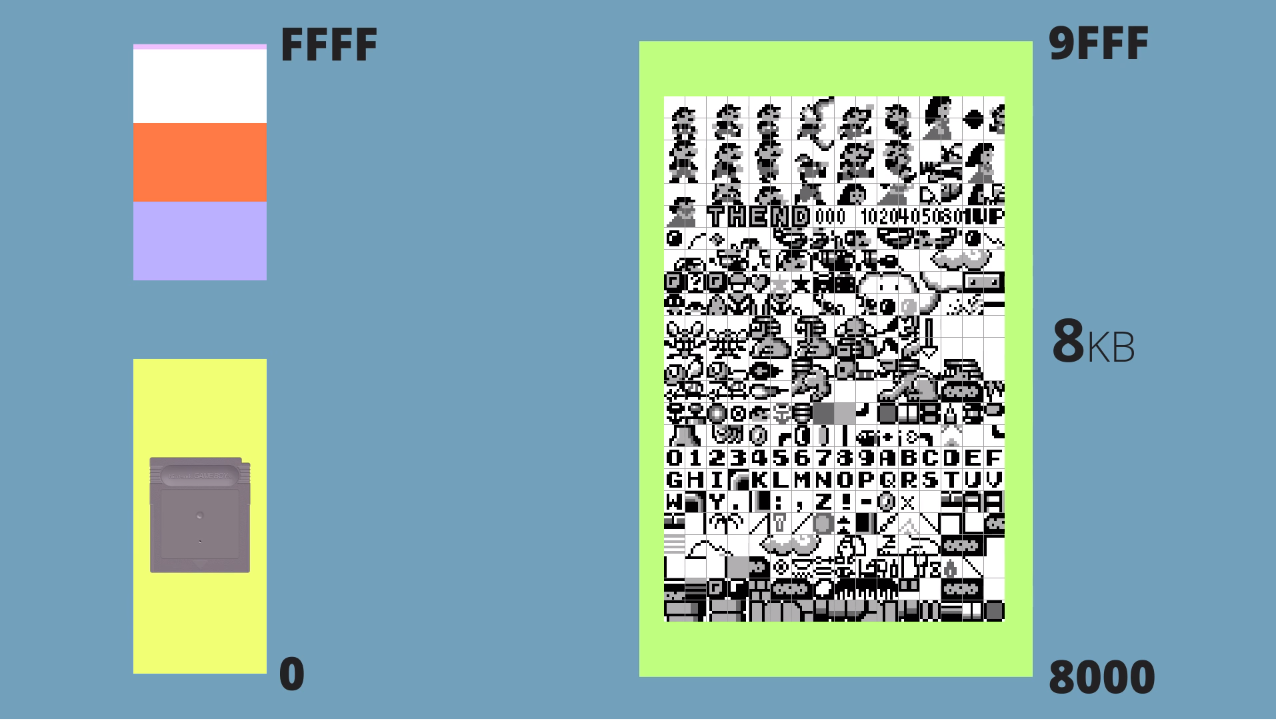
| 0x8000 - 0x9FFF | VRAM | 8,191 bytes |
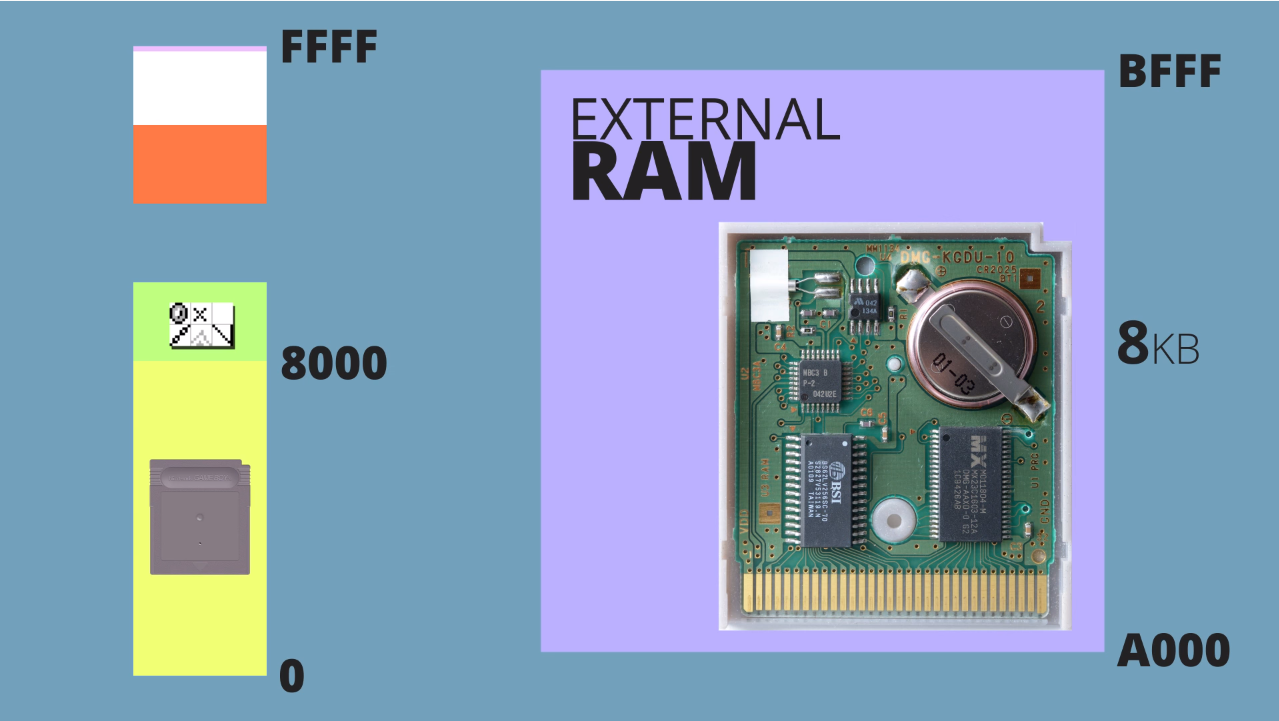
| 0xA000 - 0xBFFF | Selectable RAM - Cartridge RAM | 8,191 bytes |
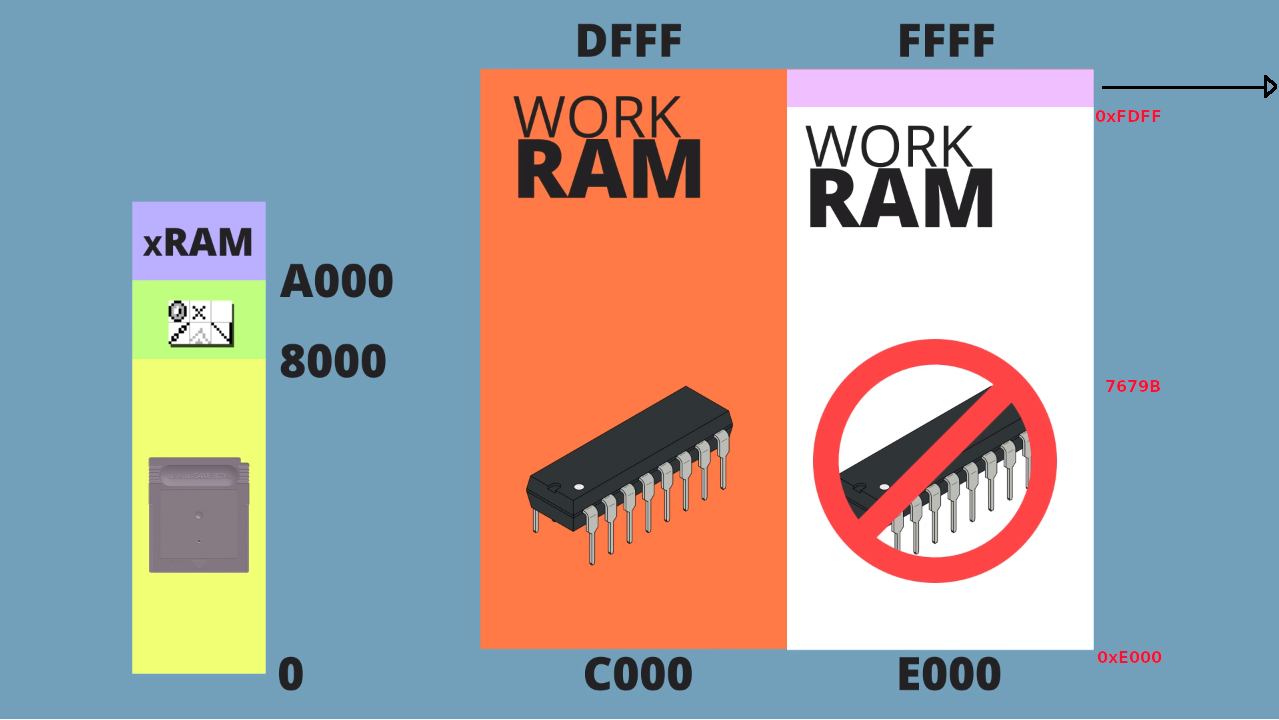
| 0xC000 - 0xDFFF | WRAM | 8,191 bytes |
| 0xE000 - 0xFDFF | EchoRAM | 7,679 bytes |
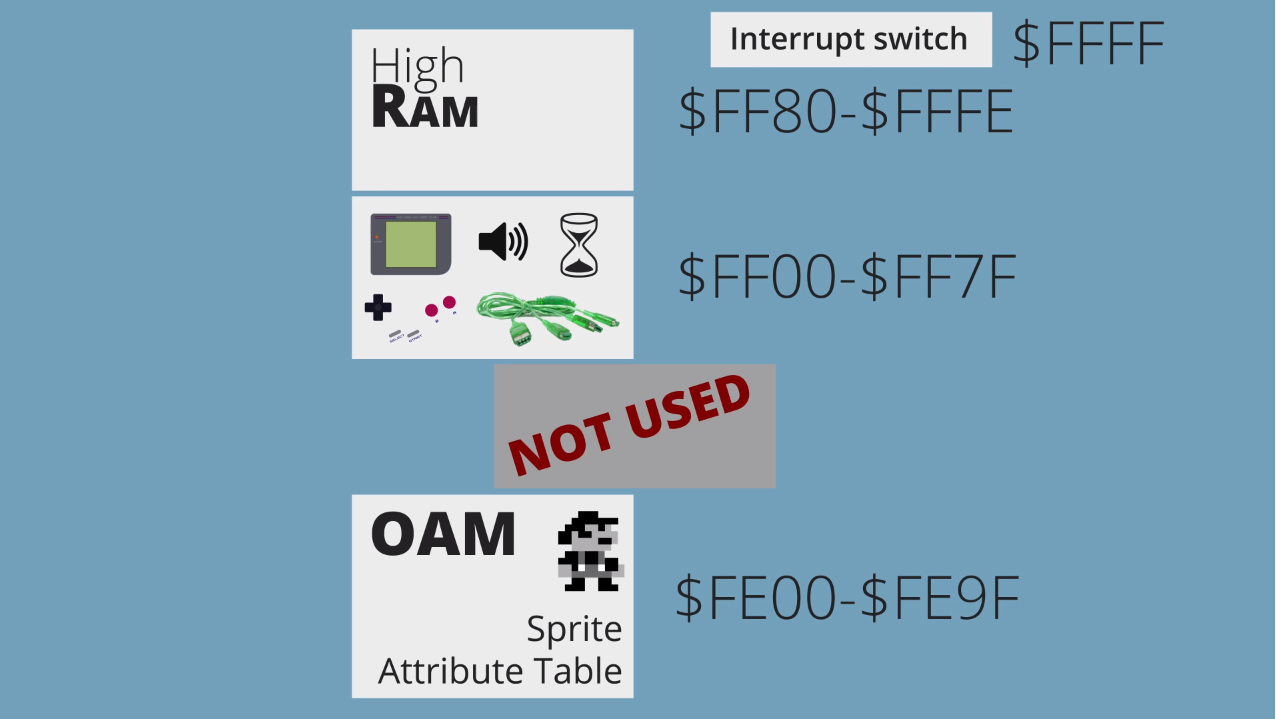
| 0xFE00 - 0xFE9F | OAM | 159 bytes |
| 0xFEA0 - 0xFEFF | Not used | 95 bytes |
| 0xFF00 - 0xFF7F | I/O Registers | 127 bytes |
| 0xFF80 - 0xFFFE | High RAM | 126 bytes |
| 0xFFFF - 0xFFFF | Interrupt control | 1 byte |
There is a peculiarity regarding the first ROM bank, as it has a reduced size since its 16KB are shared with the “GB boot + interrupt vectors” and “cartridge header”:
16383-336 = 16,047 bytes -> Bank0
32767-16384 = 16,383 bytes -> Switchable Bank
In addition, the first ROM bank is static and does not allow bank switching. This memory region will always have the cartridge’s bank0 loaded without the possibility of replacing its content. For this reason, this bank usually contains frequently used code since its access will always be available without the need for bank switching.
As we have already explained in this same article, through bank switching, we can access the cartridge’s ROM/RAM banks. We only need to select the desired bank, and its content will be loaded into memory address 0x4000 - 0x7FFF in the case of ROM and 0xA000 - 0xA7FF in the case of 2KB RAM. If the RAM bank were 8KB, it would be the memory range 0xA000 - 0xBFFF.
MBC: Memory Bank Switching
To have bank switching, the cartridge must come equipped with an MBC or Memory Bank Controller, in addition to the corresponding ROM/RAM banks. From our code, we will select the bank to load by writing to the ROM area, which is naturally read-only. This would be useless, but in the case of having an MBC, this write will be intercepted by analyzing the value to be written and interpreting it as the bank we want to access.
The external RAM usually comes with a battery so that user data can be saved and persist between machine starts. The external RAM is just as fast as the internal one, which is why some developers have used part of the battery-backed RAM as normal use RAM and not just for data storage. Some cartridges without MBC could carry RAM but needed a similar chip to function.
The bank sizes vary depending on the memory type:
- ROM: 16KB
- RAM: 2KB or 8KB
It is recommended to disable the RAM as soon as it is finished using it, in this way we minimize the possibility of corrupting the data due to a sudden loss of power or cartridge extraction.
When the GameBoy starts up, certain information such as the type of MBC, the amount of installed ROM and RAM, among other data, is read from the cartridge header. Depending on the type of cartridge we are going to use, we must configure certain bytes to the appropriate values:
- Byte $0147: MBC type.
- Byte $0148: ROM size.
- Byte $0149: RAM size.
These are the different types of cartridges that exist in the market, in the link of the photos you can see the circuitry of each cartridge in detail:
Most cartridges do not use MBC or if they do, it is of type 1, 2, or 5. MBCs type 3, 6, and 7 are reserved for special games that require an RTC, user data storage, optic responses, or advanced functions related to some type of sensor.
The table above indicates the maximum amount of installable ROM/RAM, but in the header, the exact amount installed on the cartridge must be indicated using the following values:
| Byte $0148 ID | Size | Number of banks |
|---|---|---|
| $00 | 32KB | 2(No ROM banking) |
| $01 | 64KB | 4 |
| $02 | 128KB | 8 |
| $03 | 256KB | 16 |
| $04 | 512KB | 32 |
| $05 | 1MB | 64 |
| $06 | 2MB | 128 |
| $07 | 4MB | 256 |
| $08 | 8MB | 512 |
| $52 | 1.1MB | 72 3 |
| $53 | 1.2MB | 80 3 |
| $54 | 1.5MB | 96 3 |
Regarding external RAM, the same applies. We must indicate the exact amount installed on the cartridge using the following values:
| Byte $0149 ID | Size | Number of banks |
|---|---|---|
| $00 | 0KB | No ROM banking |
| $01 | - | Not used |
| $02 | 8KB | 1 |
| $03 | 32KB | 4 |
| $04 | 128KB | 16 |
| $05 | 64KB | 8 |
NOTE: If an MBC2 type controller is used, the ID must be $00 since the RAM is not provided by an external bank but by 4 bits of the MBC itself.
Use of cartridge memory
Now that we know the types of cartridges, we are ready to start programming and make use of all their features.
As an example, we will use an MBC5+RAM+BATT or type $19 since it seems to be the least problematic model and the one recommended to use in GBDK Discord chats:
Never use MBC1, always use MBC5, and use SWITCH_ROM/SWITCH_RAM macros, not MBC-specific ones.
All modern flash carts are MBC5. MBC1 is slow and a bit odd (you can not use all pages). for the homebrew there is no sense at all to use it.
In this way, we will be able to store information in the MBC’s ROM bank and save user data in the RAM, which will be preserved thanks to the cartridge’s battery.
ROM/RAM banks are generated by saving data in external files and indicating certain parameters in the compilation. This way, it will generate the object files for each memory bank.
For my example, simply having an MBC with $00(2 - No ROM banking) ROM banks and $02(1) RAM banks would be enough since I would have 32KB of ROM and 8KB of RAM at my disposal. But to make the example more complete, we will opt for an MBC with $01(4) ROM banks and $03(4) RAM banks, which is equivalent to 4x16 = 64KB ROM and 4x8 = 32KB RAM.
The number of RAM banks is not scalable, meaning we can only choose between 1, 4, 8, or 16 banks. Since we need 2, we will have to install 4.
We will store both static data and code in the ROM, and we will use the RAM as a data storage for the user since it has a battery and will not be lost.
Both variables, constants, and the rest of the code are defined in a single file. LCC will automatically detect if it is a variable, which it will place in RAM, and if it is any other type of structure, it will place it in ROM. For example:
const unsigned char const_text[] = "I am a constant text in ROM";
unsigned char var_text[32] = "I am initialized text in RAM";
As an example, we can generate a background as we saw in GameBoy Dev3 , a test variable, and a function (code), all of this in two different banks.
The content of bank0 is as follows:
#include <gb/gb.h>

// BackgroundMapBank0
const unsigned char BackgroundMapBank0[] =
{
  0x66,0x66,0x66,0x66,0x66,0x66,0x66,0x66,0x66,0x66,
  0x66,0x66,0x66,0x66,0x66,0x66,0x66,0x66,0x66,0x66,
  0x66,0x68,0x68,0x68,0x68,0x68,0x66,0x66,0x66,0x66,
  0x66,0x68,0x68,0x68,0x68,0x68,0x68,0x66,0x66,0x66,
  0x66,0x68,0x66,0x66,0x66,0x68,0x68,0x66,0x66,0x66,
  0x68,0x68,0x66,0x66,0x66,0x66,0x68,0x68,0x66,0x66,
  0x66,0x68,0x66,0x66,0x66,0x66,0x68,0x68,0x66,0x66,
  0x68,0x66,0x66,0x66,0x66,0x66,0x66,0x68,0x68,0x66,
  0x66,0x68,0x66,0x66,0x66,0x66,0x66,0x68,0x66,0x68,
  0x68,0x66,0x66,0x66,0x66,0x66,0x66,0x66,0x68,0x66,
  0x66,0x68,0x66,0x66,0x66,0x66,0x68,0x68,0x66,0x68,
  0x66,0x66,0x66,0x66,0x66,0x66,0x66,0x66,0x68,0x68,
  0x66,0x68,0x66,0x66,0x66,0x68,0x68,0x66,0x68,0x68,
  0x66,0x66,0x66,0x66,0x66,0x66,0x66,0x66,0x66,0x68,
  0x66,0x68,0x68,0x68,0x68,0x68,0x66,0x66,0x68,0x68,
  0x66,0x66,0x66,0x66,0x66,0x66,0x66,0x66,0x66,0x68,
  0x66,0x68,0x66,0x66,0x66,0x68,0x66,0x66,0x66,0x68,
  0x66,0x66,0x66,0x66,0x66,0x66,0x66,0x66,0x66,0x68,
  0x66,0x68,0x66,0x66,0x66,0x68,0x68,0x66,0x66,0x68,
  0x66,0x66,0x66,0x66,0x66,0x66,0x66,0x66,0x66,0x68,
  0x66,0x68,0x66,0x66,0x66,0x66,0x68,0x66,0x66,0x68,
  0x66,0x66,0x66,0x66,0x66,0x66,0x66,0x66,0x66,0x68,
  0x66,0x68,0x66,0x66,0x66,0x66,0x68,0x68,0x66,0x68,
  0x68,0x66,0x66,0x66,0x66,0x66,0x66,0x66,0x68,0x68,
  0x66,0x68,0x66,0x66,0x66,0x66,0x68,0x68,0x66,0x66,
  0x68,0x66,0x66,0x66,0x66,0x66,0x66,0x66,0x68,0x66,
  0x66,0x68,0x66,0x66,0x66,0x66,0x68,0x66,0x66,0x66,
  0x68,0x66,0x66,0x66,0x66,0x66,0x66,0x66,0x68,0x66,
  0x66,0x68,0x66,0x66,0x66,0x68,0x68,0x66,0x66,0x66,
  0x68,0x68,0x66,0x66,0x66,0x66,0x66,0x68,0x68,0x66,
  0x66,0x68,0x68,0x68,0x68,0x68,0x66,0x66,0x66,0x66,
  0x66,0x68,0x68,0x68,0x68,0x68,0x68,0x68,0x66,0x66,
  0x66,0x68,0x68,0x66,0x66,0x66,0x66,0x66,0x66,0x66,
  0x66,0x66,0x66,0x66,0x66,0x66,0x66,0x66,0x66,0x66,
  0x66,0x66,0x66,0x66,0x66,0x66,0x66,0x66,0x66,0x66,
  0x66,0x66,0x66,0x66,0x66,0x66,0x66,0x66,0x66,0x66
};

unsigned int var_bank0;

void function_bank0(){
    scroll_bkg(-16,0);
}
The content of bank1:
#include <gb/gb.h>

// BackgroundMapBank1.c
const unsigned char BackgroundMapBank1[] =
{
  0x66,0x66,0x66,0x66,0x66,0x66,0x66,0x66,0x66,0x66,
  0x66,0x66,0x66,0x66,0x66,0x66,0x66,0x66,0x66,0x66,
  0x66,0x68,0x68,0x68,0x68,0x68,0x66,0x66,0x66,0x66,
  0x66,0x66,0x66,0x66,0x66,0x66,0x68,0x68,0x68,0x66,
  0x66,0x68,0x66,0x66,0x66,0x68,0x68,0x66,0x66,0x66,
  0x66,0x66,0x66,0x66,0x66,0x68,0x68,0x68,0x68,0x66,
  0x66,0x68,0x66,0x66,0x66,0x66,0x68,0x68,0x66,0x66,
  0x66,0x66,0x66,0x68,0x68,0x68,0x68,0x68,0x68,0x66,
  0x66,0x68,0x66,0x66,0x66,0x66,0x66,0x68,0x66,0x66,
  0x66,0x68,0x68,0x68,0x68,0x68,0x68,0x68,0x68,0x66,
  0x66,0x68,0x66,0x66,0x66,0x66,0x68,0x68,0x66,0x66,
  0x68,0x68,0x68,0x68,0x68,0x66,0x68,0x68,0x68,0x66,
  0x66,0x68,0x66,0x66,0x66,0x68,0x68,0x66,0x66,0x66,
  0x68,0x68,0x68,0x66,0x66,0x66,0x68,0x68,0x68,0x66,
  0x66,0x68,0x68,0x68,0x68,0x68,0x66,0x66,0x66,0x66,
  0x66,0x66,0x66,0x66,0x66,0x66,0x68,0x68,0x68,0x66,
  0x66,0x68,0x66,0x66,0x66,0x68,0x66,0x66,0x66,0x66,
  0x66,0x66,0x66,0x66,0x66,0x66,0x68,0x68,0x68,0x66,
  0x66,0x68,0x66,0x66,0x66,0x68,0x68,0x66,0x66,0x66,
  0x66,0x66,0x66,0x66,0x66,0x66,0x68,0x68,0x68,0x66,
  0x66,0x68,0x66,0x66,0x66,0x66,0x68,0x66,0x66,0x66,
  0x66,0x66,0x66,0x66,0x66,0x66,0x68,0x68,0x68,0x66,
  0x66,0x68,0x66,0x66,0x66,0x66,0x68,0x68,0x66,0x66,
  0x66,0x66,0x66,0x66,0x66,0x66,0x68,0x68,0x68,0x66,
  0x66,0x68,0x66,0x66,0x66,0x66,0x68,0x68,0x66,0x66,
  0x66,0x66,0x66,0x66,0x66,0x66,0x68,0x68,0x68,0x66,
  0x66,0x68,0x66,0x66,0x66,0x66,0x68,0x66,0x66,0x66,
  0x66,0x66,0x66,0x66,0x66,0x66,0x68,0x68,0x68,0x66,
  0x66,0x68,0x66,0x66,0x66,0x68,0x68,0x66,0x66,0x66,
  0x66,0x66,0x66,0x66,0x66,0x66,0x68,0x68,0x68,0x66,
  0x66,0x68,0x68,0x68,0x68,0x68,0x66,0x66,0x66,0x66,
  0x66,0x66,0x66,0x66,0x66,0x66,0x66,0x66,0x66,0x66,
  0x66,0x68,0x68,0x66,0x66,0x66,0x66,0x66,0x66,0x66,
  0x66,0x66,0x66,0x66,0x66,0x66,0x66,0x66,0x66,0x66,
  0x66,0x66,0x66,0x66,0x66,0x66,0x66,0x66,0x66,0x66,
  0x66,0x66,0x66,0x66,0x66,0x66,0x66,0x66,0x66,0x66
};

unsigned int var_bank1;

void function_bank1(){
      scroll_bkg(16,0);
}
The main code loads the content of BackgroundMapBank0, BackgroundMapBank1, var_bank0, var_bank1, and the functions function_bank0, function_bank1 from the cartridge.
We just need to keep in mind that we must use the word “extern” unless it is a function, in which case it is not necessary:
extern const unsigned char BackgroundMapBank0[];
extern const unsigned char BackgroundMapBank1[];

extern unsigned int var_bank0;
extern unsigned int var_bank1;

void function_bank0();
void function_bank1();
By default, the ROM is enabled since it is necessary for all games, but in order to use external RAM, we must enable it beforehand using the macro:
ENABLE_RAM;
The selection of the ROM/RAM bank to load is done through the macros:
SWITCH_RAM(N);
SWITCH_ROM(N);
At the beginning of the program, it is checked that the variables do not have a value, if so, they are initialized to 0. The value to be checked has been obtained from the Emulicious debugger, explained below in the debugging section.
if (var_bank0 == 0xFFFF){
      var_bank0 = 0;
}
Next, the complete code is shown, where several tasks are performed:
- A background is loaded from bank0.
- The background is scrolled using a function housed in bank0.
- A variable value, also housed in bank0, is read and incremented by one.
The process is repeated for bank1 of ROM/RAM, but the background is different, the scroll is in the opposite direction, and the variable is incremented by five.
#include <gb/gb.h>
#include <stdio.h>
#include <gbdk/console.h>

#include "BackgroundTiles.c"

extern const unsigned char BackgroundMapBank0[];
extern const unsigned char BackgroundMapBank1[];

extern unsigned int var_bank0;
extern unsigned int var_bank1;

void function_bank0();
void function_bank1();

void main(){
    set_bkg_data(102, 3, BackgroundTiles);
    SHOW_BKG;
    DISPLAY_ON;

    // Check previous saved RAM values
    ENABLE_RAM;
    SWITCH_RAM(0);
    if (var_bank0 == 0xFFFF){
        var_bank0 = 0;
    }
    SWITCH_RAM(1);
    if (var_bank1 == 0xFFFF){
        var_bank1 = 0;
    }
    DISABLE_RAM;

    while(1){
        ENABLE_RAM;

        // BANK0
        SWITCH_RAM(0);
        SWITCH_ROM(0);
        set_bkg_tiles(0, 0, 20, 18, BackgroundMapBank0);
        delay(900);
        function_bank0();
        delay(900);
        scroll_bkg(0,0);
        cls();
        var_bank0 = var_bank0 + 1;
        gotoxy(0,0);
        printf("var_bank0: %d", var_bank0);
        delay(1000);

        // BANK1
        SWITCH_RAM(1);
        SWITCH_ROM(1);
        set_bkg_tiles(0, 00, 20, 18, BackgroundMapBank1);
        delay(900);
        function_bank1();
        delay(900);
        scroll_bkg(0,0);
        cls();
        var_bank1 = var_bank1 + 5;
        gotoxy(0,0);
        printf("var_bank1: %d", var_bank1);
        delay(1000);

        DISABLE_RAM;
    }
}
Through the compilation options, we will define the files with the content of the ROM/RAM banks. As we have previously mentioned, both variables, constants, and the rest of the code are defined in a single file, lcc will automatically detect if it is a variable, which it will place in RAM, and if it is any other type of structure, it will place it in ROM:
-Wf-bo0 -Wf-ba0 -c -o bank0.o bank0.c -> Generates both ROM bank0 and RAM bank0
-Wf-bo1 -Wf-ba1 -c -o bank1.o bank1.c -> Generates both ROM bank1 and RAM bank1
NOTE: By default, the game data is placed in the ROM0/1 banks that come in the cartridge without MBC.
Another important step is to indicate the type of cartridge we are going to use and the ROM/RAM banks it will have:
-Wl-yt0x1B -Wl-yo4 -Wl-ya4 -o 10.gb 10.o bank0.o bank1.o
-Wl-yt0x1B -> Cartucho MBC5: 0x1B
-Wl-yo4 -> Cuatro bancos de ROM, aunque solo vayamos a utilizar 2.
-Wl-ya4 -> Cuatro bancos de RAM, aunque solo vayamos a utilizar 2.
The compilation script with all debug options enabled would be this:
#!/usr/local/bin/bash

~/GBDEV/gbdk/bin/lcc -Wf--vc -Wf--debug -Wf--nooverlay -Wf--nogcse -Wf--nolabelopt -Wf--noinvariant -Wf--noinduction -Wf--noloopreverse -Wf--no-peep -Wf--no-reg-params -Wf--no-peep-return -Wf--nolospre -Wf--nostdlibcall -Wa-l -Wa-y -Wl-m -Wl-w -Wl-y -Wf-bo0 -Wf-ba0 -c -o bank0.o bank0.c
~/GBDEV/gbdk/bin/lcc -Wf--vc -Wf--debug -Wf--nooverlay -Wf--nogcse -Wf--nolabelopt -Wf--noinvariant -Wf--noinduction -Wf--noloopreverse -Wf--no-peep -Wf--no-reg-params -Wf--no-peep-return -Wf--nolospre -Wf--nostdlibcall -Wa-l -Wa-y -Wl-m -Wl-w -Wl-y -Wf-bo1 -Wf-ba1 -c -o bank1.o bank1.c
~/GBDEV/gbdk/bin/lcc -Wf--vc -Wf--debug -Wf--nooverlay -Wf--nogcse -Wf--nolabelopt -Wf--noinvariant -Wf--noinduction -Wf--noloopreverse -Wf--no-peep -Wf--no-reg-params -Wf--no-peep-return -Wf--nolospre -Wf--nostdlibcall -Wa-l -Wa-y -Wl-m -Wl-w -Wl-y -c -o 10.o 10.c
~/GBDEV/gbdk/bin/lcc -Wf--vc -Wf--debug -Wf--nooverlay -Wf--nogcse -Wf--nolabelopt -Wf--noinvariant -Wf--noinduction -Wf--noloopreverse -Wf--no-peep -Wf--no-reg-params -Wf--no-peep-return -Wf--nolospre -Wf--nostdlibcall -Wa-l -Wa-y -Wl-m -Wl-w -Wl-y -Wl-yt0x1B -Wl-yo4 -Wl-ya4 -o 10.gb 10.o bank0.o bank1.o
The final result is shown below:
As can be seen in the video, when the ROM is reloaded, it reads the data saved in the cartridge’s battery-backed RAM, thus being able to read data from a previous execution.
Emulicious will have generated a file called 10.sav, which is where the information from that RAM is stored.
Garrus $ ~/GBDEV/code> ls -la 10.sav
-rw-r--r--  1 kr0m  kr0m  32768 11 jun.  16:46 10.sav
The assignment of banks can be done in different ways, although I have only tried the manual way:
- Compilation parameters: Used in this article.
- Defining the bank within the code itself using the pragma keyword.
- Using GBDK’s autobanking.
Debugging
To debug the initial value of the variables in the cartridge’s RAM, we must look at memory address 0xA000 in Emulicious, but we must bear in mind that although external RAM banks are always mapped to address 0xA000, depending on the selected bank, Emulicious makes a distinction by adding the bank number in front:
Something important to keep in mind is that we cannot debug the value of external RAM variables from Visual Studio Code, they always appear with the initial value:
We can obtain the cartridge header data using xdd.
Cartridge type, in this case 1B -> MBC5+RAM+BATT
1b
ROM memory size, in this case 01 -> 64KB: 4 banks of 16KB
01
RAM memory size, in this case 03 -> 32KB: 4 banks of 8KB
03