In this article, we will learn how to set up a complete email system. We will be able to send/receive emails, access them through a web interface, filter spam, define Sieve filters, and sign outgoing emails using DKIM.
The technologies used for this are:
- SendMail : Sends and receives emails
- Dovecot : Allows access to stored emails through the web interface
- SpamAssassin : Filters incoming emails based on certain rules
- RainLoop : Web interface for accessing emails
- Sieve : Email filtering/categorization system
This article is quite extensive, so I have divided it into several sections:
- SendMail
- Dovecot
- RainLoop
- SpamAssassin
- SPF
- DKIM
- DMARC
- SSL RainLoop
- SSL SendMail
- Reverse DNS
- Account maintenance
- Debug
SendMail
The first step will be to make sure our server knows its own hostname:
127.0.0.1 HellStorm HellStorm.alfaexploit.com mail.alfaexploit.com localhost localhost.my.domain
SendMail is installed by default on FreeBSD, we start the service:
sysrc sendmail_msp_queue_enable=yes
service sendmail start
We check that we can access it over the network:
220 HellStorm.alfaexploit.com ESMTP Sendmail 8.16.1/8.16.1; Sun, 1 Jan 2023 17:39:07 +0100 (CET)
In the magnificent FreeBSD handbook, we can find a guide from which I have extracted the following information.
Access permissions are filtered by origin in the file: /etc/mail/access
OK: Permitiremos la entrada del mail siempre y cuando el destino sea un dominio local(/etc/mail/local-host-names)
RELAY: Permitiremos el envío de mails a dominios de terceros a través de nuestro server
ERROR: Denegaremos el envío de mails con el mensaje indicado
SKIP: Denegaremos el envío de mails sin avisar al cliente que el email ha sido destruido
QUARANTINE: El mail se guardará en el servidor local pero no se enviará a su destino, el cliente recibirá una explicación de porque su email ha sido retenido

#From:cyberspammer.com ERROR:"550 We don't accept mail from spammers"
#From:okay.cyberspammer.com OK
#Connect:sendmail.org RELAY
#To:sendmail.org RELAY
#Connect:128.32 RELAY
#Connect:128.32.2 SKIP
#Connect:IPv6:1:2:3:4:5:6:7 RELAY
#Connect:suspicious.example.com QUARANTINE:Mail from suspicious host
#Connect:[127.0.0.3] OK
#Connect:[IPv6:1:2:3:4:5:6:7:8] OK
By default, the OK policy is applied from any IP as long as the destination is local or listed in /etc/mail/local-host-names.
For example, if we try to send an email to
kr0m@alfaexploit.com
, access will be denied, but for kr0m@localhost, it will be allowed:
Trying 192.168.69.17...
Connected to 192.168.69.17.
Escape character is '^]'.
220 HellStorm.alfaexploit.com ESMTP Sendmail 8.16.1/8.16.1; Sun, 1 Jan 2023 17:39:07 +0100 (CET)
ehlo 192.168.69.17
250-HellStorm.alfaexploit.com Hello [192.168.69.17], pleased to meet you
250-ENHANCEDSTATUSCODES
250-PIPELINING
250-8BITMIME
250-SIZE
250-DSN
250-ETRN
250-STARTTLS
250-DELIVERBY
250 HELP
mail from: test@kr0m.com
250 2.1.0 test@kr0m.com... Sender ok
rcpt to: kr0m@alfaexploit.com
250 2.1.5 kr0m@alfaexploit.com... Recipient ok
data
354 Enter mail, end with "." on a line by itself
prueba00
.
250 2.0.0 301Gd7Qr028498 Message accepted for delivery
quit
221 2.0.0 HellStorm.alfaexploit.com closing connection
Connection closed by foreign host.
In the telnet session, there will be no error, but in the logs, we can see that the mail has not been sent:
Jan 1 17:41:05 HellStorm sm-mta[32142]: 301Gd7Qr028498: to=kr0m@alfaexploit.com, delay=00:00:12, xdelay=00:00:00, mailer=esmtp, pri=30009, relay=alfaexploit.com., dsn=5.3.5, stat=Local configuration error
However, if the recipient is kr0m@localhost, we will see the delivery:
Jan 1 17:45:31 HellStorm sm-mta[35699]: 301Gj39N027210: to=kr0m@localhost, delay=00:00:18, xdelay=00:00:00, mailer=local, pri=30396, relay=local, dsn=2.0.0, stat=Sent
The user kr0m can read this last email:
Mail version 8.1 6/6/93.  Type ? for help.
"/var/mail/kr0m": 1 message 1 new
>N  1 test@kr0m.com         Sun Jan  1 17:45  13/455
& 1
Message 1:
From test@kr0m.com Sun Jan  1 17:45:31 2023
Date: Sun, 1 Jan 2023 17:45:03 +0100 (CET)
From: test@kr0m.com
To: undisclosed-recipients:;

prueba01

&
We add alfaexploit.com to the group of local domains:
alfaexploit.com
We restart SendMail:
We perform the test again:
Trying 192.168.69.17...
Connected to 192.168.69.17.
Escape character is '^]'.
220 HellStorm.alfaexploit.com ESMTP Sendmail 8.16.1/8.16.1; Sun, 1 Jan 2023 17:48:01 +0100 (CET)
ehlo 192.168.69.17
250-HellStorm.alfaexploit.com Hello [192.168.69.17], pleased to meet you
250-ENHANCEDSTATUSCODES
250-PIPELINING
250-8BITMIME
250-SIZE
250-DSN
250-ETRN
250-STARTTLS
250-DELIVERBY
250 HELP
mail from: test@kr0m.com
250 2.1.0 test@kr0m.com... Sender ok
rcpt to: kr0m@alfaexploit.com
250 2.1.5 kr0m@alfaexploit.com... Recipient ok
data
354 Enter mail, end with "." on a line by itself
prueba02
.
250 2.0.0 301Gm17S090416 Message accepted for delivery
quit
221 2.0.0 HellStorm.alfaexploit.com closing connection
Connection closed by foreign host.
We can see that now the delivery has been made correctly:
Jan 1 17:48:28 HellStorm sm-mta[13349]: 301Gm17S090416: to=kr0m@alfaexploit.com, delay=00:00:12, xdelay=00:00:00, mailer=local, pri=30402, relay=local, dsn=2.0.0, stat=Sent
We read the mail:
Mail version 8.1 6/6/93.  Type ? for help.
"/var/mail/kr0m": 1 message 1 new
>N  1 test@kr0m.com         Sun Jan  1 17:48  13/461
& 1
Message 1:
From test@kr0m.com Sun Jan  1 17:48:28 2023
Date: Sun, 1 Jan 2023 17:48:01 +0100 (CET)
From: test@kr0m.com
To: undisclosed-recipients:;

prueba02

&
NOTE: By adding the domain alfaexploit.com to local-host-names, it is equivalent to creating email accounts for all users in the operating system. For larger environments, we should look for some kind of integration of virtual users from a MySQL, LDAP, or similar database.
The aliases file defines email addresses that expand to other users, external addresses, files, programs, or other aliases. In my case, we leave it as it comes by default, but root will be an alias to
kr0m@alfaexploit.com
:
MAILER-DAEMON: postmaster
postmaster: root
_dhcp: root
_pflogd: root
auditdistd: root
bin: root
bind: root
daemon: root
games: root
hast: root
kmem: root
mailnull: postmaster
man: root
news: root
nobody: root
operator: root
pop: root
proxy: root
smmsp: postmaster
sshd: root
system: root
toor: root
tty: root
usenet: news
uucp: root
abuse: root
security: root
ftp: root
ftp-bugs: ftp
root: kr0m@alfaexploit.com
We regenerate the hash of the file:
To convert an email address to a mailbox, we will use the virtusertable file. The destination can be local mailboxes, remote mailboxes, aliases defined in /etc/mail/aliases, or files. In my case, it is not necessary to generate the file since I do not use these functionalities.
root@example.com root
postmaster@example.com postmaster@noc.example.net
@example.com joe
NOTE: Entries are checked in the order they appear in the configuration file. In this example, a generic entry has been configured for the example.com domain. If the recipient is anyone other than root or postmaster, it will be sent to joe.
If we have generated the /etc/mail/virtusertable file, we refresh the hash of the file and restart SendMail:
service sendmail restart
If we need an external computer to be able to use our server to send emails, we must indicate the IPs/DNS in the relay-domains file. In my case, it is not necessary:
service sendmail restart
We can find the documentation on SendMail configuration in the file: /usr/share/sendmail/cf/README
Dovecot
With SendMail, we can send and receive emails but not read the received ones. For this, we need an IMAP server:
We copy the example configuration files:
We remove the SSL configuration since we will access emails through the web interface, the only point of contact with the outside world will be through SendMail to send/receive emails.
ssl = no
#ssl_cert = </etc/ssl/certs/dovecot.pem
#ssl_key = </etc/ssl/private/dovecot.pem
The web interface only accesses Dovecot via IMAP:
protocols = imap lmtp
We bind Dovecot to the server’s IP:
listen = 192.168.69.17
We tell Dovecot where to organize Sent/Drafts/Spam/Trash/Archive emails and where to look for received emails:
mail_location = mbox:~/mboxDir:INBOX=/var/mail/%u
mail_privileged_group = mail
We adjust the permissions of the /var/mail directory:
We create the email directories in the user’s home directory:
su -l kr0m
mkdir mboxDir
chmod 700 mboxDir
touch mboxDir/Sent
touch mboxDir/Drafts
touch mboxDir/Spam
touch mboxDir/Trash
touch mboxDir/Archive
chmod 600 mboxDir/Sent
chmod 600 mboxDir/Drafts
chmod 600 mboxDir/Spam
chmod 600 mboxDir/Trash
chmod 600 mboxDir/Archive
exit
We start the service:
service dovecot start
RainLoop
We install RainLoop, a web interface that will allow us to read and send emails:
pkg install -y unzip curl wget socat
pkg install -y php82 php82-mbstring php82-tokenizer php82-pdo php82-pdo_mysql php82-phar php82-filter php82-zlib php82-dom php82-xml php82-xmlwriter php82-xmlreader php82-pecl-imagick php82-curl php82-session php82-ctype php82-iconv php82-gd php82-simplexml php82-zip php82-filter php82-tokenizer php82-calendar php82-fileinfo php82-intl php82-phar php82-soap php82-opcache php82-mysqli php82-bcmath php82-gmp
cp /usr/local/etc/php.ini-production /usr/local/etc/php.ini
We adjust some parameters in php.ini to be able to send larger attachments:
date.timezone = Europe/Madrid
upload_max_filesize = 25M
post_max_size = 25M
We start the php-fpm service:
service php-fpm start
We install MySQL to store user contacts:
We start the service:
service mysql-server start
We configure the database:
We create the configuration file to be able to log in without typing the password every time:
[client]
user     = root
password = XXXXXXXXX
We secure access:
We create the database and a user with access to it:
CREATE DATABASE rainloop;
CREATE USER rainloop@'192.168.69.17' IDENTIFIED WITH mysql_native_password BY 'XXXXXXXXX';
GRANT ALL PRIVILEGES ON rainloop.* TO rainloop@'192.168.69.17';
FLUSH PRIVILEGES;
exit;
We install Nginx:
We start the service:
service nginx start
We create a vhost for RainLoop:
server {

  listen 80;
  server_name mail.alfaexploit.com;

  root /usr/local/www/rainloop;

  index index.php;

  location / {
    try_files $uri $uri/ /index.php?$query_string;
  }

  location ^~ /data {
     deny all;
  }

  location ~ \.php$ {
    try_files $uri =404;
    include fastcgi_params;
    fastcgi_index index.php;
    fastcgi_split_path_info ^(.+\.php)(.*)$;
    fastcgi_keep_conn on;
    fastcgi_param SCRIPT_FILENAME $document_root$fastcgi_script_name;
    fastcgi_pass 127.0.0.1:9000;
  }

}
We include the vhost in the general Nginx configuration, add the include and increase the maximum body size in the http{} section:
http {
    include       mime.types;
    default_type  application/octet-stream;
    client_max_body_size 25M;
    include rainloop.conf;
We restart the service:
We download and install RainLoop:
cd /usr/local/www/rainloop
wget http://www.rainloop.net/repository/webmail/rainloop-latest.zip
unzip rainloop-latest.zip -d /usr/local/www/rainloop
rm rainloop-latest.zip
chown -R www:www /usr/local/www/rainloop
We access the administration panel:
http://mail.alfaexploit.com/?admin
admin
12345
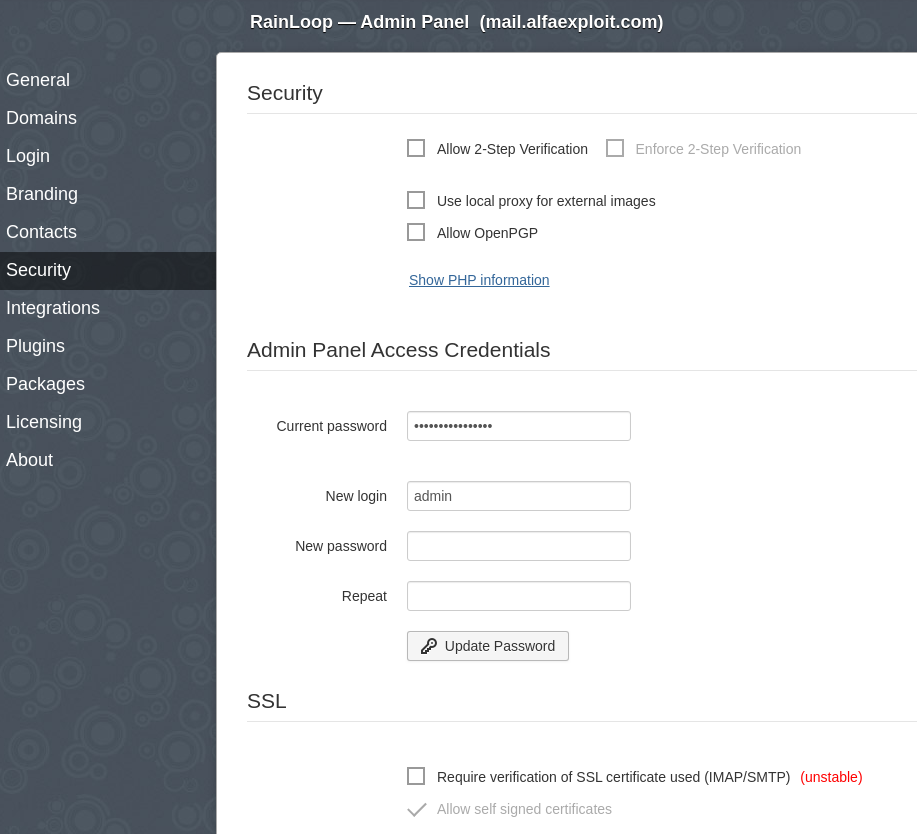
The first step is to change the password.
We configure access to the database where user contacts will be saved:
Contacts -> MySQL:
mysql:host=192.168.69.17;port=3306;dbname=rainloop
rainloop
XXXXXXXXX
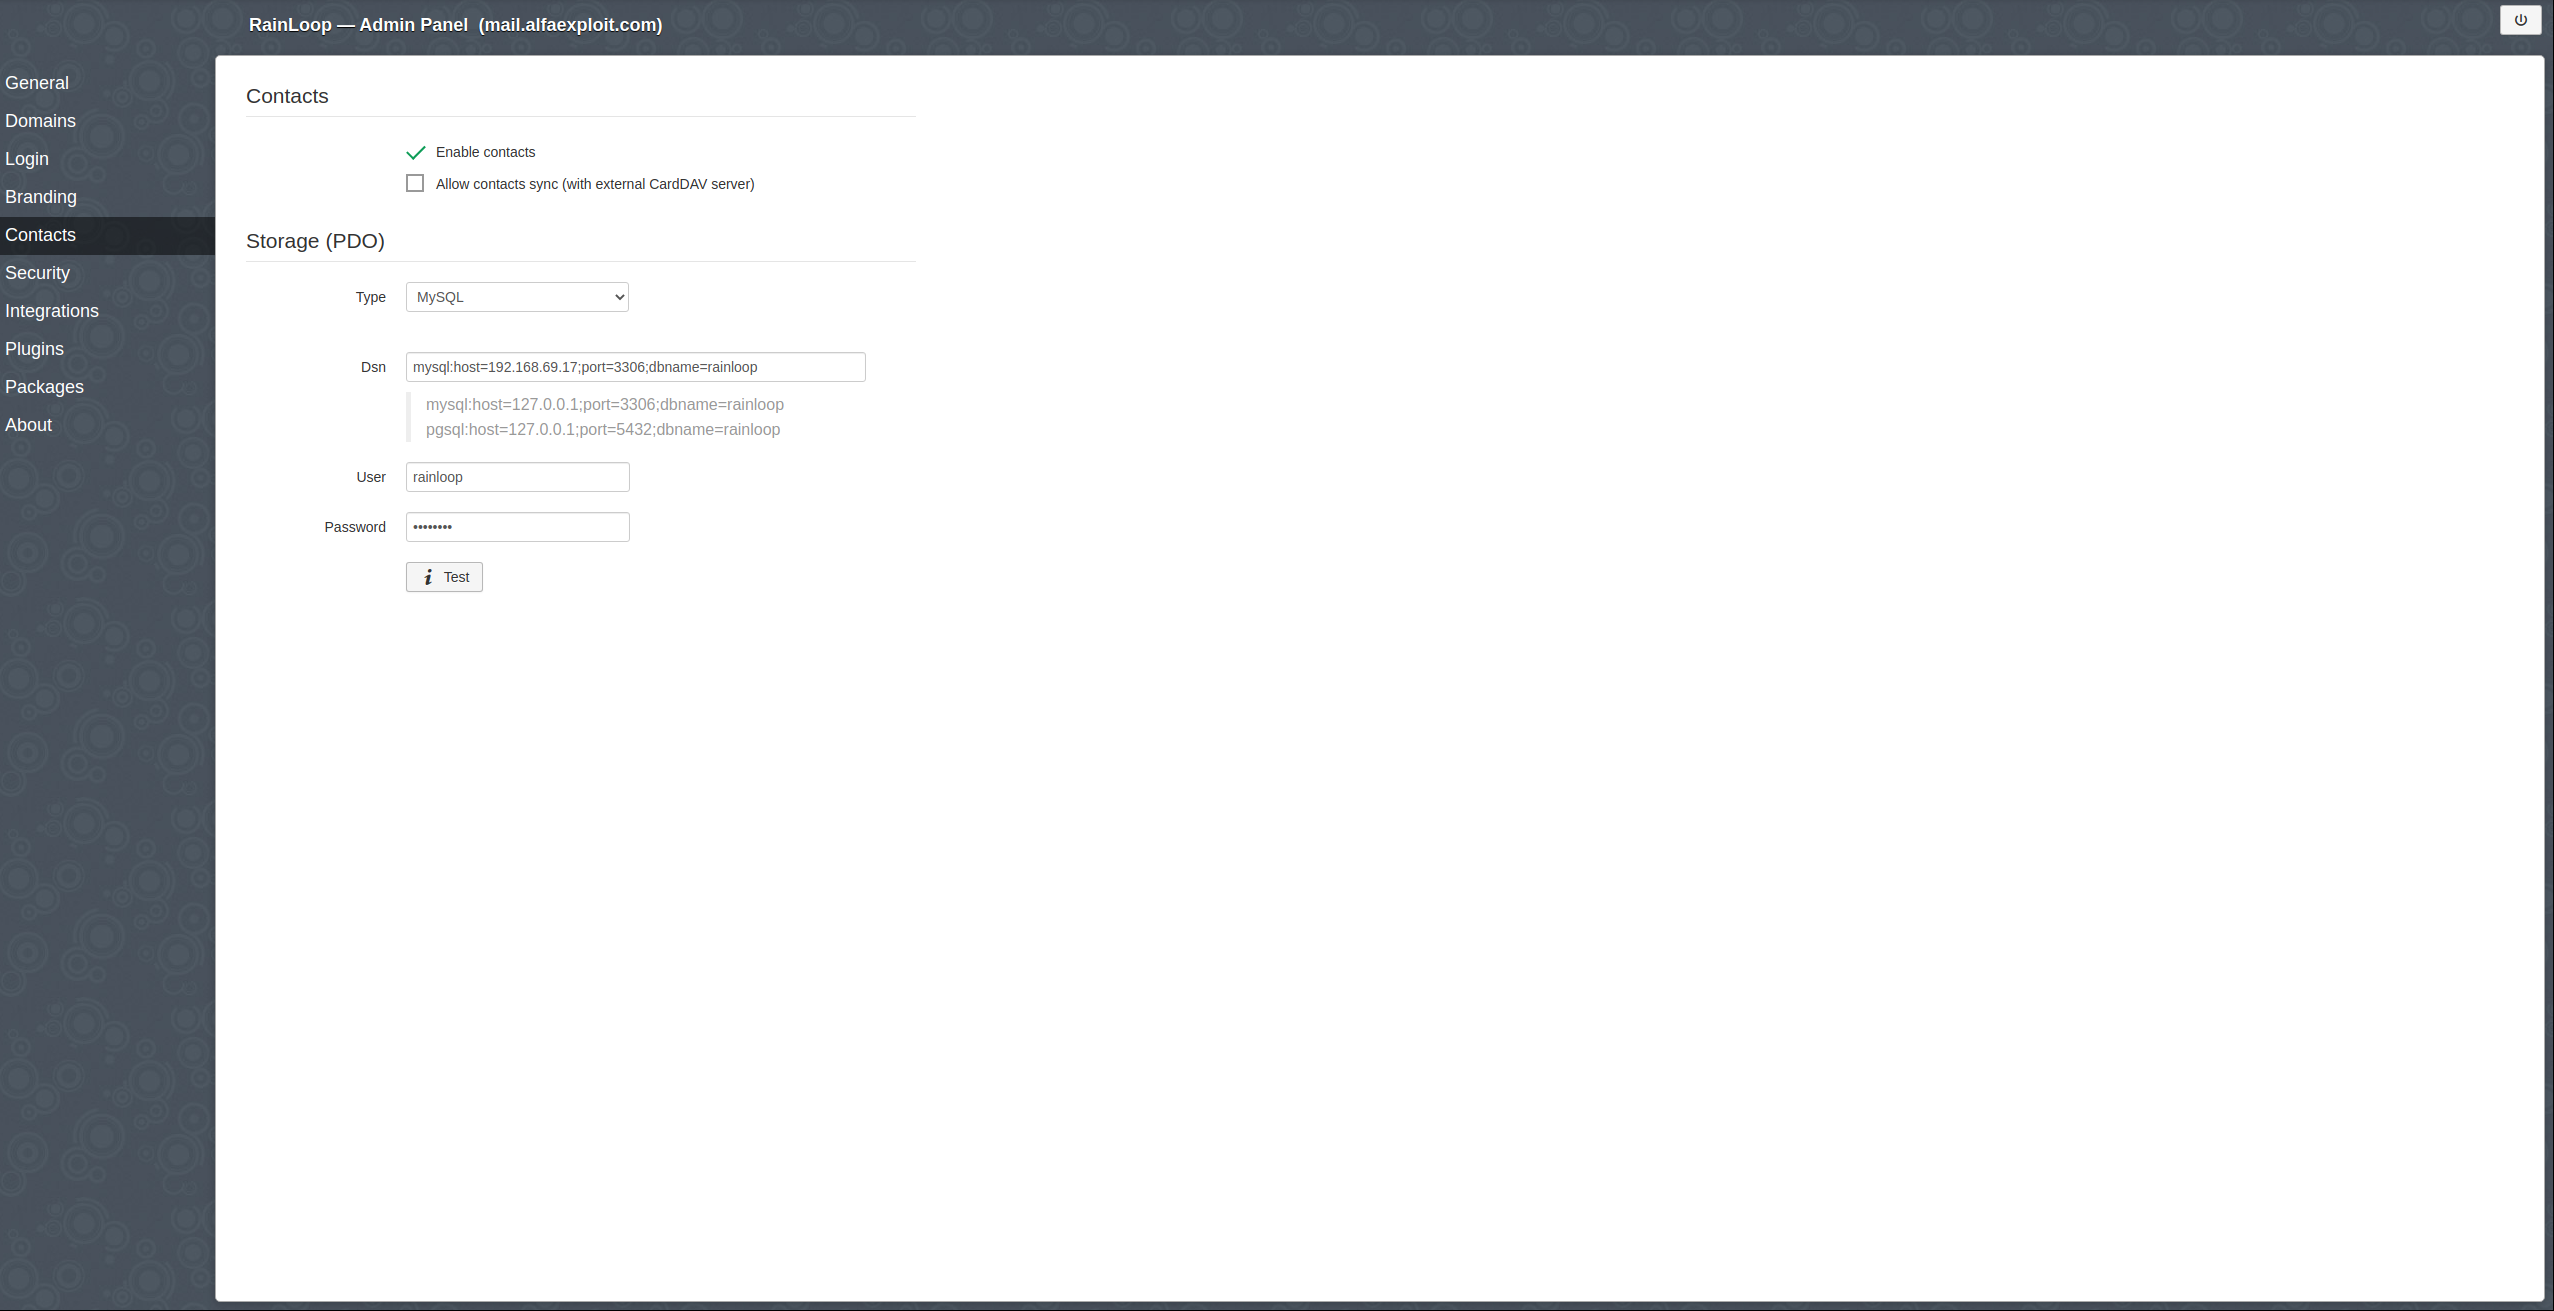
We click on the Test button to check the correct access.
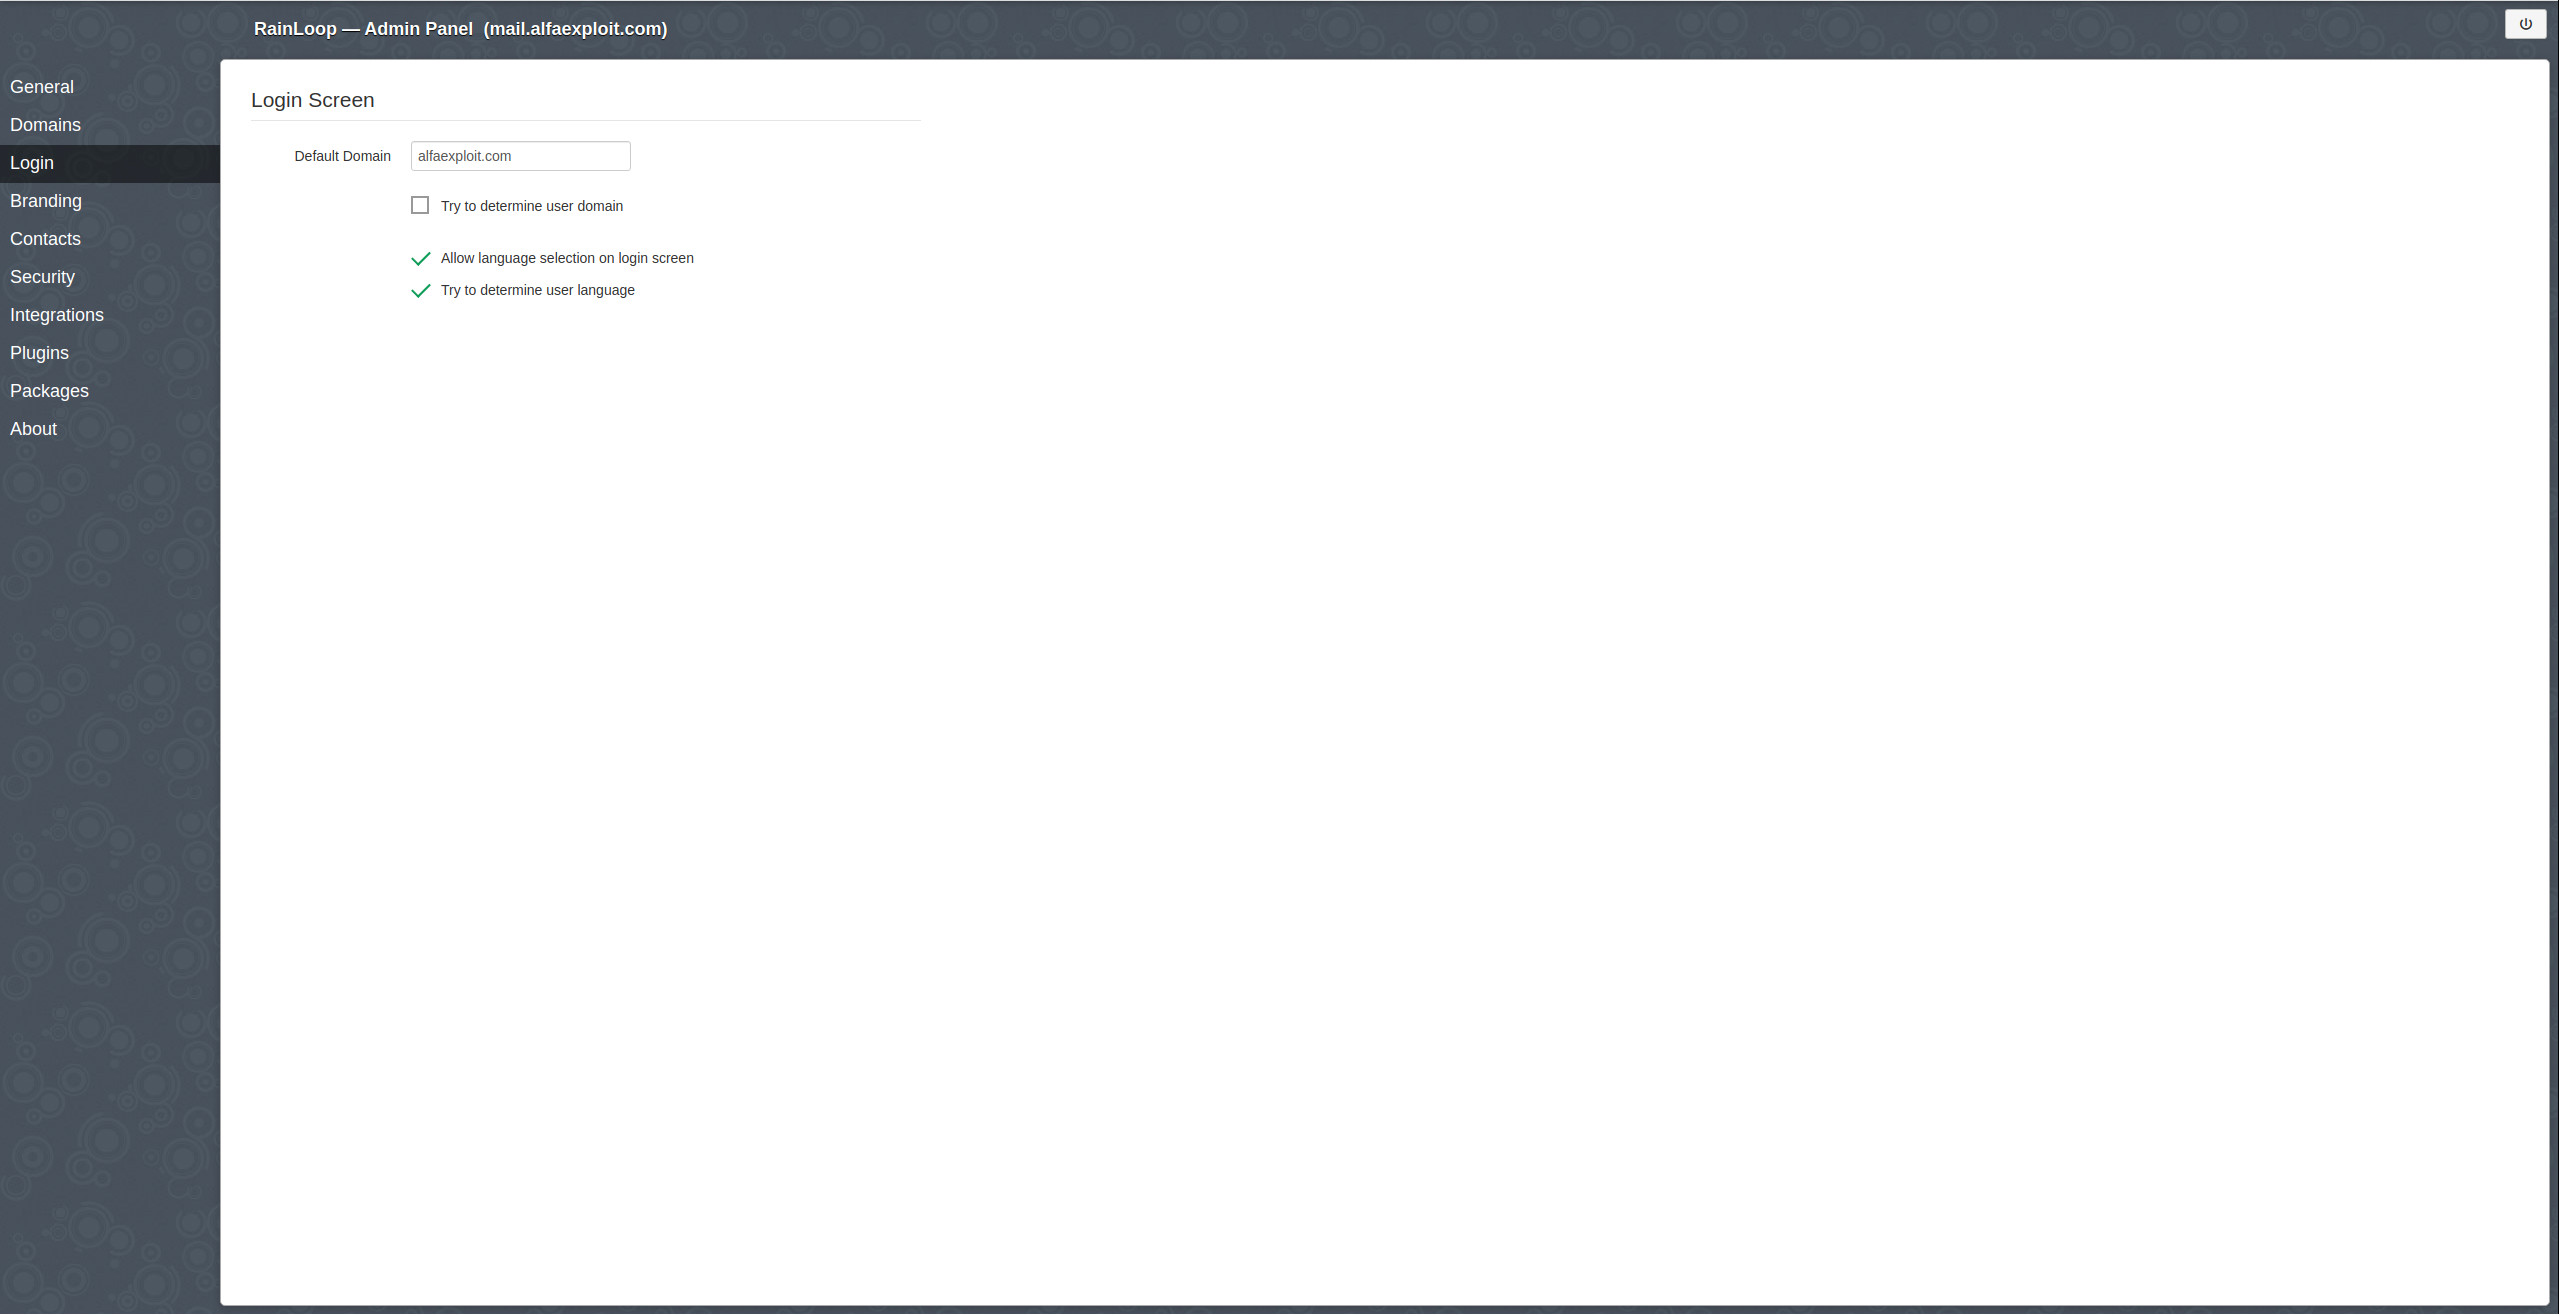
We tell the login to automatically add @alfaexploit.com to the user:
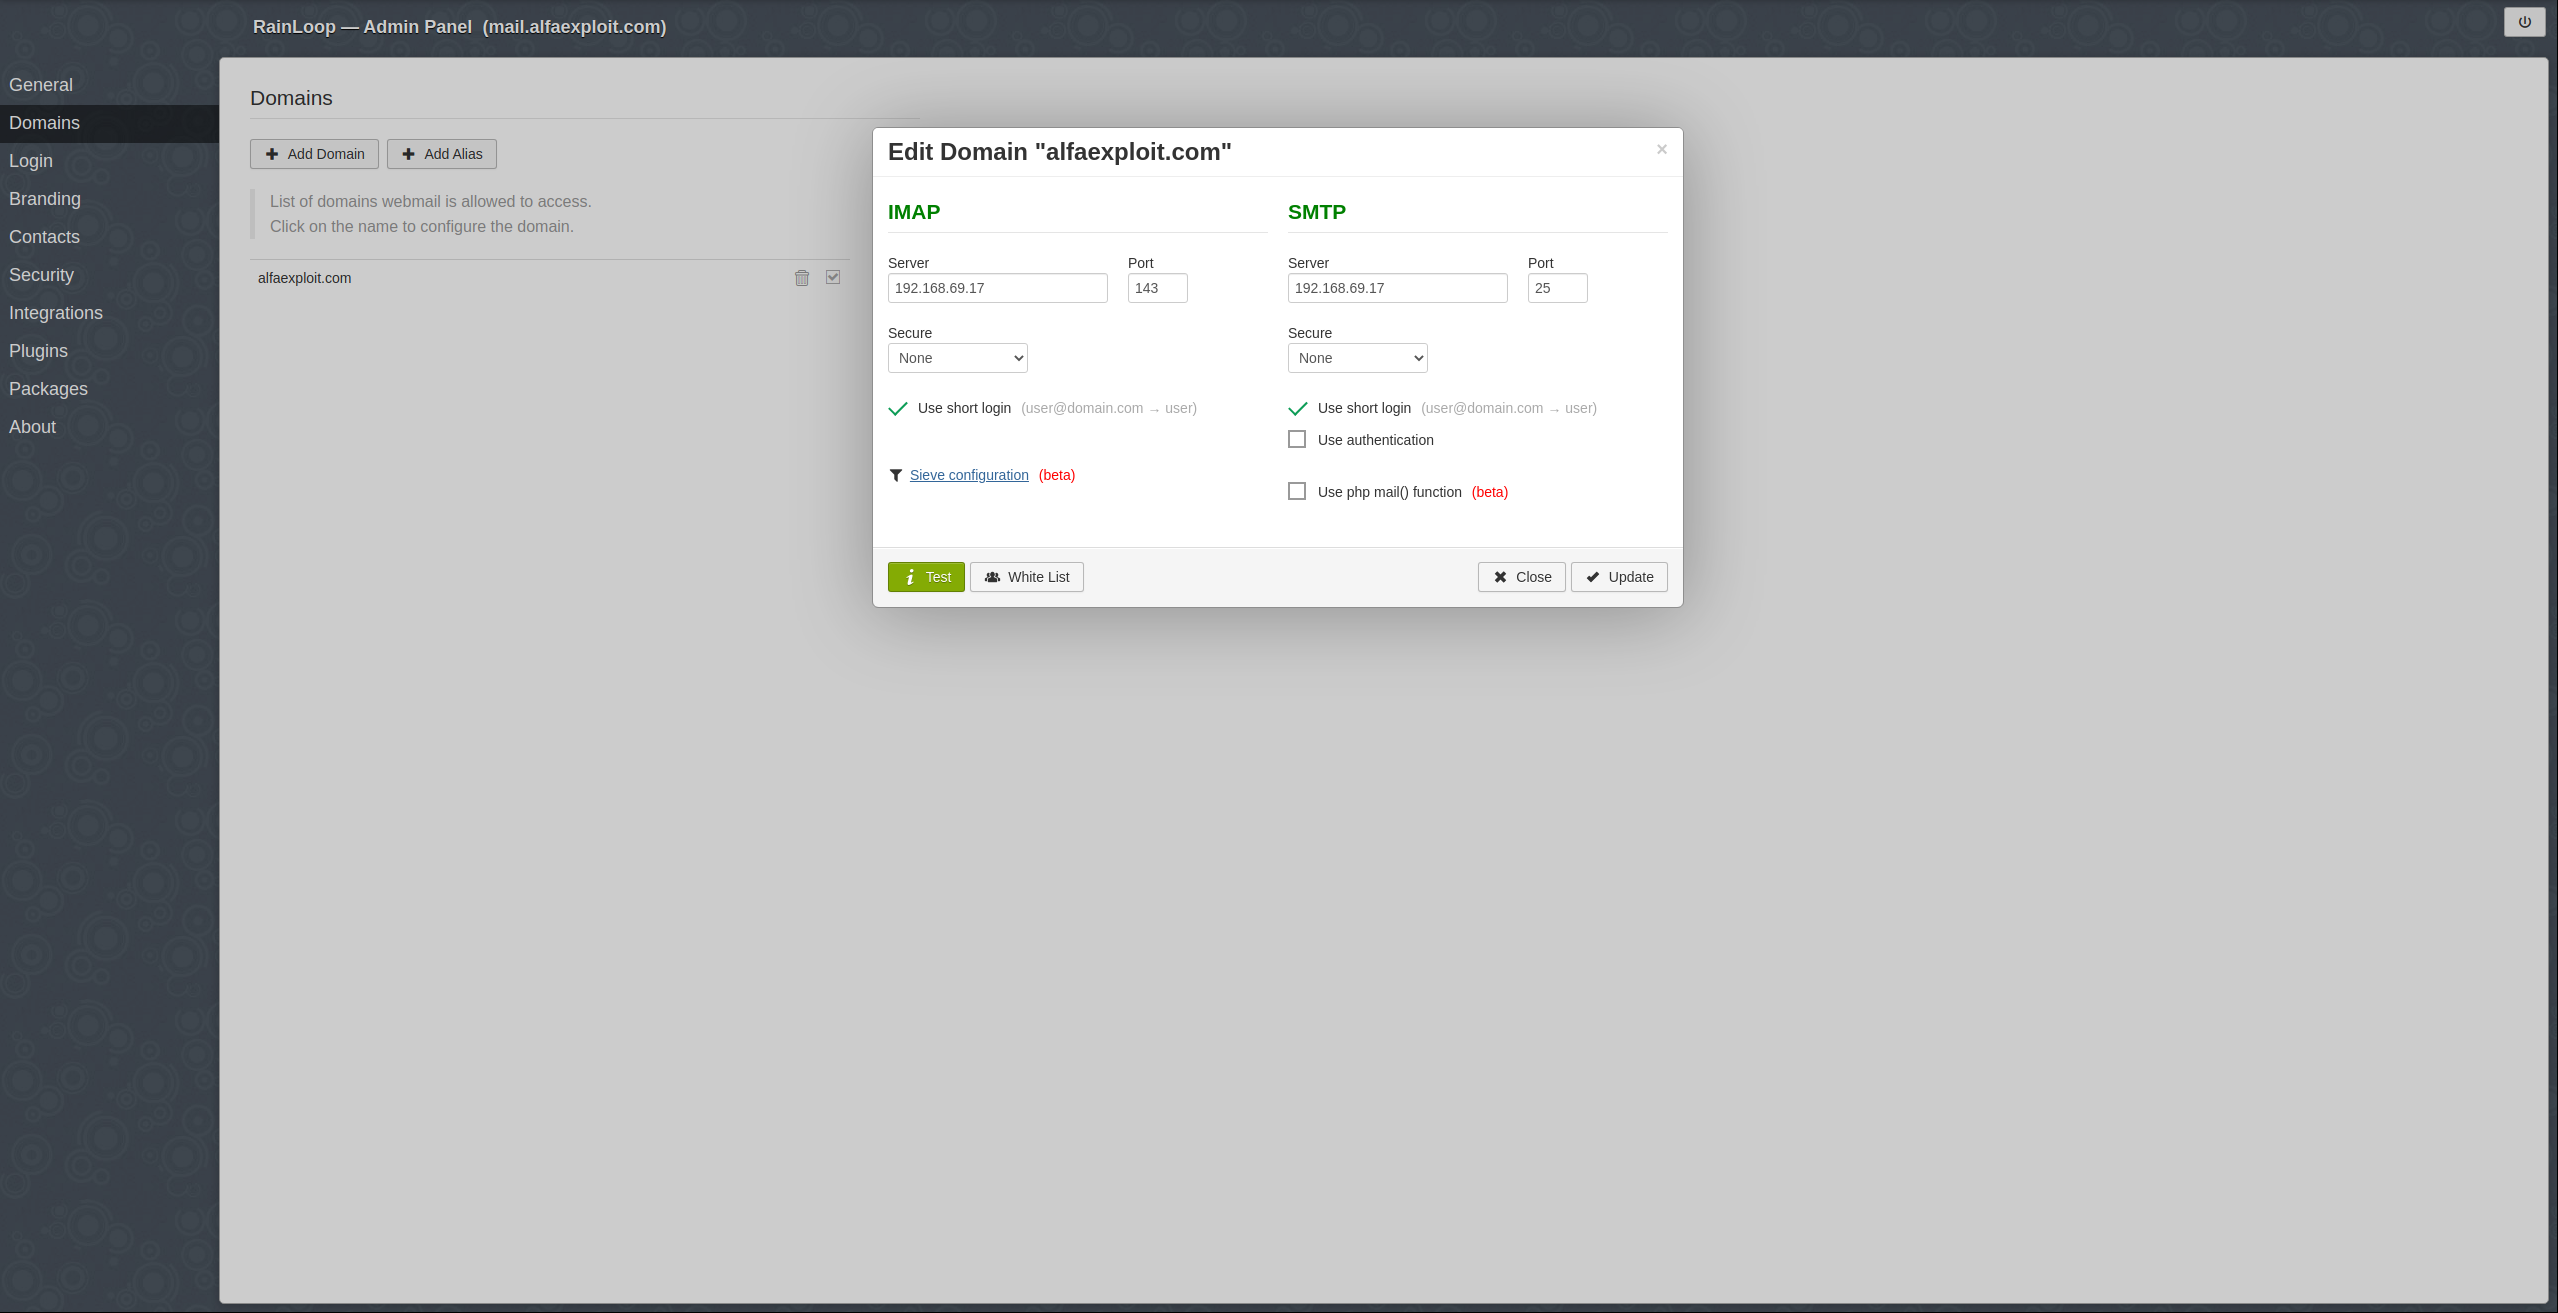
We add the domain:
Domains -> alfaexploit.com
IMAP
X.X.X.X
143
SMTP
X.X.X.X
25
Use short login
NOTE: Use short login -> Since RainLoop will automatically add @alfaexploit.com as we have indicated in the previous step.
We access the email account as a user:
http://mail.alfaexploit.com
kr0m
PASSWORD-SO
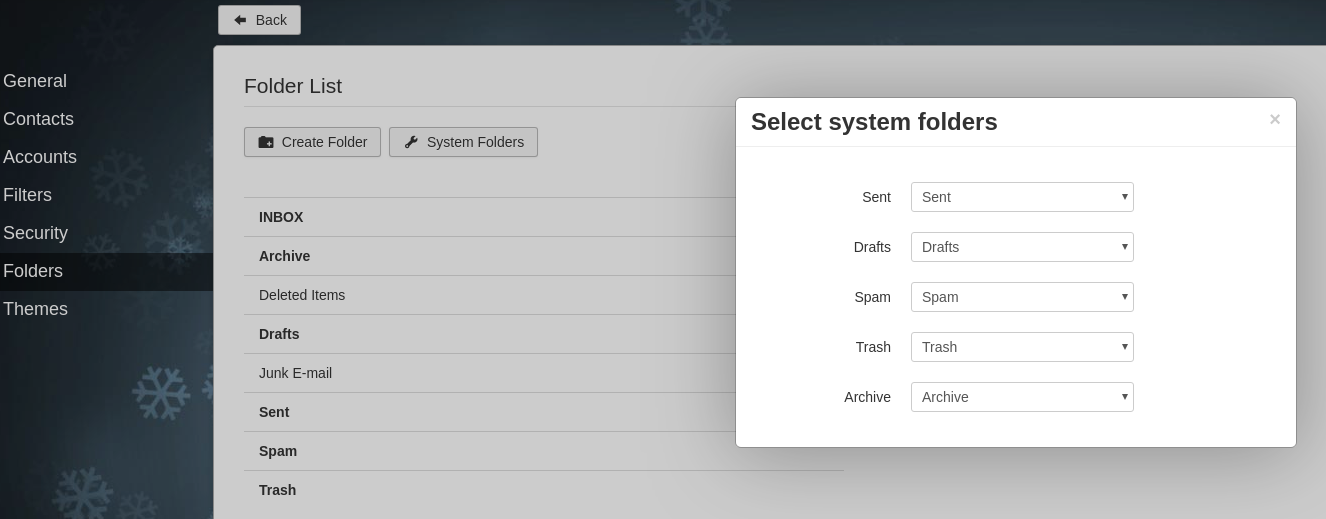
We configure the directories where to save the emails:
Bottom gear -> Folders
System Folders
We assign the directory to each Folder, we can click on the eye for Deleted items and Junk emails so they don’t show up.
We perform tests of sending and receiving emails and check the associated logs:
Sieve is an email classification service, through filters defined by the sysadmin/user we can classify incoming emails, for example based on certain headers, origins, this is very useful if we combine SpamAssassin with Sieve since SpamAssassin will mark emails with their headers and through Sieve we will filter based on these.
SpamAssassin
We install the Spamassassin milter:
We enable the spamd service indicating from which IPs it will accept connections, in this case the server’s own IP:
sysrc spamd_flags="-u spamd -H /var/spool/spamd -A 192.168.69.17"
We enable the milter indicating where it should generate the Unix socket:
sysrc spamass_milter_socket="/var/run/spamass-milter.sock"
The rest of the options that we can configure can be seen in:
: ${spamass_milter_enable="NO"}
: ${spamass_milter_socket="/var/run/spamass-milter.sock"}
: ${spamass_milter_flags="-f -p ${spamass_milter_socket} ${spamass_milter_localflags}"}
: ${spamass_milter_socket_owner="root"}
: ${spamass_milter_socket_group="wheel"}
: ${spamass_milter_socket_mode="644"}
We update the SpamAssassin rules and compile them:
sa-compile
We start SpamAssassin and SpamAssassin-milter:
service spamass-milter start
We generate a base configuration file for SendMail:
make
The above command will have generated a file with the name of the host, we define the milter at the end of the file:
MAIL_FILTER(`spamassassin', `S=local:/var/run/spamass-milter.sock, F=, T=C:15m;S:4m;R:4m;E:10m')
define(`confINPUT_MAIL_FILTERS', `spamassassin')
We compile the new configuration to M4:
We update the SendMail configuration with ours:
cp HellStorm.cf sendmail.cf
We restart the service:
We put a tail to see the logs, some errors will appear since SpamAssassin is not yet fully configured:
We send ourselves an email and we can see in the logs how spamd intercepts the incoming email and assigns it a score:
Jan 1 19:42:55 HellStorm spamd[41333]: spamd: result: . -5 - DKIM_SIGNED,DKIM_VALID,DKIM_VALID_AU,DKIM_VALID_EF,FREEMAIL_FROM,HTML_MESSAGE,RCVD_IN_DNSWL_HI,RCVD_IN_MSPIKE_H2,SPF_HELO_NONE,SPF_PASS,TVD_SPACE_RATIO scantime=0.3,size=2793,user=root,uid=58,required_score=5.0,rhost=192.168.69.17,raddr=192.168.69.17,rport=50983,mid=<CA+SWLLzfBAmUfQQTmiFejuKVkaRpkZKdd7ECv3qXLrPaW-QJAQ@mail.gmail.com>,autolearn=unavailable autolearn_force=no
If we look at the email in raw, we will see the headers added by SpamAssassin:
X-Spam-Status: No, score=-5.2 required=5.0 tests=DKIM_SIGNED,DKIM_VALID,
	DKIM_VALID_AU,DKIM_VALID_EF,FREEMAIL_FROM,HTML_MESSAGE,
	RCVD_IN_DNSWL_HI,RCVD_IN_MSPIKE_H2,SPF_HELO_NONE,SPF_PASS,
	TVD_SPACE_RATIO autolearn=unavailable autolearn_force=no version=3.4.6
X-Spam-Checker-Version: SpamAssassin 3.4.6 (2021-04-09) on
	HellStorm.alfaexploit.com
NOTE: If we want to mark a specific domain or address as spam, we add it to the end of the local.cf file of SpamAssassin:
blacklist_from *@126.com
blacklist_from hacker@xxxxxxx.com
Restart the service:
If you see errors like this in the logs:
Oct 21 22:21:19 DrWho spamd[3572]: plugin: eval failed: bayes: (in learn) locker: safe_lock: cannot create tmp lockfile /root/.spamassassin/bayes.lock.DrWho.alfaexploit.com.3572 for /root/.spamassassin/bayes.lock: Permission denied
You must define the
location of the database
of SpamAssasin to a location where the user spamd has access:
bayes_path /var/spamassassin/bayes_db/bayes
bayes_file_mode 0775
Create the directory:
Assign the permissions mentioned in the
documentation:
chown root:spamd /var/spamassassin/bayes_db/
Restart the service:
Now that we have marked our emails, we will have to categorize them according to the reputation assigned by SpamAssassin. For this, we will use Sieve, which will allow us to configure filters based on many aspects of the email, but to use it, we must make SendMail deliver local mails via LMTP to Dovecot:
Replace:
FEATURE(local_lmtp)
With:
FEATURE(local_lmtp,`[IPC]',`FILE /var/run/dovecot/lmtp')dnl
Recompile the configuration:
Replace the current configuration with ours:
Restart the service:
We install the necessary package for Dovecot to support Sieve:
We enable it as a protocol:
protocols = imap lmtp sieve
And as an LMTP plugin:
protocol lmtp {
  mail_plugins = $mail_plugins sieve
}
In the plugin configuration, we set where the users’ Sieve filters will be stored and which filter should be applied. We also indicate a filter that will always be executed before those defined by the user, ideal for sysadmins to perform their pre-user filtering:
plugin {
    sieve = file:~/.sieve;active=~/.sieve/dovecot.sieve
    sieve_before = file:/var/lib/dovecot/default.sieve
}
When scripting in Sieve, the required libraries must be indicated at the top and then used throughout the rest of the script:
require ["fileinto"];

if header :contains "X-Spam-Flag" "YES" {
    fileinto "Spam";
    stop;
}
We compile the script:
We create the Sieve scripts directory in the user’s home directory:
mkdir /home/kr0m/.sieve
exit
We check that Dovecot’s LMTP module has loaded the Sieve plugin:
mail_plugins = sieve
We restart Dovecot:
We manually connect to the Sieve-manager:
Trying 127.0.0.1...
Connected to HellStorm.
Escape character is '^]'.
"IMPLEMENTATION" "Dovecot Pigeonhole"
"SIEVE" "fileinto reject envelope encoded-character vacation subaddress comparator-i;ascii-numeric relational regex imap4flags copy include variables body enotify environment mailbox date index ihave duplicate mime foreverypart extracttext"
"NOTIFY" "mailto"
"SASL" "PLAIN"
"VERSION" "1.0"
OK "Dovecot ready."
The sieve_before script (/var/lib/dovecot/default.sieve) that moves emails marked as spam by SpamAssassin to the Spam directory should already be running.
We access the RainLoop administration panel and enable Sieve for our domain:
http://mail.alfaexploit.com/?admin
admin
XXXXXXX
Domains -> alfaexploit.com

Sieve configuration:
Allow sieve scripts
Allow custom user script
Server: 192.168.69.17 Port: 4190
Secure: None
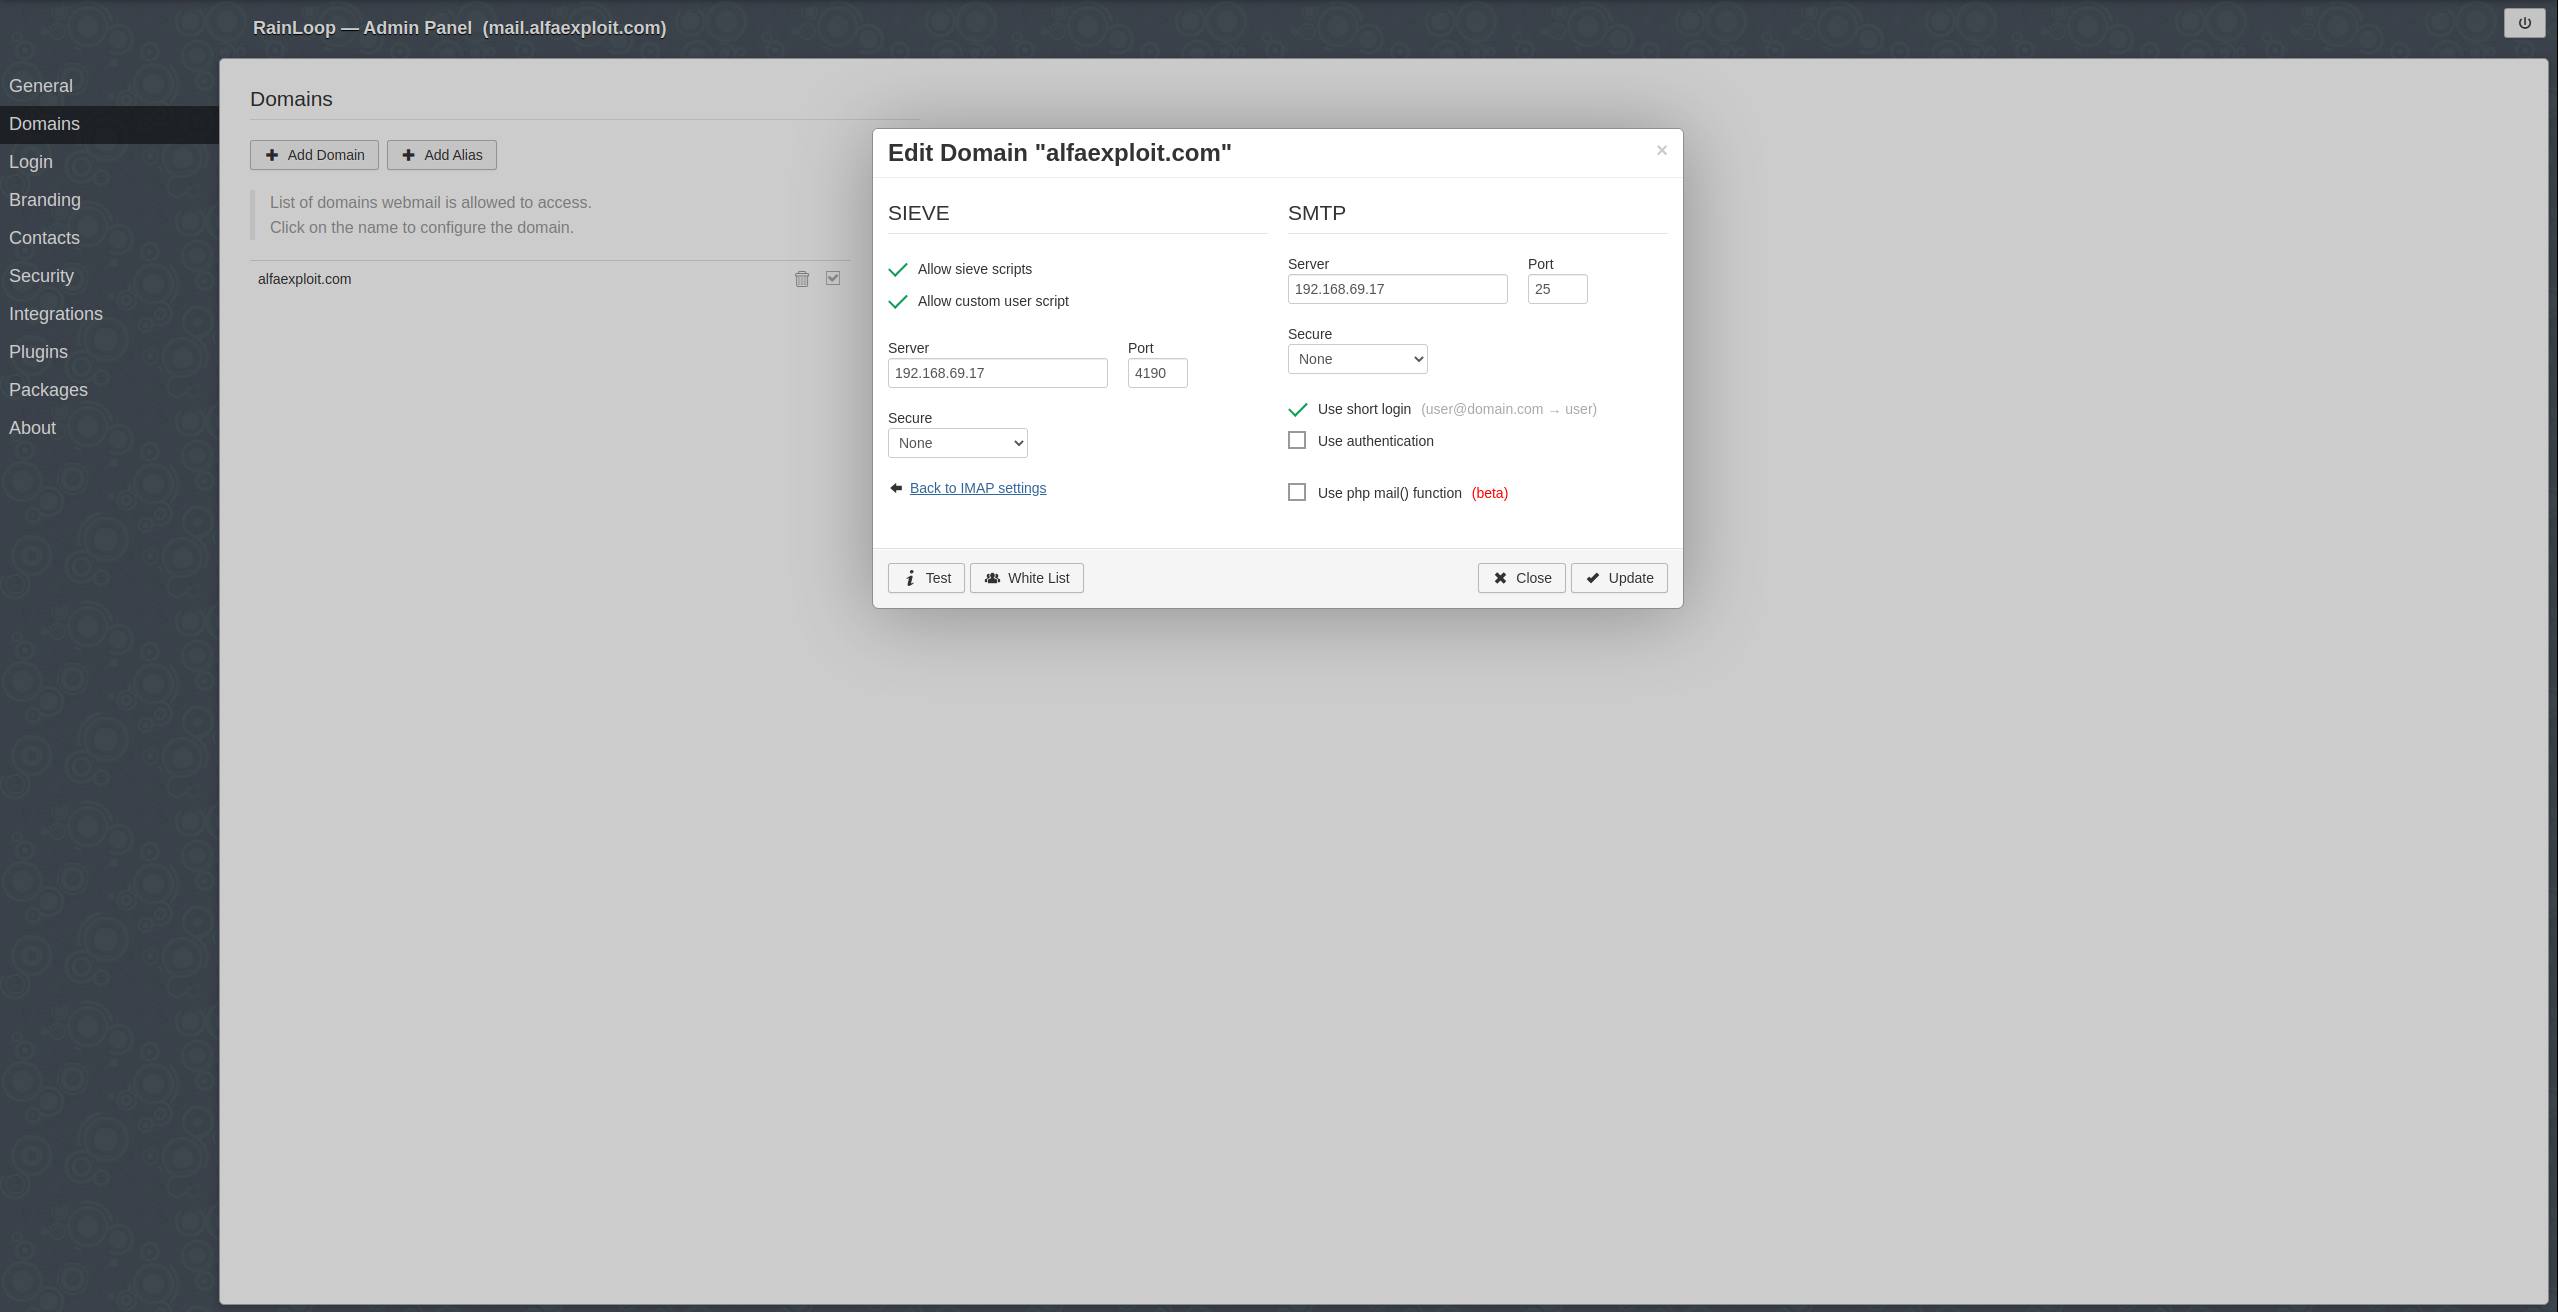
Click on the Update button.
Access with the normal user account and configure a filter:
Configuration -> Filters
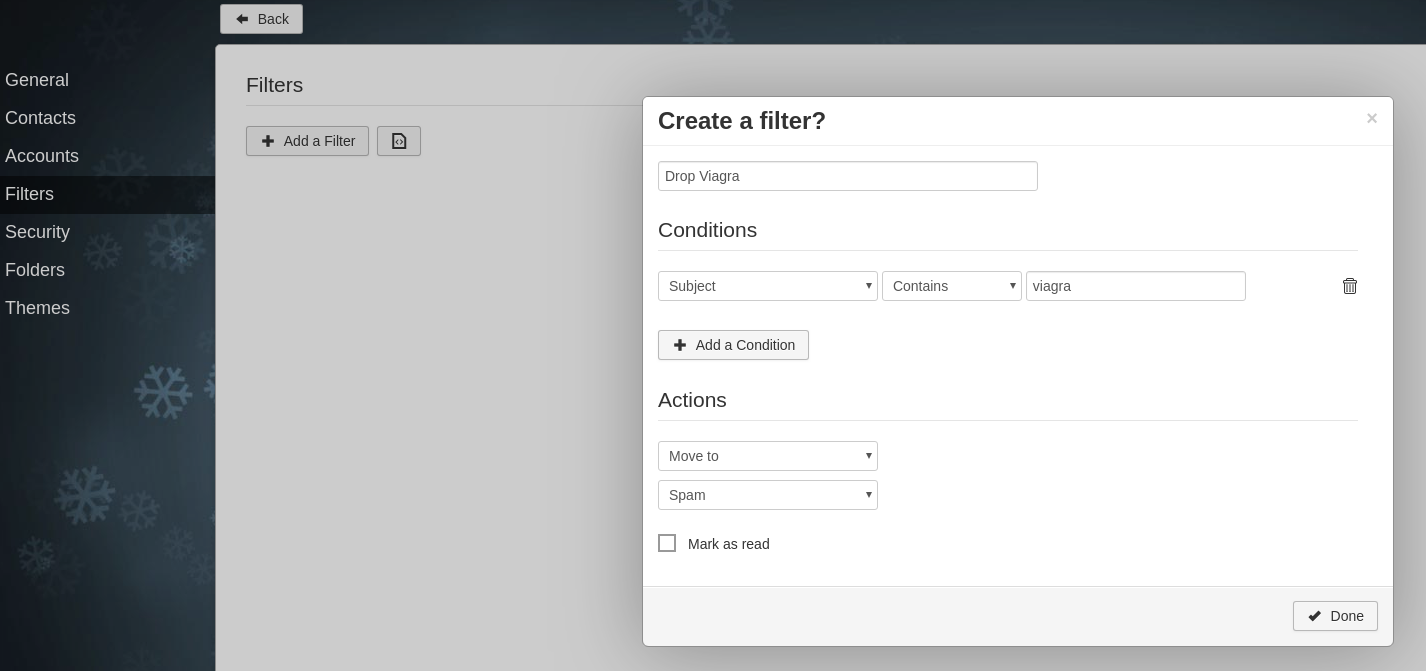
NOTE: We must filter network traffic through a firewall to prevent unauthorized access to Sieve(4190)/SpamAssassin(783) services.
SPF
Through SPF we will indicate which servers are authorized to send emails from our domain, this is nothing more than DNS entries indicating the IPs, in my case it would be as follows.
A 92.176.161.228 mail.alfaexploit.com
MX mail.alfaexploit.com
TXT spf2.0/mfrom,pra a mx -all
TXT v=spf1 mx -all
NOTE: The first entry is a simple A entry resolving mail.alfaexploit.com to the IP, the second indicates which server(MX) is responsible for receiving emails, the third indicates that the IP of the server indicated in the MX record of the domain is authorized to send emails and the fourth does the same as the third but it is spf1.
SPF supports two types of fails:
- hardfails: Any email coming from an unauthorized IP will be deleted, this behavior is indicated by entering -all in the DNS entry.
- softfail: Any email coming from an unauthorized IP will be marked as Spam, this behavior is indicated by entering ~all in the DNS entry.
We check that all entries resolve as they should:
0 mail.alfaexploit.com.
79.116.145.12
"spf2.0/mfrom,pra a mx ~all"
"v=spf1 mx ~all"
DKIM
Through DKIM we will be able to sign outgoing emails with a private key so that the recipient can verify that the email was sent from our server and not from another pretending to be us, the key to this process is to publish the pubkey in a DNS entry so that the recipient can obtain it and thus verify the authenticity of the email.
We install the OpenDkim milter:
We enable the service:
We generate the private-key/pub-key pair:
cd /var/db/dkim
opendkim-genkey -s smtp -d alfaexploit.com
NOTE: The -s smtp parameter is just the selector, it is a string with which the DNS query will have to be made to obtain the value of the pubkey.
The OpenDkim configuration would be as follows:
Domain          alfaexploit.com
KeyFile         /var/db/dkim/smtp.private
InternalHosts   /var/db/dkim/internal_hosts
Selector        smtp
Socket          local:/var/run/milteropendkim/milter-opendkim.sock
Syslog          Yes
We adjust the permissions so that OpenDkim can generate the unix socket file:
We define which IPs can connect to the milter, in my case the IP of the server itself:
192.168.69.17
We start the service:
We configure SendMail to use the new milter:
MAIL_FILTER(`spamassassin', `S=local:/var/run/spamass-milter.sock, F=, T=C:15m;S:4m;R:4m;E:10m')
MAIL_FILTER(`dkim-filter', `S=/var/run/milteropendkim/milter-opendkim.sock, F=T, T=R:2m')
define(`confINPUT_MAIL_FILTERS', `spamassassin, dkim-filter')
We compile and update the configuration:
cp HellStorm.cf sendmail.cf
We restart the service:
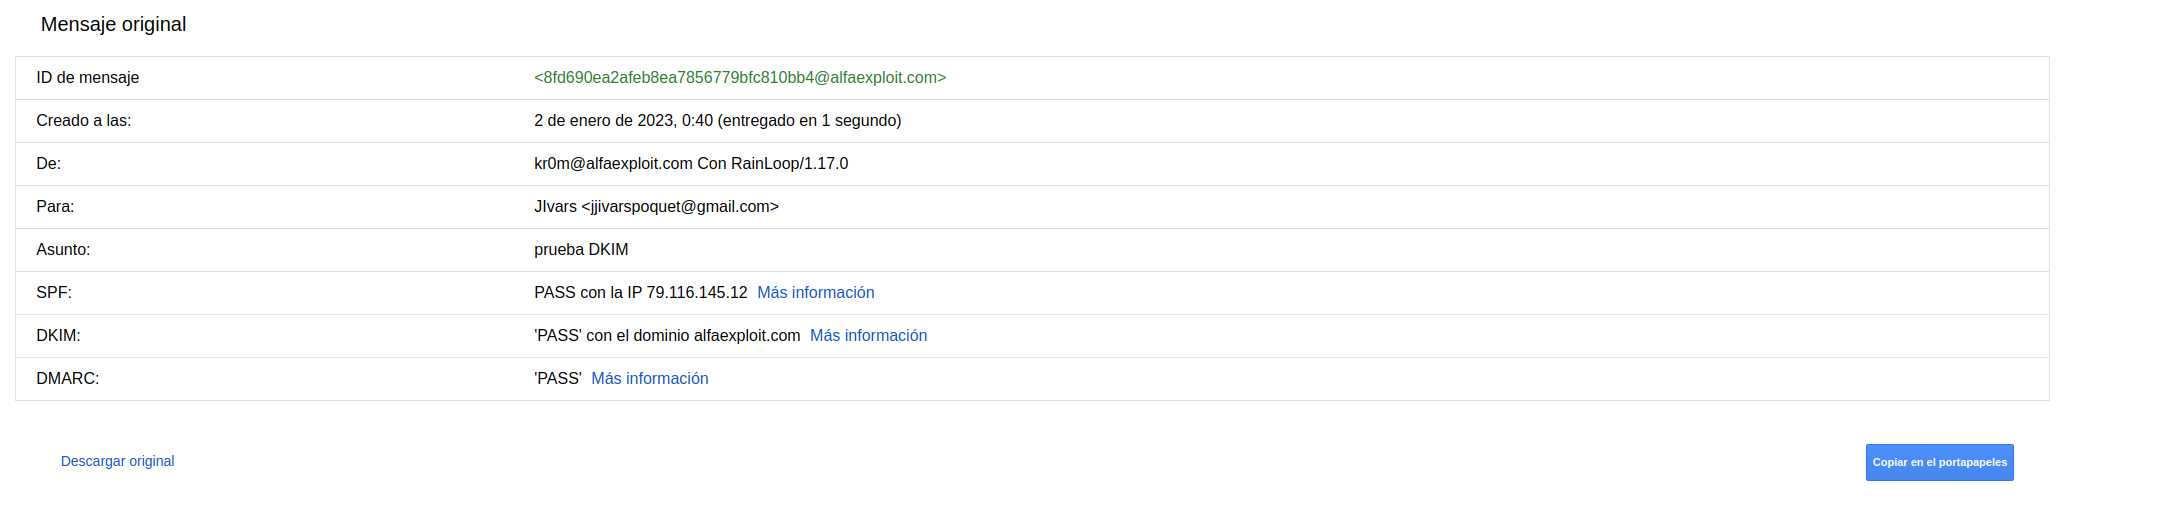
If we send an email, we will see that they are signed.
DKIM-Signature: v=1; a=rsa-sha256; c=simple/simple; d=alfaexploit.com; s=smtp; t=1672616405; bh=G1jVXBHX92kUkSHkyQ6MzL5LYYAW8yEUeAJmHQPkbeQ=; h=Date:From:Subject:To; b=u49nGRAoDNY0tWxab5lbE7GSDvJ796snMaJbMDKA9+Iz5NSxeqGbfCCswsDo+yuZ8
	 96TXfWXO0tzo0kjSqCcrm5s2gdhNPeG9Q2+eTjs71pXJS7sonqw4AncamPQl2kOx3i
	 ZFCq67c/BK+gup601dSdrurFVLt57jpgUcOwD9Kc=
But we must publish our pubkey on the Internet so that servers that receive our emails can verify that the email signature was generated with the private key corresponding to the published pubkey:
smtp._domainkey    IN    TXT    ( "v=DKIM1; k=rsa; "
      "p=MIGfMA0GCSqGSIb3DQEBAQUAA4GNADCBiQKBgQC+6l6oAODR0hUzsHqb2StBHVKlXdemKhbRNaCNDdoqMH9yi7TOfYeO4Ko5Wnp4Gq449ur8h14Afvgji24DC6GCBNbHCcDh67M9HZW28BJPRoaaIInQHzt5+9oVa9BREliNa50gfbwmNS/WnrZ6o3X94xCCbb6xcdQJC6FCrGoyMQIDAQAB" )  ; ----- DKIM key smtp for alfaexploit.com
The TXT record will have the following content:
v=DKIM1; k=rsa; p=MIGfMA0GCSqGSIb3DQEBAQUAA4GNADCBiQKBgQC+6l6oAODR0hUzsHqb2StBHVKlXdemKhbRNaCNDdoqMH9yi7TOfYeO4Ko5Wnp4Gq449ur8h14Afvgji24DC6GCBNbHCcDh67M9HZW28BJPRoaaIInQHzt5+9oVa9BREliNa50gfbwmNS/WnrZ6o3X94xCCbb6xcdQJC6FCrGoyMQIDAQAB
The final DNS entry should contain the selector (smtp):
TXT smtp._domainkey v=DKIM1; k=rsa; p=MIGfMA0GCSqGSIb3DQEBAQUAA4GNADCBiQKBgQC+6l6oAODR0hUzsHqb2StBHVKlXdemKhbRNaCNDdoqMH9yi7TOfYeO4Ko5Wnp4Gq449ur8h14Afvgji24DC6GCBNbHCcDh67M9HZW28BJPRoaaIInQHzt5+9oVa9BREliNa50gfbwmNS/WnrZ6o3X94xCCbb6xcdQJC6FCrGoyMQIDAQAB
If we consult the entry, it returns the configured pubkey:
"v=DKIM1;k=rsa;p=MIGfMA0GCSqGSIb3DQEBAQUAA4GNADCBiQKBgQC+6l6oAODR0hUzsHqb2StBHVKlXdemKhbRNaCNDdoqMH9yi7TOfYeO4Ko5Wnp4Gq449ur8h14Afvgji24DC6GCBNbHCcDh67M9HZW28BJPRoaaIInQHzt5+9oVa9BREliNa50gfbwmNS/WnrZ6o3X94xCCbb6xcdQJC6FCrGoyMQIDAQAB;t=s;"
DMARC
DMARC are DNS records where we indicate to email servers what to do when the incoming email does not pass SPF/DKIM. Of course, each ISP can then respect what is indicated in the DMARC or not.
TXT _dmarc.alfaexploit.com
v=DMARC1\; p=reject\; rua=mailto:kr0m@alfaexploit.com\; ruf=mailto:kr0m@alfaexploit.com\; pct=100
Let’s break down each of the fields:
- v: Protocol version
- p: Indicates the DMARC policy to follow
- rua: Where notifications will be sent when an email that does not pass SPF/DKIM is received
- ruf: Where a copy of the spam emails will be sent when an email that does not pass SPF/DKIM is received
- pct: What percentage of received emails should have the DMARC filter applied
The possible policies are:
- none: Treat the email without applying DMARC
- quarantine: Accept the email but treat it as spam
- reject: Reject the email
We check that the DNS record responds with the correct information:
"v=DMARC1; p=reject; rua=mailto:kr0m@alfaexploit.com; ruf=mailto:kr0m@alfaexploit.com; pct=100"
We can see how Google approves the three checks:
SSL RainLoop
If we are going to access the RainLoop interface from the Internet, it is better to do it through SSL.
To do this, we will reconfigure Nginx by temporarily removing the include of the rainloop.conf file:
...
http {
    include       mime.types;
    default_type  application/octet-stream;
    client_max_body_size 25M;
    #include rainloop.conf;
...
We restart the service:
We install ACME:
We issue the certificate request:
[Mon Jan  2 08:02:05 CET 2023] Your cert is in: /root/.acme.sh/mail.alfaexploit.com/mail.alfaexploit.com.cer
[Mon Jan  2 08:02:05 CET 2023] Your cert key is in: /root/.acme.sh/mail.alfaexploit.com/mail.alfaexploit.com.key
[Mon Jan  2 08:02:05 CET 2023] The intermediate CA cert is in: /root/.acme.sh/mail.alfaexploit.com/ca.cer
[Mon Jan  2 08:02:05 CET 2023] And the full chain certs is there: /root/.acme.sh/mail.alfaexploit.com/fullchain.cer
We include rainloop.conf again:
...
http {
    include       mime.types;
    default_type  application/octet-stream;
    client_max_body_size 25M;
    #include rainloop.conf;
...
But this time it will only listen on port 443, and since my traffic goes through a traffic balancer, I use
proxy_protocol
:
server {

  listen 443 ssl proxy_protocol;
  server_name mail.alfaexploit.com;

  set_real_ip_from 192.168.69.11;
  real_ip_header proxy_protocol;

  root /usr/local/www/rainloop;

  ssl_certificate "/root/.acme.sh/mail.alfaexploit.com/fullchain.cer";
  ssl_certificate_key "/root/.acme.sh/mail.alfaexploit.com/mail.alfaexploit.com.key";

  index index.php;

  location / {
    try_files $uri $uri/ /index.php?$query_string;
  }

  location ^~ /data {
     deny all;
  }

  location ~ \.php$ {
    try_files $uri =404;
    include fastcgi_params;
    fastcgi_index index.php;
    fastcgi_split_path_info ^(.+\.php)(.*)$;
    fastcgi_keep_conn on;
    fastcgi_param SCRIPT_FILENAME $document_root$fastcgi_script_name;
    fastcgi_pass 127.0.0.1:9000;
  }

}
We restart the service:
SSL Sendmail
By default, SendMail comes with SSL enabled with self-signed certificates:
dnl Enable STARTTLS for receiving email.
define(`CERT_DIR', `/etc/mail/certs')dnl
define(`confSERVER_CERT', `CERT_DIR/host.cert')dnl
define(`confSERVER_KEY', `CERT_DIR/host.key')dnl
define(`confCLIENT_CERT', `CERT_DIR/host.cert')dnl
define(`confCLIENT_KEY', `CERT_DIR/host.key')dnl
define(`confCACERT', `CERT_DIR/cacert.pem')dnl
define(`confCACERT_PATH', `CERT_DIR')dnl
define(`confDH_PARAMETERS', `CERT_DIR/dh.param')dnl
To configure ours, we will first make a copy of the originals:
The certificates are obtained on the web server, so we synchronize them using the following script:
#!/usr/local/bin/bash

function sendTelegram {
        message=${@:1}
        #curl -s -X POST https://api.telegram.org/botAPI_KEY/sendMessage -d chat_id=CHAT_ID -d text="$message"
        curl -s -X POST https://api.telegram.org/bot535179217:AAGXRe1df_1WNgqxOCfC8VrCNKGqouhslLw/sendMessage -d chat_id=30418601 -d text="$message"
}

if [ -f "/etc/mail/certs/alfaexploit.com/fullchain.cer" ] && [ -f "/etc/mail/certs/alfaexploit.com/alfaexploit.com.key" ] && [ -f "/etc/mail/certs/alfaexploit.com/ca.cer" ]; then
    mv /etc/mail/certs/alfaexploit.com/fullchain.cer /etc/mail/certs/alfaexploit.com/fullchain.cer.ori
    mv /etc/mail/certs/alfaexploit.com/alfaexploit.com.key /etc/mail/certs/alfaexploit.com/alfaexploit.com.key.ori
    mv /etc/mail/certs/alfaexploit.com/ca.cer /etc/mail/certs/alfaexploit.com/ca.cer.ori
    PREV_CERTS_FOUND=1
else
    PREV_CERTS_FOUND=0
fi

if [ ! -d /etc/mail/certs/alfaexploit.com/ ]; then
    mkdir /etc/mail/certs/alfaexploit.com/
fi
fetch http://admin:XXXX@192.168.69.19:8080/fullchain.cer -o /etc/mail/certs/alfaexploit.com/fullchain.cer
if [ $? -ne 0 ]; then
    sendTelegram "$HOSTNAME-SMTP/SSL: Cant download http://admin:XXXX@192.168.69.19:8080/fullchain.cer"
fi
fetch http://admin:XXXX@192.168.69.19:8080/alfaexploit.com.key -o /etc/mail/certs/alfaexploit.com/alfaexploit.com.key
if [ $? -ne 0 ]; then
    sendTelegram "$HOSTNAME-SMTP/SSL: Cant download http://admin:XXXX@192.168.69.19:8080/alfaexploit.com.key"
fi
fetch http://admin:XXXX@192.168.69.19:8080/ca.cer -o /etc/mail/certs/alfaexploit.com/ca.cer
if [ $? -ne 0 ]; then
    sendTelegram "$HOSTNAME-SMTP/SSL: Cant download http://admin:XXXX@192.168.69.19:8080/ca.cer"
fi
chmod 600 /etc/mail/certs/alfaexploit.com/*

if [ $PREV_CERTS_FOUND -eq 1 ]; then
    for file in /etc/mail/certs/alfaexploit.com/*.ori; do
      md5_ori=$(md5 $file|awk '{print$4}')
      file=${file::-4}
      md5=$(md5 $file|awk '{print$4}')
      #echo "md5_ori: $md5_ori -- md5: $md5"
      if [ "$md5_ori" != "$md5" ]; then
        echo ">> New certs detected -> Restarting SendMail"
        service sendmail restart
        sendTelegram "$HOSTNAME:25-SSL alfaexploit certificates updated"
        break
      fi
    done
fi

check=$(echo Q|openssl s_client -connect 192.168.69.17:25 -starttls smtp 2>/dev/null | grep '0 s:' | grep 'CN =' | awk -F "CN = " '{print$2}' | awk -F "," '{print$1}')
#echo "check: $check"
if [ "$check" != "alfaexploit.com" ]; then
    sendTelegram "$HOSTNAME-SMTP/SSL Incorrect CommonName: $check"
fi
We assign the necessary permissions:
We add it to the crontab:
*/30 * * * * /root/.scripts/get_alfaexploit_certs.sh >/dev/null 2>&1
Once copied, we perform the following configuration:
dnl Enable STARTTLS for receiving email.
define(`CERT_DIR', `/etc/mail/certs/alfaexploit.com')dnl
define(`confSERVER_CERT', `CERT_DIR/fullchain.cer')dnl
define(`confSERVER_KEY', `CERT_DIR/alfaexploit.com.key')dnl
define(`confCLIENT_CERT', `CERT_DIR/fullchain.cer')dnl
define(`confCLIENT_KEY', `CERT_DIR/alfaexploit.com.key')dnl
define(`confCACERT', `CERT_DIR/ca.cer')dnl
define(`confCACERT_PATH', `CERT_DIR')dnl
We compile the configuration:
cp HellStorm.cf sendmail.cf
We restart the service:
We leave a tail in the log to make sure everything is still working:
We perform a manual test to verify that the correct certificate is being used:
Verification: OK
One way to check SSL for both incoming and outgoing mail is through this website:
https://ssl-tools.net/mailservers
https://ssl-tools.net/mails
Reverse DNS
Regarding reverse DNS, GMail/HotMail/OVH servers only require that the origin IP of the email has a reverse, it doesn’t matter what the reverse is, they DO NOT require it to match the origin domain of the email.
Account maintenance
Over time, mailboxes can fill up with emails due to neglect by users, thus causing excessive disk space consumption, SMTP denial of service, or even causing problems for the entire operating system if the disk is not partitioned correctly or disk quotas are not applied.
Dovecot provides an email system management tool called doveadm which also provides useful commands for user account administration.
We can see where the user stores their emails with the following command:
field	value
uid	1001
gid	1001
home	/home/kr0m
mail	mbox:~/mboxDir:INBOX=/var/mail/kr0m
system_groups_user	kr0m
We can check the email folders:
Drafts
Trash
Archive
Sent
Spam
INBOX
We can see the general status of each folder:
Spam messages=4 recent=0 uidnext=2343 uidvalidity=1584649428 unseen=4 highestmodseq=4277 vsize=31212 guid=1e54ce3009d6735e13310000d09efc50 firstsaved=1661967302
We can also get a list of emails in that folder:
uid	date.saved
2339	2022-08-31 19:35:02
2340	2022-09-01 07:14:41
2341	2022-09-01 09:25:54
2342	2022-09-01 22:00:09
It’s very useful to perform a search before deleting emails to make sure we’re deleting the correct content:
1e54ce3009d6735e13310000d09efc50 2339
1e54ce3009d6735e13310000d09efc50 2340
We delete the emails:
If we check now, we’ll see that only two emails remain:
uid	date.saved
2341	2022-09-01 09:25:54
2342	2022-09-01 22:00:09
Spam messages=2 recent=0 uidnext=2343 uidvalidity=1584649428 unseen=2 highestmodseq=4278 vsize=15667 guid=1e54ce3009d6735e13310000d09efc50 firstsaved=1662017154
It’s a good idea to schedule a script to clean the accounts periodically:
#!/usr/local/bin/bash
/usr/local/bin/doveadm expunge -u kr0m mailbox Spam savedbefore 1d
/usr/local/bin/doveadm expunge -u kr0m mailbox Trash savedbefore 7d
Assign the necessary permissions to the script:
Schedule the script:
00 00 * * * /root/.scripts/clearMail >/dev/null 2>&1
The expunge command allows executing commands on all existing users but NOT when system users are being used:
If the -A option is present, the command will be performed for all users.
Using this option in combination with system users from userdb { driver = passwd } is not recommended, because it contains also users with a lower UID than the one configured with the first_valid_uid setting.
When the SQL userdb module is used make sure that the iterate_query setting in /etc/dovecot/dovecot-sql.conf.ext matches your database layout. When using the LDAP userdb module, make sure that the iterate_attrs and iterate_filter settings in /etc/dovecot/dovecot-ldap.conf.ext match your LDAP schema. Otherwise doveadm(1) will be unable to iterate over all users.
Debug
We can enable Dovecot and Sieve debug by configuring certain parameters:
log_path = syslog
syslog_facility = mail
mail_debug = yes
Check the logs:
We can dump the entire running-config of Dovecot with:
The plugins loaded in the Dovecot LMTP service:
Some interesting links:
https://wiki.dovecot.org/Pigeonhole/Sieve/Troubleshooting
https://wiki1.dovecot.org/Logging
A very interesting website when experiencing deliverability issues is:
https://mxtoolbox.com/