Now that we have vast knowledge about ASM and C, we can proceed to boot our kernel. The steps to follow are: write and compile the kernel code, write and assemble the bootloader code, create a disk image that includes our bootloader and kernel, load the kernel into RAM, switch to 32-bit protected mode, and execute our kernel.
Before starting, it is recommended that you read these previous articles:
- Boot Sector
- Interrupts
- Memory
- Stack
- IF-ELSE
- Functions
- Memory Segmentation
- Reading Data from Disk
- Entering Protected Mode 32bits
- Compilation, Linking, Stack Management, and Variables in C
- Pointers
Our kernel will be very simple for now, we will only write the character X in the upper left corner of the screen, for which we will access the video memory using a pointer.
void main () {
    // Create a pointer to a char , and point it to the first text cell of video memory (i.e. the top - left of the screen )
    char* video_memory = (char*) 0xb8000 ;

    // At the address pointed to by video_memory , store the character ’X’ (i.e. display ’X’ in the top - left of the screen ).
    *video_memory = 'X';
}
We generate the object file. If we are on a 64-bit system, it is important to tell the compiler to generate 32-bit assembly code. Otherwise, the bootloader will work, but when it reaches the kernel part, the ASM instructions will be incorrect:
We link the object indicating at which memory address (0x1000) it should be loaded:
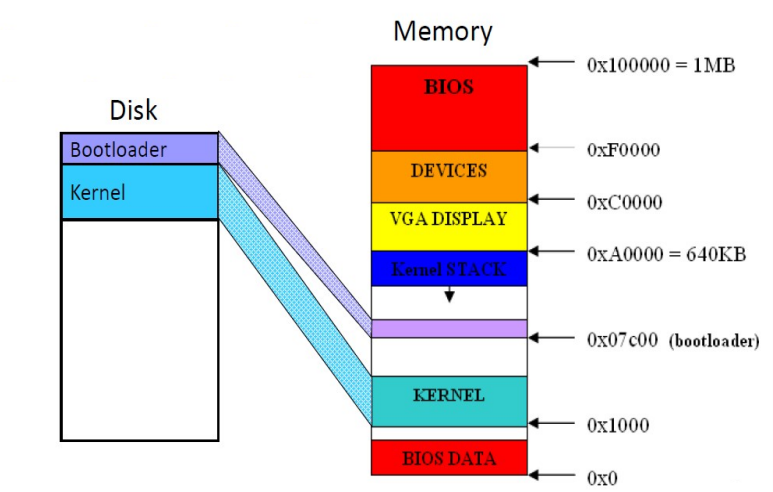
To simplify the kernel loading, we will write the image just after our bootloader, so we won’t have to locate where it is.
[org 0x7c00]
    KERNEL_OFFSET equ 0x1000 ; The same one we used when linking the kernel

    mov [BOOT_DRIVE], dl ; Remember that the BIOS sets us the boot drive in 'dl' on boot
    mov bp, 0x9000
    mov sp, bp

    mov bx, MSG_REAL_MODE
    call print
    call print_nl

    call load_kernel ; read the kernel from disk
    call switch_to_pm ; disable interrupts, load GDT,  etc. Finally jumps to 'BEGIN_PM'
    jmp $ ; Never executed

%include "./boot_sect_print.asm"
%include "./boot_sect_print_hex.asm"
%include "./boot_sect_disk.asm"
%include "./32bit-gdt.asm"
%include "./32bit-print.asm"
%include "./32bit-switch.asm"

[bits 16]
load_kernel:
    mov bx, MSG_LOAD_KERNEL
    call print
    call print_nl

    mov bx, KERNEL_OFFSET ; Read from disk and store in 0x1000
    mov dh, 1
    mov dl, [BOOT_DRIVE]
    call disk_load
    ret

[bits 32]
BEGIN_PM:
    mov ebx, MSG_PROT_MODE
    call print_string_pm
    call KERNEL_OFFSET ; Give control to the kernel
    jmp $ ; Stay here when the kernel returns control to us (if ever)


BOOT_DRIVE db 0 ; It is a good idea to store it in memory because 'dl' may get overwritten
MSG_REAL_MODE db "Started in 16-bit Real Mode", 0
MSG_PROT_MODE db "Landed in 32-bit Protected Mode", 0
MSG_LOAD_KERNEL db "Loading kernel into memory", 0

; padding
times 510 - ($-$$) db 0
dw 0xaa55
All included files are explained in previous articles, the only one that has been slightly modified is boot_sect_disk.asm, where the line indicating from which disk it should read has been commented out, now it is passed from the main program:
; load 'dh' sectors from drive 'dl' into ES:BX
disk_load:
    pusha; save all registers to stack before executing function
    push dx; save dx to stack, we are goig to use dl/dh meanwhile

    mov ah, 0x02 ; read from disk action when int13 is fired

    ;mov dl, 0x80 ; use first hard disk
    mov al, dh   ; number of sectors to read
    mov dh, 0x00 ; use first header
    mov ch, 0x00 ; read from first cilinder(track)
    mov cl, 0x02 ; sector number to start reading

    int 0x13      ; BIOS interrupt
    jc disk_error ; if error (stored in the carry bit)

    pop dx; recover dx content from stack
    cmp al, dh    ; BIOS also sets 'al' to the # of sectors read. Compare it.
    jne sectors_error

    popa; restore registers state
    ret


disk_error:
    mov bx, DISK_ERROR
    call print
    call print_nl
    mov dh, ah ; ah = error code, dl = disk drive that dropped the error
    call print_hex ; check out the code at http://stanislavs.org/helppc/int_13-1.html
    jmp disk_loop

sectors_error:
    mov bx, SECTORS_ERROR
    call print

disk_loop:
    jmp $

DISK_ERROR: db "Disk read error", 0
SECTORS_ERROR: db "Incorrect number of sectors read", 0
We generate the disk image as we have indicated, bootloader (first sector) + OS (next sector):
cat boot_sect.bin kernel.bin > os-image
The contents of the RAM and the disk image will be as shown in the following image:
We load it in Qemu:
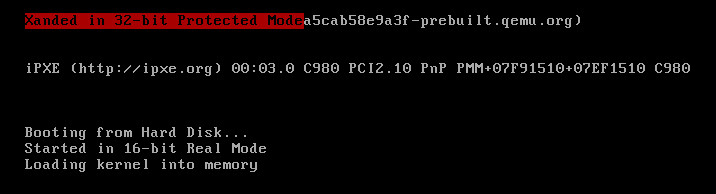
As you can see, we have managed to load our kernel written in C.
DEBUG:
We can see the assembly instructions of the disk image using ndisasm:
We can also see them with xdd but only the opcodes, but we will clearly see where the bootloader ends and where our kernel begins:
00000000: 8816 5c7d bd00 9089 ecbb 5d7d e80b 00e8  ..\}......]}....
00000010: 1a00 e820 01e8 ee00 ebfe 608a 073c 0074  ... ......`..<.t
00000020: 09b4 0ecd 1083 c301 ebf1 61c3 60b4 0eb0  ..........a.`...
00000030: 0acd 10b0 0dcd 1061 c360 b900 0083 f904  .......a.`......
00000040: 741c 89d0 83e0 0f04 303c 397e 0204 07bb  t.......0<9~....
00000050: 6b7c 29cb 8807 c1ca 0483 c101 ebdf bb66  k|)............f
00000060: 7ce8 b6ff 61c3 3078 3030 3030 0060 52b4  |...a.0x0000.`R.
00000070: 0288 f0b6 00b5 00b1 02cd 1372 075a 38f0  ...........r.Z8.
00000080: 7512 61c3 bb9c 7ce8 90ff e89f ff88 e6e8  u.a...|.........
00000090: a7ff eb06 bbac 7ce8 80ff ebfe 4469 736b  ......|.....Disk
000000a0: 2072 6561 6420 6572 726f 7200 496e 636f   read error.Inco
000000b0: 7272 6563 7420 6e75 6d62 6572 206f 6620  rrect number of
000000c0: 7365 6374 6f72 7320 7265 6164 0000 0000  sectors read....
000000d0: 0000 0000 00ff ff00 0000 9acf 00ff ff00  ................
000000e0: 0000 92cf 0017 00cd 7c00 0060 ba00 800b  ........|..`....
000000f0: 008a 03b4 403c 0074 0b66 8902 83c3 0183  ....@<.t.f......
00000100: c202 ebed 61c3 fa0f 0116 e57c 0f20 c066  ....a......|. .f
00000110: 83c8 010f 22c0 ea1b 7d08 0066 b810 008e  ...."...}..f....
00000120: d88e d08e c08e e08e e8bd 0000 0900 89ec  ................
00000130: e816 0000 00bb 997d e8df fee8 eefe bb00  .......}........
00000140: 10b6 018a 165c 7de8 23ff c3bb 797d 0000  .....\}.#...y}..
00000150: e896 ffff ffe8 a692 ffff ebfe 0053 7461  .............Sta
00000160: 7274 6564 2069 6e20 3136 2d62 6974 2052  rted in 16-bit R
00000170: 6561 6c20 4d6f 6465 004c 616e 6465 6420  eal Mode.Landed
00000180: 696e 2033 322d 6269 7420 5072 6f74 6563  in 32-bit Protec
00000190: 7465 6420 4d6f 6465 004c 6f61 6469 6e67  ted Mode.Loading
000001a0: 206b 6572 6e65 6c20 696e 746f 206d 656d   kernel into mem
000001b0: 6f72 7900 0000 0000 0000 0000 0000 0000  ory.............
000001c0: 0000 0000 0000 0000 0000 0000 0000 0000  ................
000001d0: 0000 0000 0000 0000 0000 0000 0000 0000  ................
000001e0: 0000 0000 0000 0000 0000 0000 0000 0000  ................
000001f0: 0000 0000 0000 0000 0000 0000 0000 55aa  ..............U.
00000200: 5589 e550 b800 800b 0089 45fc 8b45 fcc6  U..P......E..E..
00000210: 0058 83c4 045d c300                      .X...]..
One way to debug in real-time is through GDB and Qemu, but for GDB to be able to see the function names and make debugging easier, we will have to generate the symbol file:
We start Qemu so that it waits for commands from a remote debugging connection:
We start GDB:
We set a breakpoint right at the beginning of the bootloader:
continue
We can see the start and end of the bootloader in RAM, it should match the output of xxd:
0x7c00: 0x88 0x16 0x5c 0x7d 0xbd 0x00 0x90 0x89
0x7c08: 0xec 0xbb 0x5d 0x7d 0xe8 0x0b 0x00 0xe8
0x7df0: 0x00 0x00 0x00 0x00 0x00 0x00 0x00 0x00
0x7df8: 0x00 0x00 0x00 0x00 0x00 0x00 0x55 0xaa
We set a breakpoint at the memory position where the bootloader will write the OS:
continue
We check that the values are correct, they should match those of the xxd output:
0x1000: 0x55 0x89 0xe5 0x50 0xb8 0x00 0x80 0x0b
0x1008: 0x00 0x89 0x45 0xfc 0x8b 0x45 0xfc 0xc6
0x1010: 0x00 0x58 0x83 0xc4 0x04 0x5d 0xc3 0x00
0x1018: 0x00 0x00 0x00 0x00 0x00 0x00 0x00 0x00
We step through the ASM instructions using the “si” command, we should see the execution of the entire process including the execution of our kernel.