RattleGram
is a software for Android/iOS that, using the
Ribbit
protocol, converts text into audio tones which are then modulated and transmitted over radio.
The technical details of this system are:
- Raw transfer rate: 2800 bps
OFDMmodulation, used in WiFi, 4G, and 5G- Bandwidth: 256 streams of 6.25 Hz → BW: 1600 Hz
It is worth noting that these messages are not encrypted in any way. If we want encryption, perhaps the best option is to reflash the handheld with NUNU .
If you are new to the world of amateur radio, I recommend this previous article , where the fundamentals are explained.
This article consists of the following sections:
- Considerations
- Configuration Parameters
- Quansheng-K6 Configuration
- APP Mode
- APP/Radio Mode
- VOX Mode (Phone-USB → K1-Radio)
- Repeater Mode
- Ultrasonic Mode
- Fancy Header
- Other Implementations
Considerations:
First of all, to clarify:
- Text messages are encoded into an audio signal.
- Audio signals are converted into digital data through sampling.
- Depending on the sampling rate, the digital signal will have more or fewer sampled points, which implies greater resistance to data loss/damage, since only a minimum number of samples is needed to reconstruct the signal.
Configuration Parameters:
The configuration parameters are:
Encoder Settings:
| Parameter | Description |
|---|---|
| Sample Rate | How many samples per second the audio signal sent from the phone (through the speaker or USB port) to the radio will have. It must match the sample rate used in the Decoder. If there is interference in the environment, a higher sampling rate may help because even if some bits arrive corrupted, there will be more nearby samples, allowing the audio signal to be reconstructed. |
| Channel Select | If the signal is sent by cable (not speaker), we can select which audio channel to send. Sometimes it depends on the type of cable used to connect to the radio. When in doubt, use Analytical, which sends the exact same signal on both channels. Whichever channel reaches the radio will be received, and if the radio connector is stereo, we gain greater robustness since the same data is sent twice. If using the speaker, leave it as Analytical as well. |
| Leading Noise | Adds white noise at the beginning of the transmitted sound (before the actual message). This is used to “wake up”
VOX (Phone-USB → K1-Radio)
mode if we are using it. |
| Fancy Header | Makes your callsign appear “drawn” in the spectrum analyzer. Useful for testing. |
| Carrier Frequency | Center frequency of the sound. |
| Default ~1500 Hz (most radios: 700–2300 Hz). | |
Very high (>18000). Should only be used with:Danger Zone → Ultrasonic: ON.Encoder Settings → Sample Rate: 48000. |
Decoder Settings:
| Parameter | Description |
|---|---|
| Sample Rate | How many times per second the received audio signal is sampled on the phone (through the microphone or USB port). It must match the sample rate used in the Encoder. |
| Channel Select | If the signal is received by cable (not speaker), we can select which audio channel to decode. Sometimes it depends on the type of cable used to connect to the radio. When in doubt, use Analytical, which reads both channels. Whichever channel reaches the radio will be received, and if the radio connector is stereo, we gain greater robustness since the same data is read twice. If using the speaker, leave it as Analytical as well. |
| Audio Source | Audio input source selection for reception. |
Microphone: Android usually applies automatic echo cancellation and noise reduction. For the human ear this is good, but for Rattlegram these filters may “erase” part of the digital data, causing reception errors. |
|
| Video Camera: Uses the microphone configured for video recording. Useful if you point the phone toward the sound source (an external radio) and want to use a more directional microphone that ignores side noise. | |
Voice Recognition: Configures the microphone to be more sensitive to human speech frequencies. It tries to minimize aggressive voice processing but sometimes applies high and low frequency filters that can distort the Rattlegram signal. |
|
Unprocessed: The best option for Rattlegram. It asks Android to deliver completely raw audio, without noise cancellation, without automatic gain control (AGC), and without echo filters. Since there are no filters “cleaning” the sound, the digital waveform reaches the app intact, allowing optimal decoding. |
|
Voice Communication: Optimizes audio for VoIP applications (like WhatsApp or Skype calls). The worst option for Rattlegram. It applies very aggressive echo cancellation and constant volume adjustments that destroy COFDM modulation. Should only be used if no other option works. |
|
| Spectrum Analyzer | Displays a real-time graph of incoming audio. It also allows visualization of
Encoder Settings → Fancy Header
. |
Parrot Mode:
Repeater mode allows us to repeat the received signal, increasing range. If we use more than one repeater, loops will form. To prevent this, we must configure Debounce, but this will mean we can only send identical messages every X amount of time (the configured Debounce).
| Parameter | Description |
|---|---|
| Enable/Disable | ON/OFF |
| Delay | Delay before retransmitting a received message. |
| Debounce | Minimum time between retransmissions of identical messages. |
Night Mode:
Dark theme to avoid glare at night.
Danger Zone:
| Parameter | Description |
|---|---|
| Delete Messages | Deletes message history. |
| Enable Ultrasonic | Allows Encoder Settings → Carrier Frequency > 18 kHz (almost inaudible). Requires Encoder Settings → Sample Rate 48000 Hz. |
| Force Quit | Completely shuts down the application to ensure it is not listening or transmitting anything in the background. |
Call Sign:
Callsign to identify yourself in a conversation.
Privacy Policy
Privacy policy regarding microphone access and what is done with that audio.
About Rattlegram
Information about the software version, libraries used, resources employed, and disclaimer.
Quansheng-K6 Configuration:
On my Quansheng UV-K6 I must configure:
Normal use:
Encoder/Decoder Settings → Sample Rate: XXEncoder/Decoder Settings → Channel Select: First/Analytical (since it is mono)Encoder → Leading Noise: If usingVOX (Phone-USB → K1-Radio)1–2s-
Encoder → Fancy Header: Optional Encoder/Decoder Settings → Carrier Frequency: 1500 Hz-
Parrot Mode: OFF Danger Zone → Enable Ultrasonic: OFF
Silent testing:
Encoder/Decoder Settings → Sample Rate: 48000 HzEncoder/Decoder Settings → Channel Select: First/Analytical (since it is mono)Encoder → Leading Noise: If usingVOX (Phone-USB → K1-Radio)1–2s-
Encoder → Fancy Header: Optional Encoder/Decoder Settings → Carrier Frequency: ≥ 18000 Hz-
Parrot Mode: OFF Danger Zone → Enable Ultrasonic: ON
APP Mode:
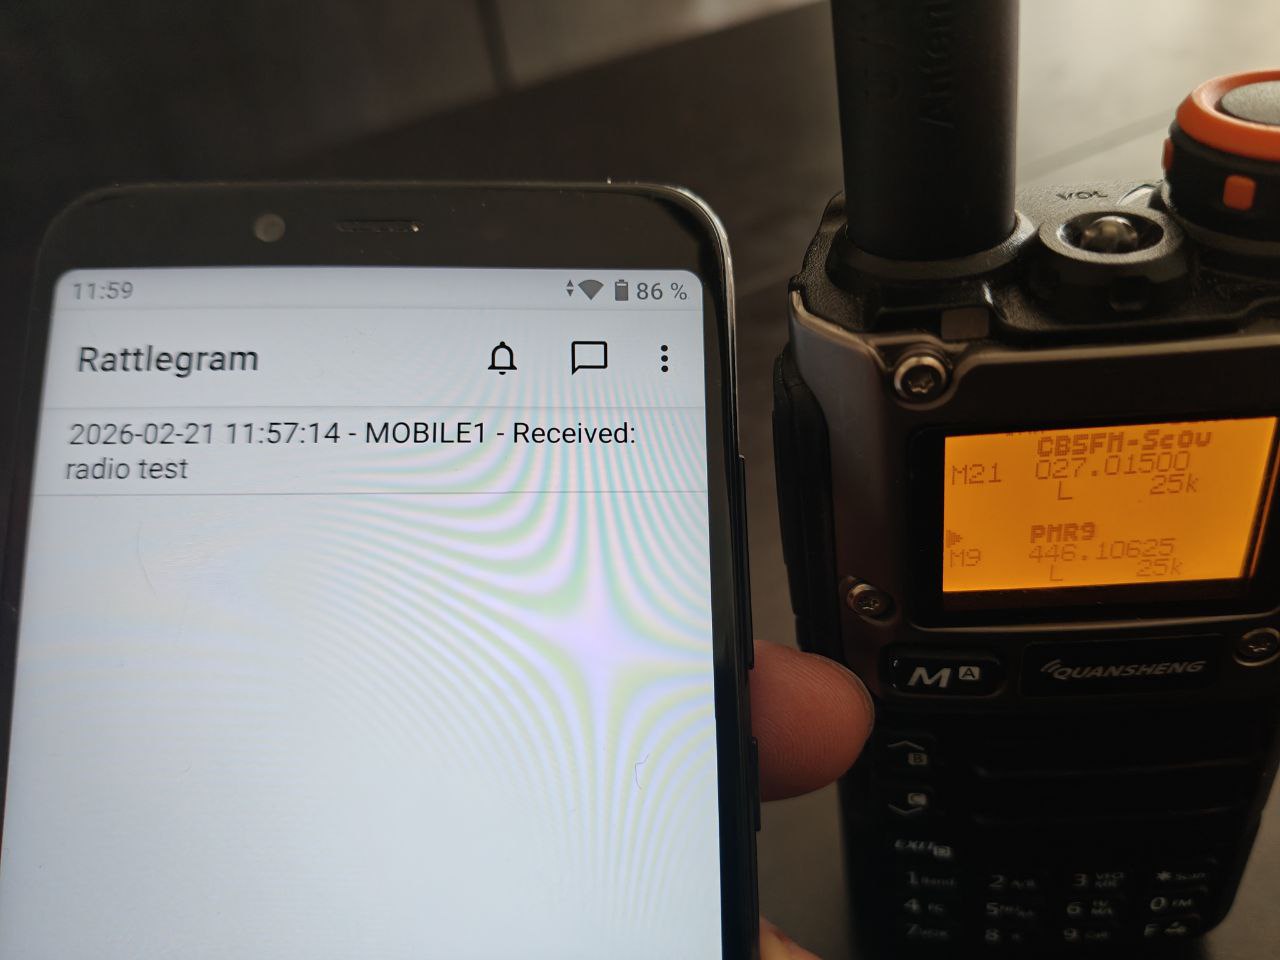
The application can work independently without any radio, but with very limited range (as far as sound can travel). The steps are:
- Text is encoded into an acoustic signal.
- It is played through the speaker.
- The receiving phone’s microphone captures it.
- It is decoded back into text.
We can see how it works in the following video:
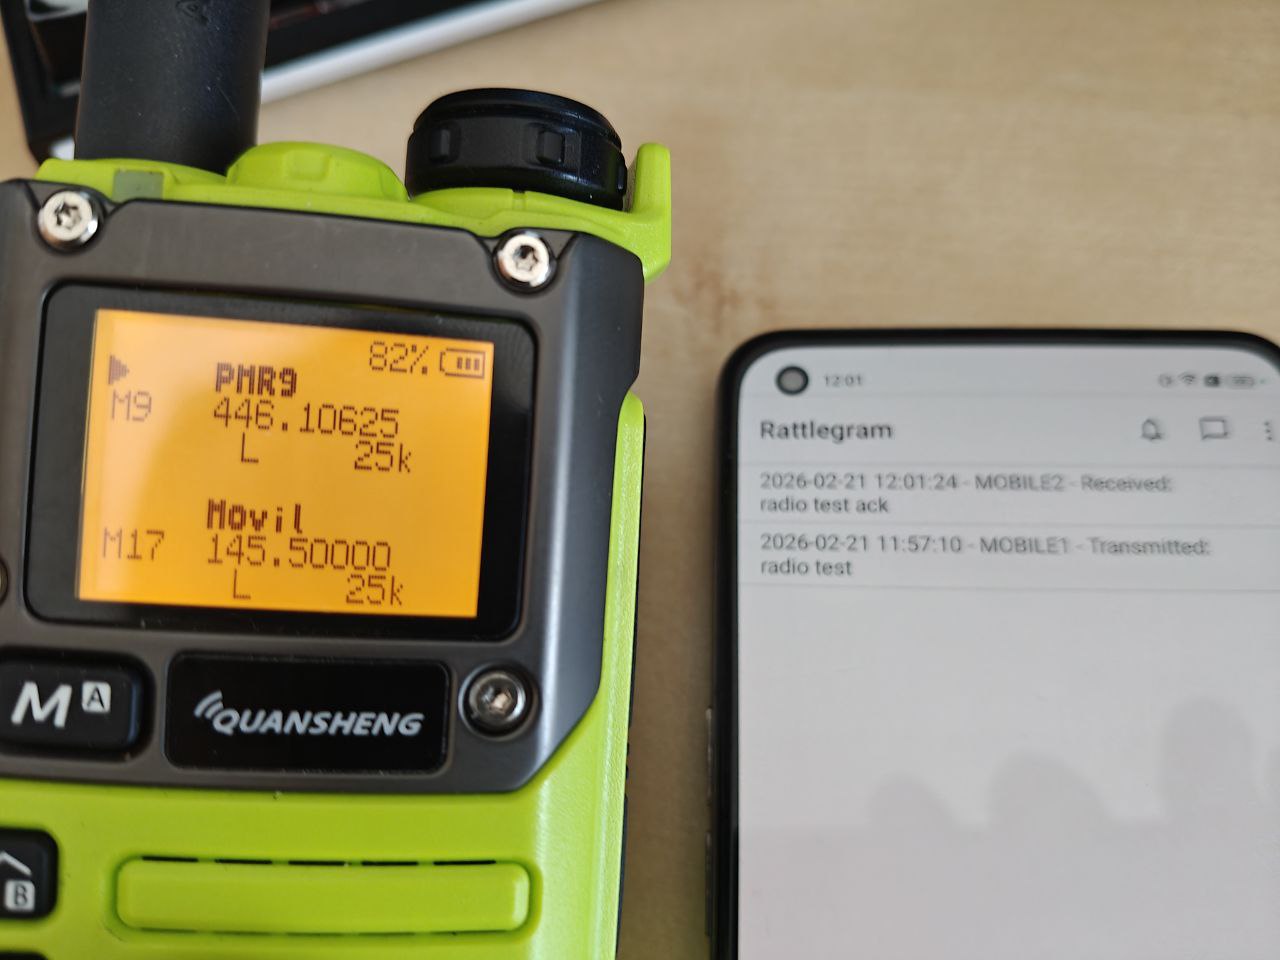
APP/Radio Mode:
Now we combine a radio with each phone to increase range. The process is very similar:
- Text is encoded into an acoustic signal.
- It is played through the speaker.
- The radio’s microphone captures it.
- It transmits it over radio.
- The receiving radio receives the radio signal.
- It plays it through the speaker.
- The receiving phone’s microphone captures it.
- It is decoded back into text.
We can see how it works in the following video:
| TX | RX |
|---|---|
|
|
|
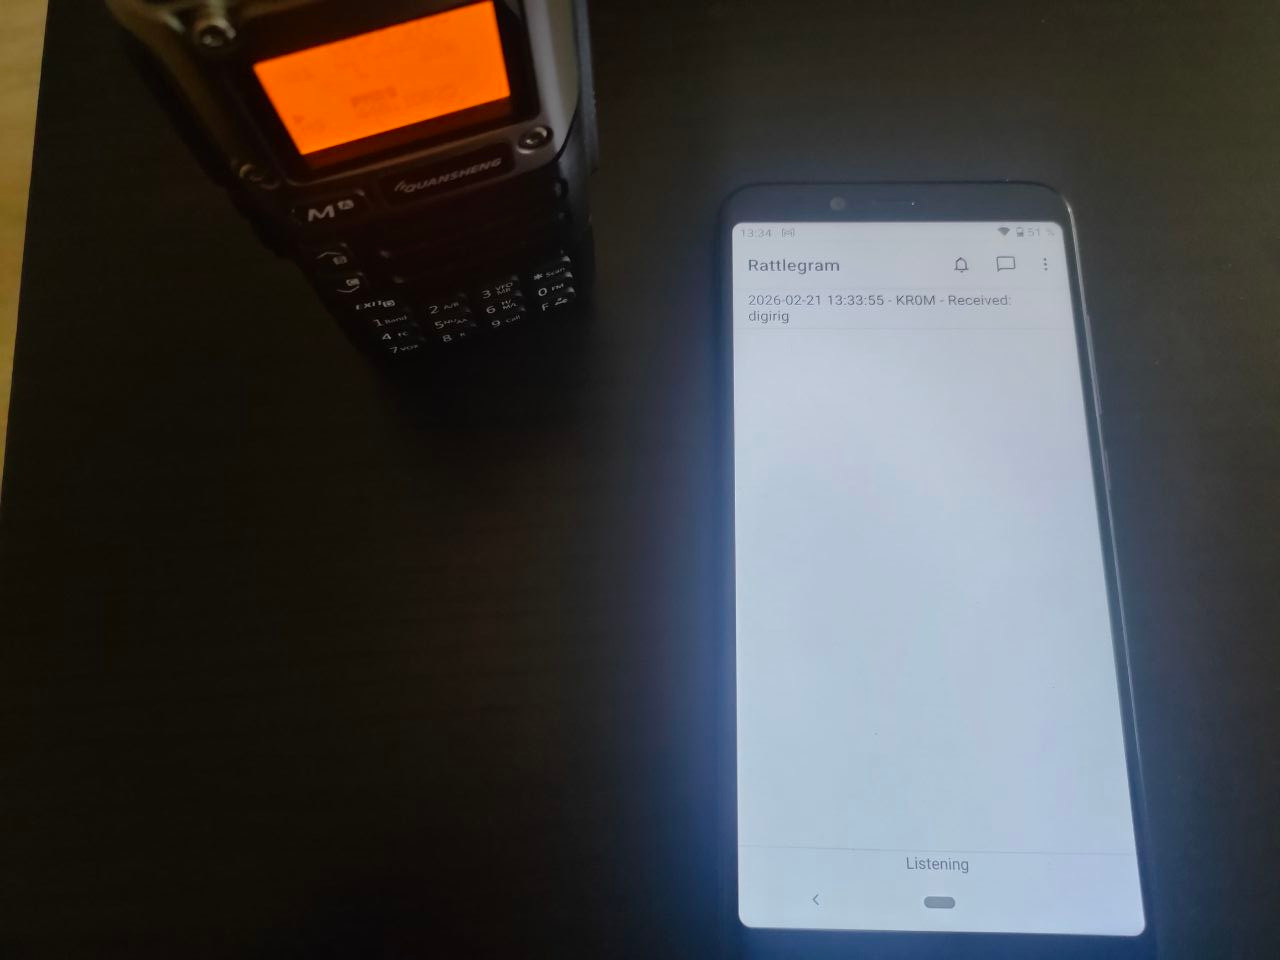
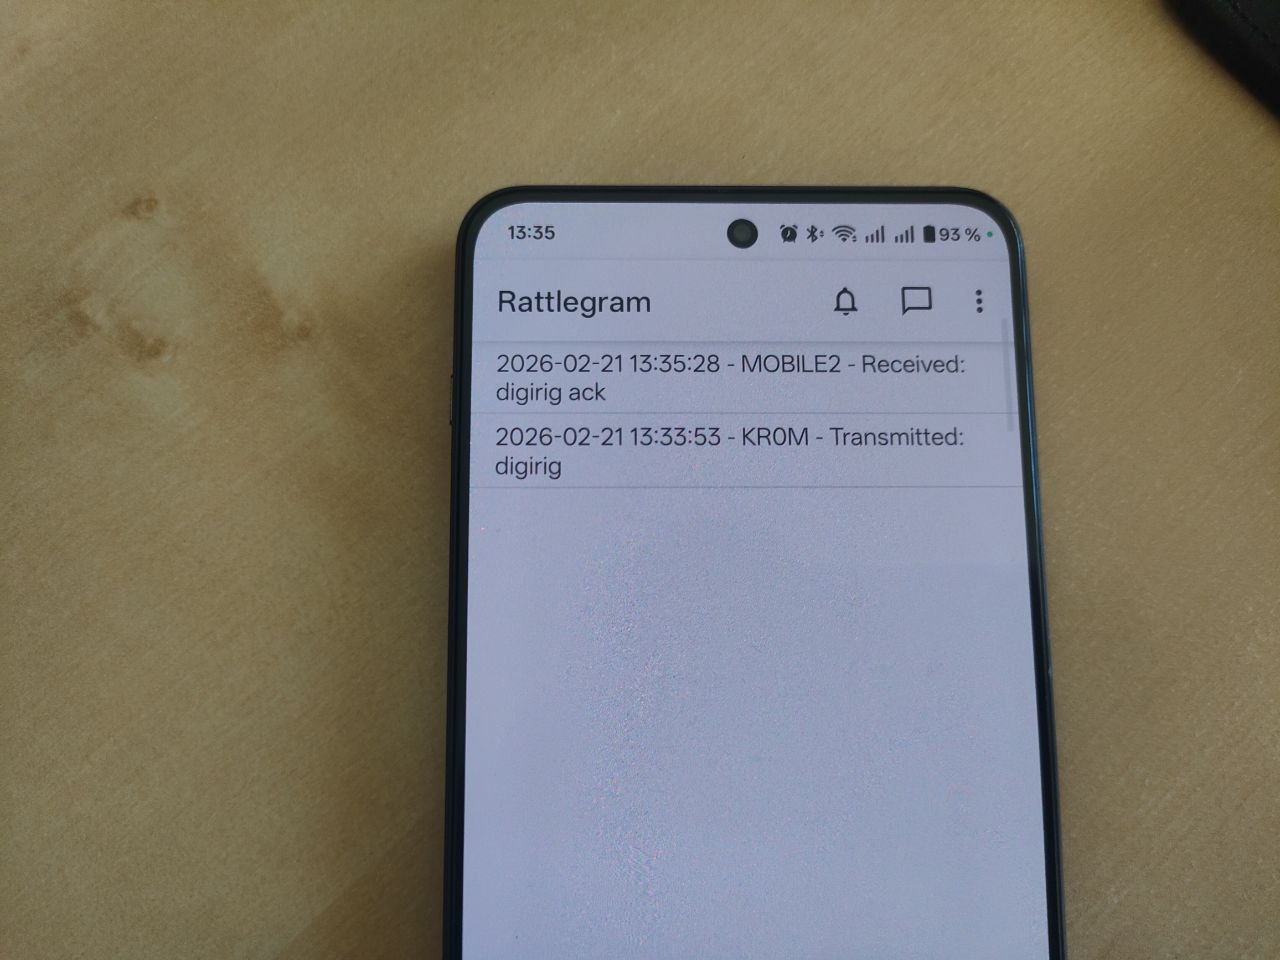
VOX Mode (Phone-USB → K1-Radio):
To test VOX mode, enable:
- On the phone:
Settings → Accessibility and convenience → OTG Connection. - Ensure the phone volume level is high enough.
- On the radio:
VOXSen: 1. - Rattlegram
Encoder → Leading Noise: 1–2s. - Rattlegram
Decoder → Audio Source: Microphone.
In my tests, I tried three different cables, obtaining satisfactory results with only one. The cables that did not work were:
| APRS-Audio | APRS-K1 |
|---|---|
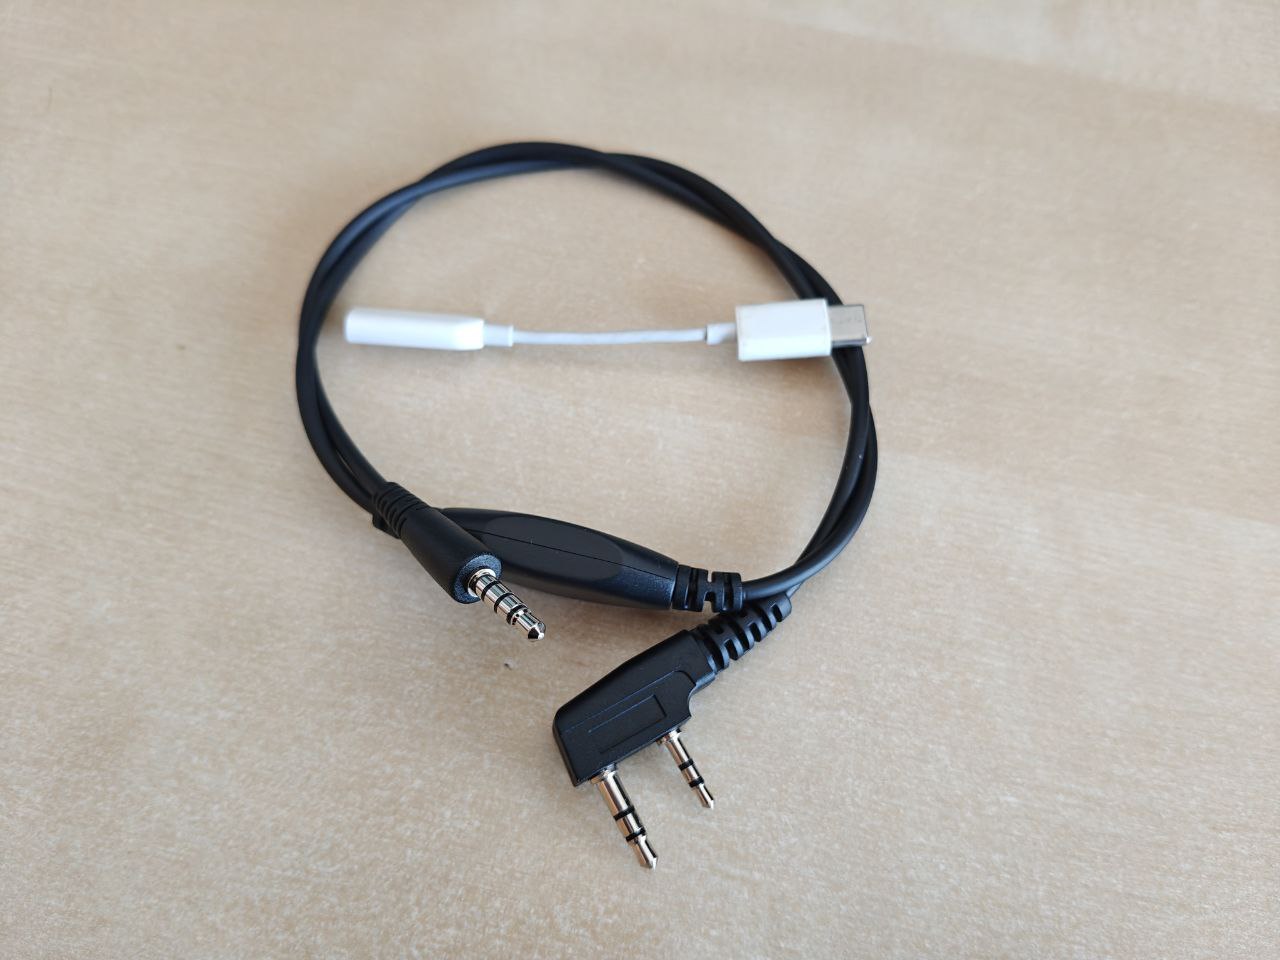
|
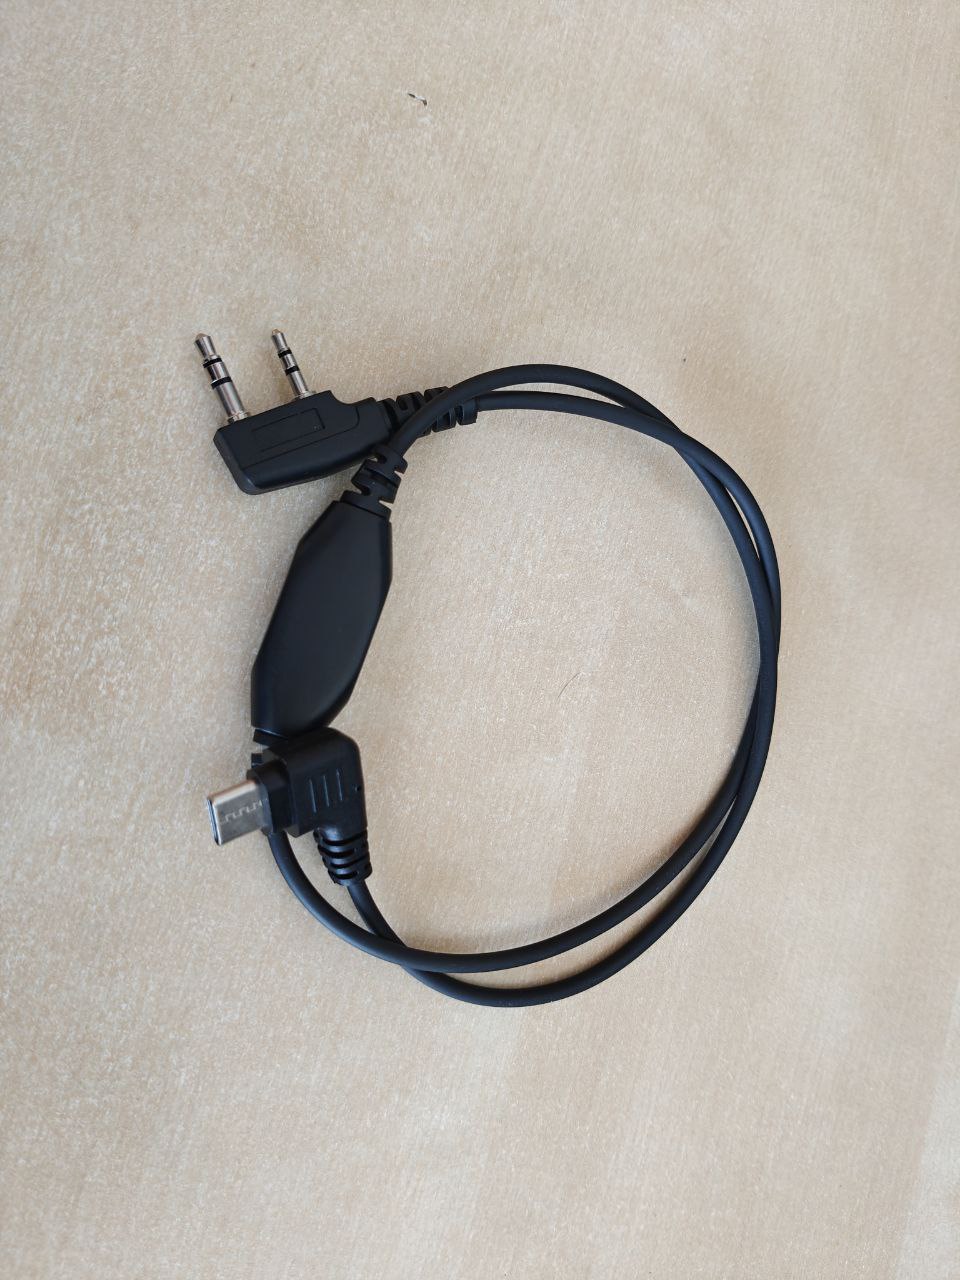
|
With APRS-Audio I could neither receive nor send. With APRS-K1 I could send but not receive.
With a DigiRig Mobile, everything worked perfectly.
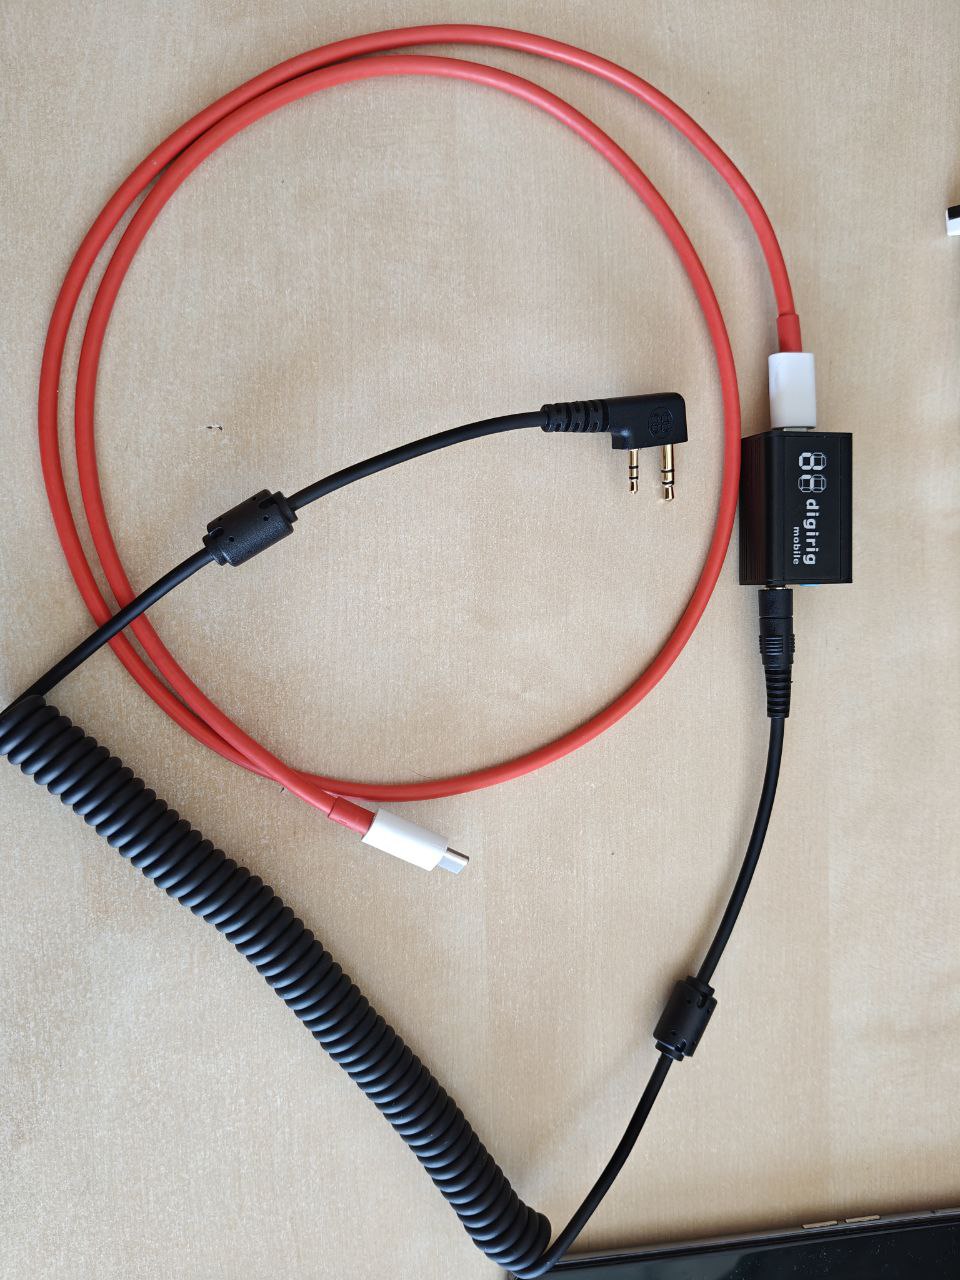
|
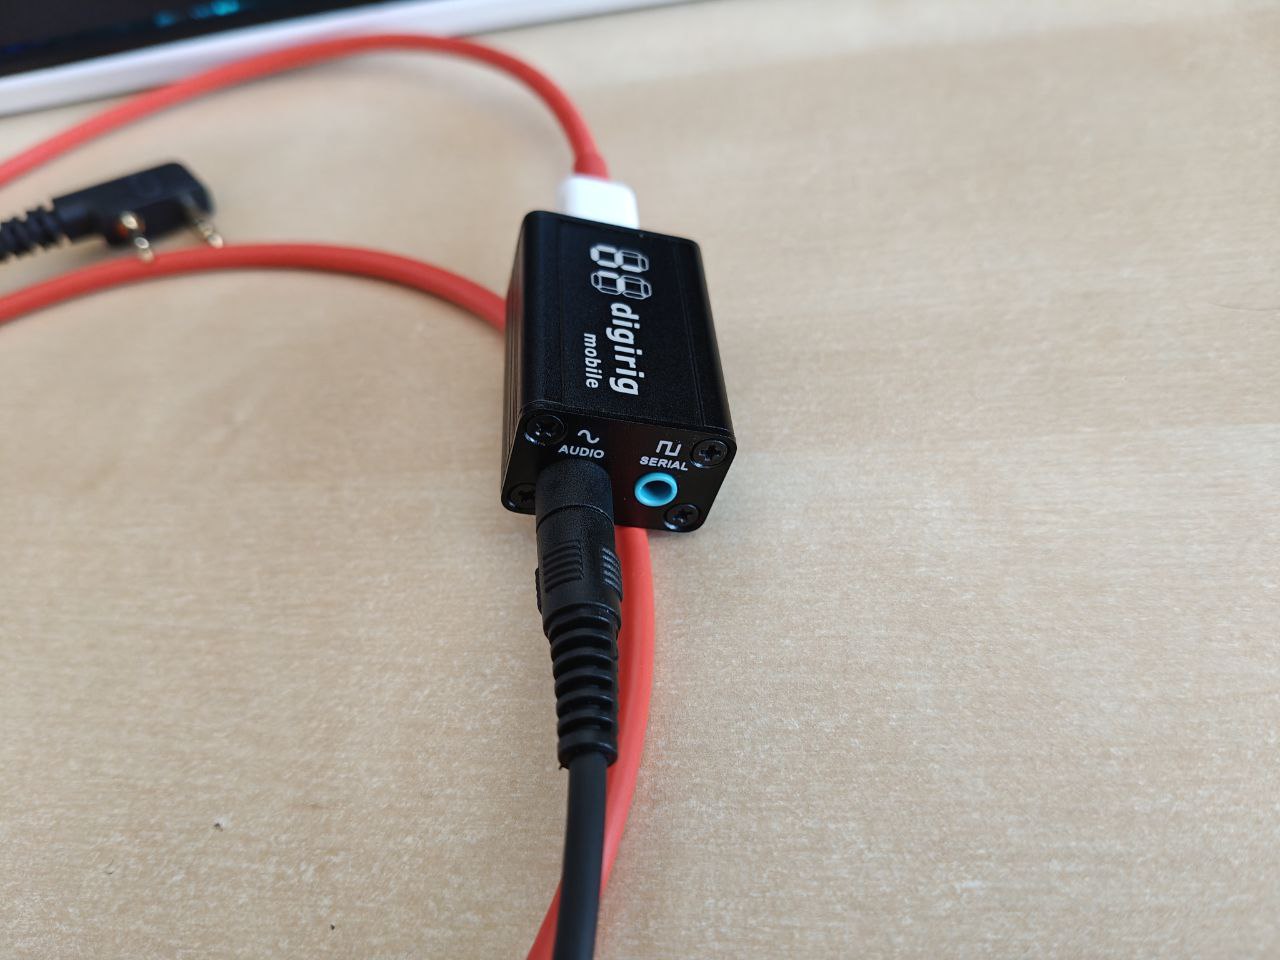
|
We can see how it works in the following video:
| TX | RX |
|---|---|
|
|
|
Repeater mode:
As we already explained, repeater mode allows us to repeat the received signal and thus increase the range. The only drawback is that if we use more than one repeater, loops will form. To prevent this, we must configure Debounce, but this will mean we can only send identical messages every X amount of time (the configured Debounce).
First, let’s see how it works with a single repeater. The phone–walkie on the right sends the message, the phone on the left—configured in Parrot mode—receives it and, after the configured Delay seconds, repeats it. The original transmitting device receives it again, as well as anyone within the repeater’s coverage area.
When we see messages with the same text and our own CallSign, we must deduce that our message has been retransmitted by a repeater and that we are hearing our own message repeated.
Now let’s see what happens when a loop is formed with two repeaters without Debounce configured. In these tests I use the speakers because I don’t have two DigiRigs, which would be the correct way to transmit the radio signal when operating in repeater mode:
Let’s also see how to avoid loops using Debounce. The message reaches the walkie on the left, which repeats it. It then reaches the one on the right, which also repeats it because it is configured as a repeater. However, when the left one hears the identical message again before 15 seconds (Debounce: Quarter of a min), it does not repeat it but instead ignores it (bottom section of Rattlegram), successfully containing the loop:
Loops between repeaters are now contained, but with the restriction that we can only send identical messages every Debounce seconds.
In the following video, we can see this restriction in action:
- The phone on the right sends the message
aa. - The phone on the left receives it and forwards it.
- The phone on the right receives it and forwards it as well since it is configured as a repeater.
- But the phone on the left detects that in the last 2 minutes (
Debounce) it has already seen the same message, so it ignores it (bottom section ofRattlegram), preventing the loop.
If we send a second message bb, the process will repeat. However, if we try to send an identical message within the configured Debounce time, we will see that it is directly ignored and not retransmitted. If we wait for the configured 2-minute Debounce, we will be able to send the message again without problems.
In normal conversations, Debounce is usually not a problem because identical messages are rarely repeated. We can also leave the window at a low value such as 15 seconds. If it still causes issues, a small trick is to add a trailing space at the end of the message so they are no longer identical.
Ultrasonic mode:
Ultrasonic mode allows us to encode messages at a frequency inaudible to the human ear. This can be useful if we do not have a DigiRig and are testing late at night or in an environment where we do not want to be detected by the noise produced. However, we must keep in mind that prolonged exposure to ultrasound may damage our hearing.
First, configure Danger Zone -> Enable Ultrasonic, Encoder Settings -> Sample rate 48000 Hz, Decoder Settings -> Sample rate 48000 Hz, and Encoder Settings -> Carrier Frequency >= 18000. Operation is exactly the same, except we will not hear the annoying sound:
Fancy header:
As explained in the
Configuration Parameters
section, the Fancy Header option makes the callsign appear “drawn” in the spectrum analyzer.
We only need to configure on the receiver Decoder Settings -> Spectrum Analyzer, and on the transmitter CallSign, Encoder Settings -> Fancy Header -> Enable, then press the bell icon or send a message.
This feature seems to be something specific to Rattlegram, since if we transmit over radio using a DigiRig, the CallSign cannot be visualized on the SDR. Moreover, even when viewing it directly in Rattlegram after passing through radio, the CallSign appears less clear:
Other implementations:
There are other implementations of the
Ribbit
protocol, such as
this one
.
However, the tests have been disappointing to say the least. It is unclear whether this is because the project undergoes continuous changes that break the code, because phones apply audio filters, or because the Linux audio/browser system is poor.
Even Badkangaroo to Badkangaroo tests result in decoding errors and other problems:
Message received but could not be decoded
Failed to encode message: Cannot read properties of null (reading 'state')
Failed to access microphone: NotFoundError: Requested device not found
Failed to access microphone: NotSupportedError: AudioContext.createMediaStreamSource: Connecting AudioNodes from AudioContexts with different sample-rate is currently not supported.
Of course, communication between Rattlegram and Badkangaroo was completely impossible.
Message transmission was tested both via sound and using radio, and with several phones—one of which was able to send messages but not receive them.
In short, a complete disaster.