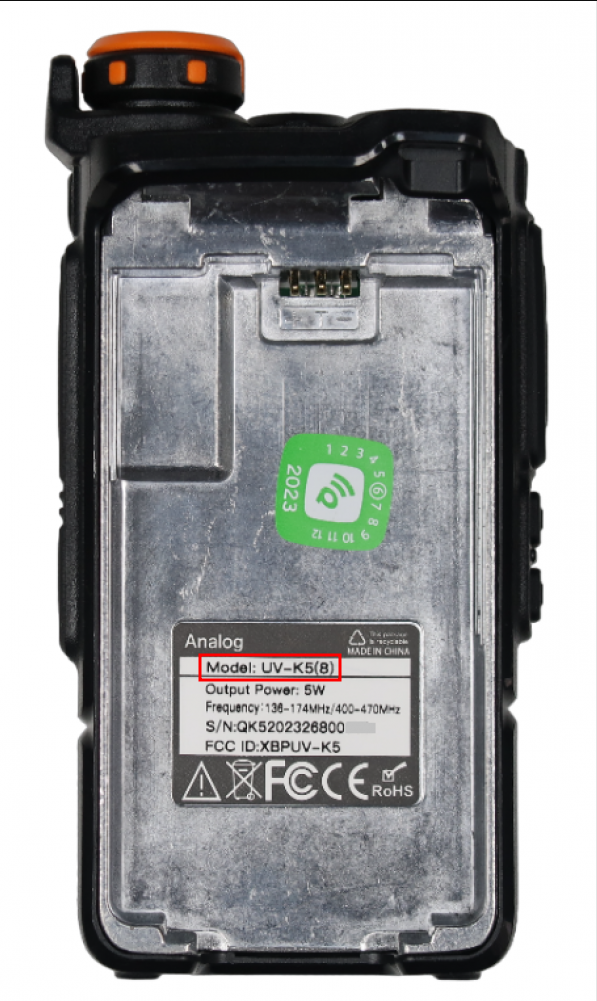
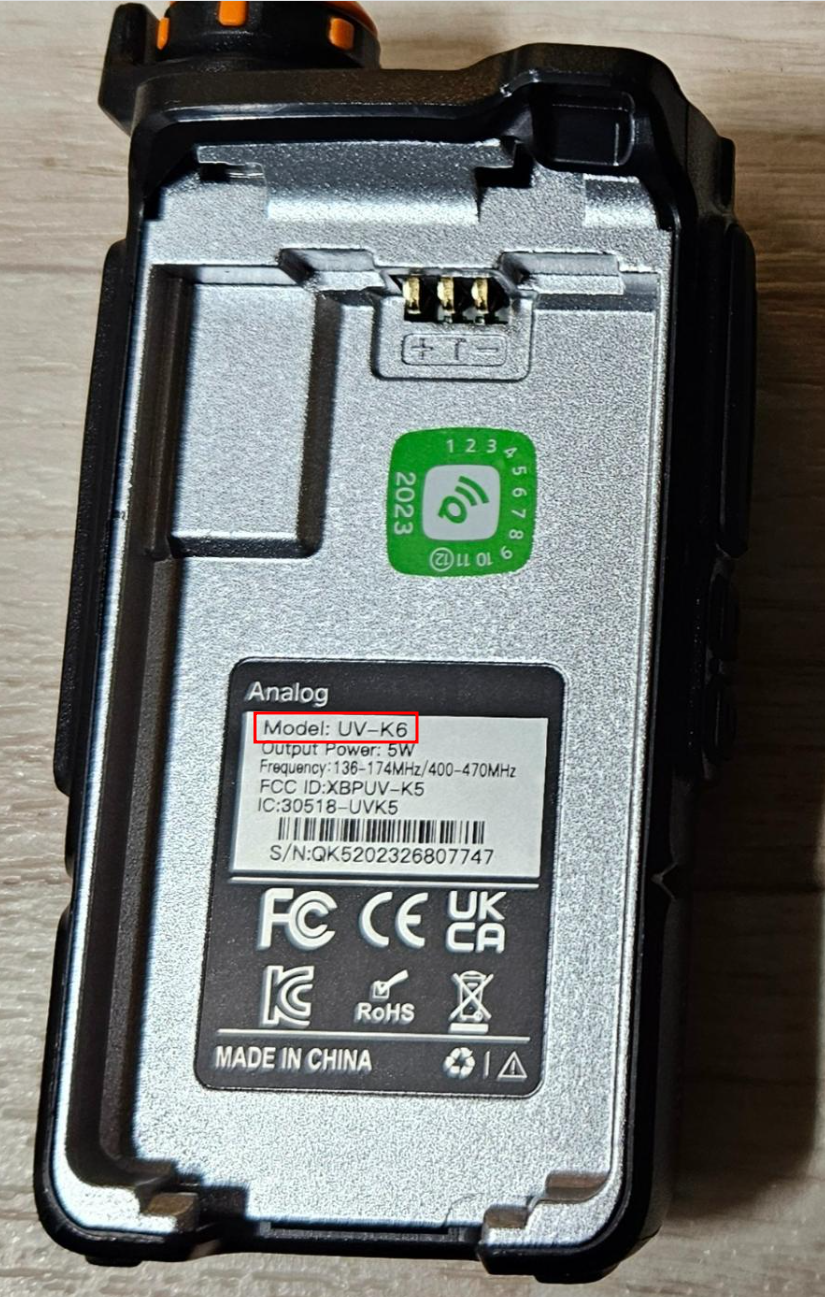
In this article, we will cover the basic knowledge that every radio amateur should master to make basic use of radio systems. In my case, I will focus on the use of the Quansheng uv-K5(8)/uv-K6 device, it can be found for around 20€ on AliExpress . Don’t be fooled by the name; although it may be referred to in two different ways, uv-K5(8)/uv-K6, both models are exactly the same in terms of electronics and aesthetics. In fact, there is no model called K6 on the official website.
It is worth noting that this device is illegal even with a radio amateur license, as it operates beyond the frequencies designated for amateur radio use. Additionally, I must mention that I am not an expert in this field, so there may be inaccuracies or errors in the text presented here. In such cases, I would appreciate any suggestions for improvement through the Telegram group .
The article is composed of the following sections:
- PMR446
- PMR7-7
- Quansheng UV-K5(8)/UV-K6
- Operation modes
- Light indicator
- Tones and codes
- Modulation kinds
- Repeaters
- Reverse mode
- Functions
- Buttons and functions
- Display indicators
- DTMF calls
- Scrambling
- Air copy
- Frequency scanner
- Remote kill
- Frequency unlock
- Software prerequisites
- Backup configuration/calibration files
- Updater
- CPS
- CHIRP
- Tips
- Resources
PMR446
The
PMR446
(Personal Mobile Radio, 446 MHz) walkie-talkies is a frequency for personal use without the need for a license.
These walkies cover the frequencies:
Analogic: 446.00625 MHz  - 446,19375 MHz  / Step: 12.5 kHz
Digital:  446.003125 MHz - 446.196875 MHz / Step: 25 kHz
They allow for code configuration and operate with a Narrow bandwidth.
PMR446 walkie-talkies must comply with the following requirements:
Antenna:       Fixed
Maximum power: 0.5w
Approved by:   European Economic Community(CE), NO China Export(CE).
PMR7-7:
Emergency or consultation channel, can be used if you are lost or to check if there is a shelter or village nearby.
Very limited, it would have to be by chance that someone passes by or that the walkie-talkie signal reaches a shelter with the radio tuned to this frequency. Once emergency communication has been established, the parties involved should switch to another channel and free up 7-7.
Frequency: 446.08125 Mhz
Subtone:   85.4 MHz
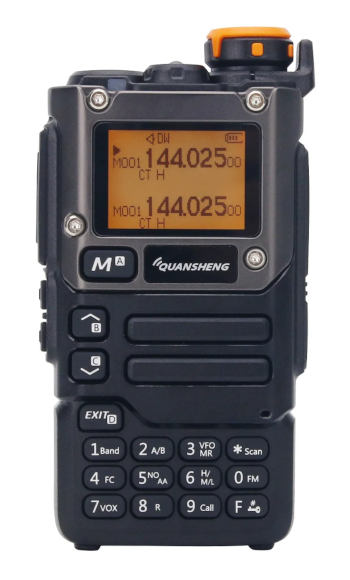
Quansheng UV-K5(8)/UV-K6:
This walkie-talkie has been designed to transmit on typical amateur radio frequencies:
| Image | Diagram | Technical specifications |
|---|---|---|
|
|
Power: 1/3/5W FCC(FM-VHF): 144 MHz ∽ 148 MHz FCC(FM-UHF): 420 MHz ∽ 450 MHz CE(FM-VHF): 144 MHz ∽ 146 MHz CE(FM-UHF): 430 MHz ∽ 440 MHz FM-VHF: 136 MHz ∽ 174 MHz FM-UHF: 400 MHz ∽ 470 MHz |
NOTE: In the table above, reference is made to FCC: Federal Communications Commission - USA, CE: European Community - CE, and the frequency range where nothing is indicated, which represents the rest of the world.
But this walkie-talkie is capable of listening on many more bands, notably the AM band used by commercial aircrafts, so we will be able to listen to their conversations even though the reception quality may be very poor.
FM:            F1 50∽76 MHz         (RX only)
FM:            F2 108∽135.9975 MHz  (RX only)
FM:            F3 136∽173.9975 MHz  (TX and RX both)
FM:            F4 174∽349.9975 MHz  (RX only)
FM:            F5 350∽399.9975 MHz  (RX only)
FM:            F6 400∽469.9975 MHz  (TX and RX both)
FM:            F7 470∽599.9975 MHz  (RX only)
WFM(Radio FM):    76∽108       MHz  (RX only)
AM:            F2 108∽135.9975 MHz  (RX only)
As we can see, the walkie-talkie can only operate in AM mode in the F2 108∽135.9975 MHz band; the rest are FM only.
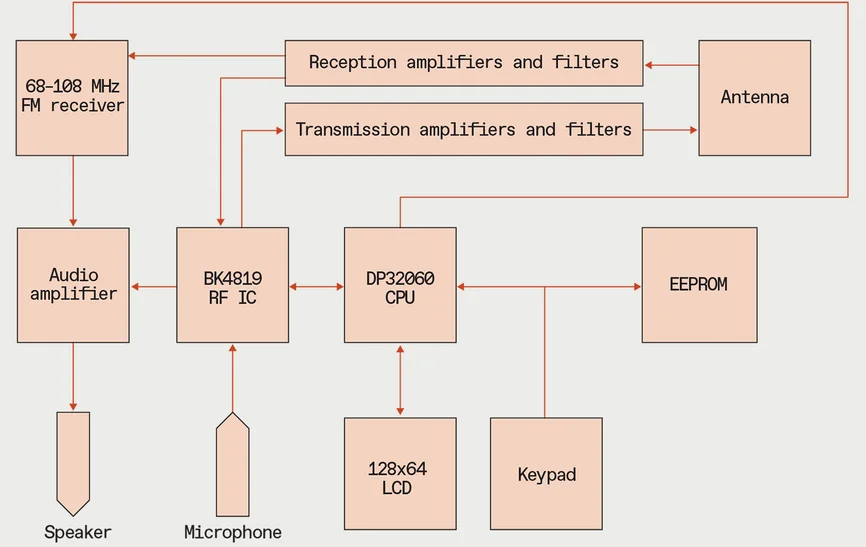
The walkie-talkie features the 32 bits DP32G030 (2) ARM processor working at 48MHz and 8 KB of RAM, an open radio FM chip and the radio chip, BK4819 , which can operate in the FM frequency range of 18 MHz ~ 660 MHz, 840 MHz ~ 1300 MHz. By loading modified firmware, we can access these bands. However, it’s crucial to note that the electronics were not designed to transmit on all of these frequencies, only those allocated for amateur radio. Therefore, transmitting outside of these frequencies could eventually damage the walkie-talkie, rendering it unusable. Additionally, the power output in these extra bands will be very low, making them useful only for listening purposes.
NOTE: For more hardware details we can take a look at walkie component list. and here some datasheets.
We can see the schema here:
It seems to be two K5(8)-K6 versions, but both models are exactly the same in terms of electronics and aesthetics.
| K5(8) | K6 |
|---|---|
|
 |
An interesting aspect is that this walkie-talkie allows battery charging from the charging base and through the USB-C connector, although its use is only recommended in emergencies. Furthermore, this model supports receiving NOAA alerts, but unfortunately, this service is only available in the USA.
Operation modes:
The non- PMR446 walkie-talkies allow operation in two different modes: channel or VFO (Variable Frequency Oscillator).
- Channel: When we press the arrow keys, they will navigate between the channels previously memorized. If we initiate a scan, it will be performed on the channels memorized in one of the available channel lists.
- VFO: When we press the arrow keys, they will adjust the configured “step” on the current frequency. If we initiate a scan, it will be performed on the current band.
An important aspect when using walkie-talkies is that communication is half-duplex, not full-duplex, so we must speak “in turns.”
Light indicator:
- Green: Receiving signal.
- Red: Transmitting signal.
- Blue: Battery charging via USB.
- Flashing Blue: Battery nearly charged via USB.
NOTE: The LED may illuminate in green, but we may not hear any audio. This can occur if we have configured an input code/subtone , causing the green light to indicate incoming signal, but we won’t hear anything because the code/subtone is incorrect. Another possibility is that this happens because we have DTMF decoding activated.
Tones and codes:
Tones and codes are a way of filtering incoming communications. It’s crucial to understand that they are only input filters for the walkie-talkie; they are NOT encryption systems and do not provide any confidentiality to the communication. With that said, they are useful in channels with high activity where users may interfere with each other.
If a pair of walkie-talkies configure a tone or code for reception, these two devices will only hear audio between themselves. Other walkie-talkies will continue to hear the audio since they do not have an input filter, thus receiving any signal from the channel. However, those who configured the tone/code will only hear each other.
- R-DCS: Digital reception code.
- R-CTCS: Same as the digital code but using analog subtones.
- T-DCS: Digital transmission code.
- T-CTCS: Same as the digital code but using analog subtones.
The codes can be different for TX (transmission) and RX (reception), so the transmitting walkie-talkie must use the code configured for reception on the other device.
Tones/codes prevent both undesired input communications and certain interferences that can cause noise on our frequency. The source of noise will not be able to generate the code or tone, so we will stop hearing it.
Digital codes are denoted with the suffix N and I, where N indicates the code is positive and I indicates it is negative. Practically, whether it’s positive or negative doesn’t matter. The management software CPS refers to negative codes as DCS-Reverse.
Modulation kinds:
| Type | Description |
|---|---|
| FM | Frequency Modulation: Works by varying the frequency of the transmitted signal in relation to the information being sent. |
| AM | Amplitude Modulation: Works by varying the amplitude of the transmitted signal in relation to the information being sent. |
There are other modulation techniques yet most modern analog models use FM due to its greater resistance to interference and noise. Another aspect we should be aware of is that frequencies can be expressed in cycles per second (Hz: Hertz) or wavelength (m: meters).
Repeaters:
Repeaters are an effective way to enable communication between systems when direct communication is not possible due to terrain or distance limitations. Essentially, they consist of a radio system with two antennas: one that listens on a frequency and another that retransmits what it receives, but on a different frequency.
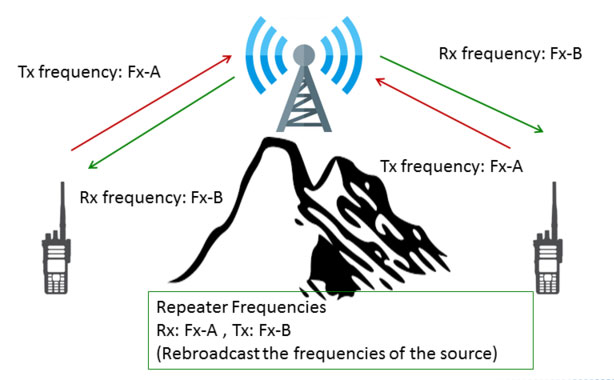
Communication data is always provided from the perspective of the repeater.
Input frequency: The frequency at which the repeater listens. Fx-A in the image above.
Output frequency: The frequency at which the repeater re-transmits. Fx-B in the image above.
Offset: The difference between the input frequency/output frequency.
The offset is very useful because it allows walkie-talkies to listen to the repeater’s transmit frequency, and when we press the PTT (Push-To-Talk) button, it automatically applies the indicated offset, changing to the frequency +/- offset automatically, thereby transmitting on the repeater’s receive frequency.
For example, a repeater could have the following configuration parameters:
Input frequency: 145.000 Khz
Output frequency: 145.600 Khz
Offset: -600 Khz
The walkie-talkie should be configured as follows:
Frequency: 145.600 Khz
SFT-D: -
OFFSET: 000.600 Khz
What is happening is that when:
- We transmit a signal: The offset is automatically applied, shifting from 145.600 kHz -> 145.000 kHz, matching the repeater’s input frequency.
- We receive a signal: We listen on the frequency 145.600 kHz.
To access some repeaters, it is necessary to send them a 1750Hz tone, which we can do by pressing and holding SideKey1.
If we want to see which repeaters are near our area, we can always use applications like
this one
.
Reverse mode:
It may happen that two users are using a repeater to communicate, but one of them is not transmitting with enough power to reach the repeater, so this last one can only listen.
However, if the two walkie-talkies are close to each other, one of them could switch to reverse mode. What this does is that from that moment on, that walkie-talkie will listen on the repeater’s input frequency and transmit on its output frequency. This is usually used momentarily to agree with the partner on a frequency through which they can communicate directly without using the repeater. It should be used for the minimum necessary time because by transmitting on the repeater’s output frequency, we will overlap its signal for X kilometers around, potentially affecting other users.
To activate it, we must do it using the key combination: F+8(R).
Functions:
In the manual, you can find all the functionalities. I leave the link to both the official website and a copy on AlfaExploit .
To access the options, you need to press the M(A) button and navigate using the arrows. You can also access the options quickly if you know their ID. For example, if you know that the TDR option is 17, you can press M(A)+17.
| Option | ID-Menu | Function |
|---|---|---|
| SQL | 1 | Threshold at which audio input is detected. A value of 0 means it’s open, allowing all noise to enter. It’s important to note that a low Squelch(SQL) setting will consume more battery as it will be listening constantly, not just when there is a real signal. |
| STEP | 2 | How many kHz will advance or retreat when scanning or manually changing the frequency, useful for quickly memorizing PMR channels. We can set a step of 12.5 kHz and start memorizing them. |
| TXP | 3 | Transmitting power. If it’s high, it can affect adjacent channels: |
| LOW: 1w | ||
| MID: 3w | ||
| HIGH: 5w | ||
| R_DCS | 4 | Digital reception code: If we are on a frequency but don’t know the emission code our partner is using, we can press the F+*(Scan) key, and the walkie-talkie will start scanning DCS codes until it automatically finds the correct code. |
| R_CTCS | 5 | Analog reception sub-tone: If we are on a frequency but don’t know the emission tone our partner is using, we can press the F+*(Scan) key, and the walkie-talkie will start scanning CTCS tones until it automatically finds the correct tone. |
| T_DCS | 6 | Digital transmission code |
| T_CTCS | 7 | Analog transmission sub-tone |
| SFT-D | 8 | Applies the offset in either the positive(+) or negative(-) direction, as used in repeaters . |
| OFFSET | 9 | Offset to be applied in repeaters . |
| W/N | 10 | Bandwidth to be used: |
| Wide: Short range, better sound quality. With Wideband, it is recommended to use low power as it’s likely to affect adjacent channels. By reducing the power, we can at least limit the range of the interference. | ||
| Narrow( PMR446 ): Greater range, worse sound quality. If our goal is range, we should also increase the power. In Narrowband, it’s less likely to affect adjacent channels, and it also consumes less battery than in Wideband mode. | ||
| SCR | 11 | Encrypted Communication: It allows for 1-10 types of scrambling. |
| BCL | 12 | Busy Channel Lock: If the channel is busy, it does not allow transmission. |
| MEM-CH | 13 | Save channel. |
| SAVE | 14 | Active/inactive time ratio allows for battery saving, but if it’s too aggressive, there may be signals that come in while the walkie-talkie is inactive, causing it to miss the first few seconds of an incoming communication: |
| Off: It is always checking for incoming signals. | ||
| 1:1: Half of the time, it checks for incoming signals. | ||
| 1:2: One out of every three time slots is checked for incoming signals. | ||
| 1:3: One out of every four time slots is checked for incoming signals. | ||
| 1:4: One out of every five time slots is checked for incoming signals. | ||
| VOX | 15 | Voice detection, it’s purpose is to transmit without pressing the PTT button. When the sound exceeds a certain threshold, the microphone will open, and the audio will be transmitted. |
| ABR | 16 | Auto Backlight, time it takes for the screen backlight to turn off. |
| TDR | 17 | Transmit Dual Receive, dual reception of both frequencies simultaneously: |
| Chan_A: Enables dual watch and sets channel A as active. If a signal comes in on channel B, it will respond on this one. If we change the active channel using F+2(A/B), the TDR will switch to it. | ||
| Chan_B: Enables dual watch and sets channel B as active. If a signal comes in on channel A, it will respond on this one. If we change the active channel using F+2(A/B), the TDR will switch to it. | ||
| Off: Disabled, it only listens to the active channel. | ||
| WX | 18 | Cross-Band: This option forces the indicated channel as transmit-only and the other as receive-only. If the TDR(17) is active, it can receive on both channels but only transmit on the indicated one: |
| Chan_A: It forces channel A as transmit-only and channel B as receive-only. Or, with TDR: It forces channel A as transmit-only and channels A and B as receive-only. | ||
| Chan_B: It forces channel B as transmit-only and channel A as receive-only. Or, with TDR: It forces channel B as transmit-only and channels A and B as receive-only. | ||
| Off: Transmission will be carried out on the active channel. | ||
| BEEP | 19 | Enables/disables the beep sound with each keystroke. |
| TOT | 20 | Maximum transmission limit, even with the PTT pressed. Transmission will be cut off after reaching the specified time, useful for saving battery, preventing the walkie-talkie from overheating, and avoiding accidental transmissions while in a backpack. |
| VOICE | 21 | Enables/disables the annoying voices. |
| SC-REV | 22 | Scanning options: |
| TO: Upon detecting a signal, scanning pauses for a few seconds and then continues. | ||
| CO: Upon detecting a signal, scanning does not advance while the signal remains active. | ||
| SE: When a signal is detected, scanning pauses. | ||
| MDF | 23 | What should be displayed when in channel mode : |
| FREQ: Frequency. | ||
| NAME: User-defined name from the PC. | ||
| CHAN: Channel number. | ||
| AUTOLK | 24 | Keyboard autolock. |
| S-ADD1 | 25 | Adding a channel to list 1. This walkie-talkie allows creating channel lists, so when we start scanning in channel mode , it will only scan this list, not all the memorized channels. |
| S-ADD2 | 26 | This model allows for up to two customizable channel lists. This function is exactly the same as S-ADD1(25) but for the second list. |
| STE | 27 | Squelch Tail Elimination: If enabled, the walkie-talkie adds an inaudible tone at the end of the transmission, which the receiver will detect and prevent the annoying noise of releasing the PTT from being heard. |
| RP-STE | 28 | RePeater - Squelch Tail Elimination: Some repeaters, upon receiving an incoming transmission, respond with a tone. This option prevents that tone from being heard through the speaker. |
| MIC | 29 | Microphone sensitivity. |
| 1-CALL | 30 | We assign the channel we want to switch to when pressing F+Call , similar to what used to be called “speed dial” on mobile phones. |
| S-LIST | 31 | Enables a channel list for scanning: |
| LIST1: Enable list1. | ||
| LIST2: Enable list2. | ||
| SLIST1 | 32 | View list1 content. |
| SLIST2 | 33 | View list2 content. |
| AL-MOD | 34 | Alarm configuration mode: |
| SITE: Only local alarm. | ||
| TONE: Local alarm and remote signal transmitted. | ||
| ANI-ID | 35 | DTMF ID used in DTMF calls , it can only be modified using the PC software. |
| UPCODE | 36 | DTMF code when pressing the PTT, the PTT-ID(42) must be active in BOT or BOTH mode. |
| DWCODE | 37 | DTMF code when releasing the PTT, the PTT-ID(42) must be active in EOT or BOTH mode. |
| D-ST | 38 | Allows listening to the DTMF codes we are sending or receiving through the speaker. |
| D-RSP | 39 | Automatic response upon receiving a DTMF call : |
| NULL: If the receiving walkie-talkie receives its ANI-ID, audio will be outputed through speakers. We could say it’s a phone with automatic answer. | ||
| RING: It behaves exactly the same as with NULL, but additionally, it plays a ringing tone that will only stop when the receiver makes a transmission. | ||
| REPLY: It behaves exactly the same as with NULL, but the receiving walkie-talkie also responds. This way, the transmitting walkie-talkie knows that the other side is active and will be able to hear the audio. | ||
| BOTH: It behaves exactly the same as with NULL, but additionally, it plays a ringing tone and responds to the sender. | ||
| D-HOLD | 40 | DTMF Hold: If no transmission is made on the channel during a DTMF call , the call will remain auto-answered for the time configured in D-HOLD. |
| D-PRE | 41 | DTMF Preload: Time between the start of an outgoing signal and the transmission of DTMF tones. High values allow the receiving radio to detect the incoming signal and open the SQL in time to not lose the DTMF codes. |
| PTT-ID | 42 | Configuration regarding whether to send the UPCODE, DWCODE, both, or none. This serves as an auditory identifier for the transmission receiver. If they hear a tone they can recognize and associate with a walkie-talkie, they can mentally know who is calling: |
| BOT(Begin Of Transmission): The UPCODE is sent when the PTT button is pressed. | ||
| EOT(End Of Transmission): The DWCODE is sent when the PTT button is released. | ||
| BOTH(Both): The UPCODE is sent when the PTT button is pressed, and the DWCODE is sent when the PTT button is released. | ||
| OFF: Disabled. | ||
| D-DCD | 43 | DTMF-DeCoDer: Enables DTMF code detection, we will only listen audio if transmitter sends our ANI-ID(35), necessary if we want to make or receive DTMF calls or use the remote kill function . |
| D-LIST | 44 | DTMF contact list, useful for identifying walkie-talkies by name during a DTMF call . |
| PONMSG | 45 | Power On Message: Welcome message upon startup: |
| VOL: Battery voltage. | ||
| FULL: Displays the entire screen in black, useful for checking for any dead pixels. | ||
| ROGER | 46 | Sends a sound when releasing the PTT to notify the other end that we have finished speaking, to avoid having to say the typical “over”: |
| ROGER: Beep. | ||
| MDC: Sound similar to a frog. | ||
| VOL | 47 | Displays the battery voltage |
| AM | 48 | Switches to AM mode( only F2 band ). Normally, the walkie operates in FM mode, but to receive in the air band, we must switch to AM mode. |
| NOAA_S | 49 | Automatic scanning of the USA emergency channels. If a signal is detected on any of them, it will sound through the speaker. This may not be useful for us, but by reflashing the firmware, we can replace the NOAA channels with others. |
| ON: Enables automatic scanning. | ||
| OFF: Disables automatic scanning. | ||
| DEL_CH | 50 | Delete previously memorized channels. |
| RESET | 51 | Reset options: |
| VFO: Reset the configuration parameters. | ||
| ALL: Reset the configuration parameters and the saved channels. |
If we enter the extended menu, we will be able to see the extra configuration parameters, to do this, we start by pressing:
SideKey1 + PTT + Power On
| Option | Menu-ID | Function |
|---|---|---|
| 350TX | 52 | Enables the transmission in 350MHz F5. |
| F-LOCK | 53 | Assign the allowed bands for transmission. |
| 200TX | 54 | Enables the transmission in 200MHz F4. |
| 500TX | 55 | Enables the transmission in 500MHz F7. |
| 350EN | 56 | Enables the transmission in 350MHz F5. |
| SCREN | 57 | Allow the posibility to enable the scrambling SCR(11), if this parameter is disabled from the extended menu, the parameter in the normal menu will not take effect. |
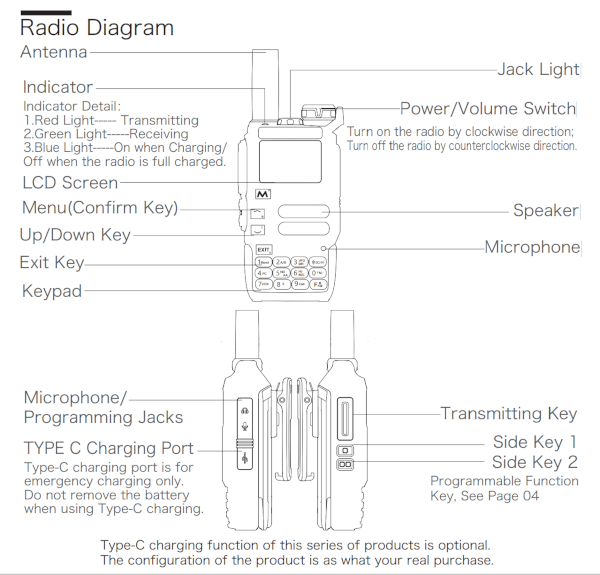
Buttons and functions:
| Button | Functionality |
|---|---|
| Wheel | Power and volume control. |
| M(A) | Main configuration menu. |
| Up(B)/Down(C) arrows | Allows us to navigate through the menu and change parameters. |
| Exit(D) | Exit from the menu. |
| PTT | Push To Talk. |
| SideKey1 | Configurable from the PC, by default: - Short press: Disables the SQL:1. - Long press: Emits a 1750Hz tone, some repeaters require it. |
| SideKey2 | Configurable from the PC, by default: - Short press: Turns on light. - Long press: Turns on alarma. |
| Conector SP/MIC | Speaker/microphone and pc plug. |
| USB-C | USB-C charging port, it must only be used in emergency case. |
| *(Scan) | - Short press: : Allows making
DTMF calls
by dialing the ANI-ID(35), with SideKey1 we can delete characters. - Long press: Scans from the frequency indicated in VFO mode or from the channels saved in the active list S-LIST(31). To continue scanning, we can press the Up Arrow(D). If we want to save a frequency to a channel, we will press Exit(D) and navigate through the main menu M(A) until reaching the MEM-CH:13 option. |
| 0(FM) | - Short press: : Enters the frequency in VFO mode or the channel number in channel mode . |
| F(#) | - Short press: : Activates function mode. - Long press: Blocks the keyboard. |
All keyboard buttons have a special function that is activated by pressing the F key in combination:
| Function | Functionality |
|---|---|
| F+0(FM) | Activates FM radio. |
| F+1(Band): Switches between VFO mode or saved radio stations. | |
| F+2(A/B): Scans and saves the first 20 found stations. | |
| F+3(VFO/MR): Station scanner, press M(A) to save the frequency. | |
| F+1(Band) | Switches between available bands. |
| F+2(A/B) | Switches between one line of the display or the other. |
| F+3(VFO/MR) | Switches between VFO mode or memorized channels . |
| F+4(FC) | Switches to frequency and code/subtone detection mode ; we can press * in case of detecting an incorrect one. |
| F+5(NOAA) | We access the NOAA channels; it’s really worth reflashing with a custom firmware and putting the PMR446 channels instead of the NOAA ones. |
| F+6(H/M/L) | Changes the transmission signal power TXP(3). |
| F+7(VOX) | Activates VOX(15). |
| F+8(R) | Activates reverse mode . |
| F+9(Call) | Switches to the channel configured in menu option 1-CALL(30). |
| F+*(Scan) | Finds out the code/subtone when we are on a frequency or channel . |
Display indicators:
| Symbol | Function |
|---|---|
 |
Indicates the strength of the incoming or outgoing signal. |
 |
Indicates the signal emission power: H(High)/M(Medium)/L(Low) TXP(13). |
 |
Indicates the configuration of a code/subtone R_DCS(4), R_CTCS(5), T_DCS(6), T_CTCS(7). |
 |
Indicates that the menu voice is activated VOICE(21). |
 |
Indicates that we are working with a narrow bandwidth W/N(10). |
 |
Indicates that the VOX(VOX:15) function is activated. |
 |
Indicates whether the offset of the repeater channel is positive or negative SFT-D(8). |
 |
Indicates that DTMF decoding is enabled D-DCD(43). |
 |
Indicates that dual-band monitoring is enabled TDR(17). |
 |
Indicates that the keyboard is locked. |
 |
Indicates the battery charge level. |
 |
Indicates that the battery is low. |
 |
Indicates the channel on the display that we are operating on. |
 |
Indicates that scrambling is activated SCR(11). |
 |
Indicates that reverse mode (F+8(R)) is activated. |
 |
Indicates if the channel is included in any scan list. The first diamond indicates it’s in scanlist1, the second diamond in scanlist2, and both diamonds in both scan lists. |
 |
Indicates if Cross-Band is enabled WX(18). |
 |
Indicates that the walkie is receiving a signal on the indicated channel. |
 |
Indicates that the walkie is transmitting a signal on the indicated channel. |
 |
Indicates that the battery is charging. |
 |
Indicates that AM reception is activated AM(48). |
 |
Indicates that NOAA channel scanning NOAA_S(49) is active. It will only appear if we are in NOAA mode(F+5(NOAA)). |
| If we are on one channel but a signal comes in on another because we have enabled dual watch TDR(17), this symbol will indicate that the signal is coming in on the other channel. |
DTMF calls:
The basic idea is to have a set of walkie-talkies all on the same frequency and be able to call one of them or a group of them using DTMF codes. Each walkie-talkie must have a unique identifier called an ANI-ID(35), which can only be configured using PC software.
If we transmit on the channel without setting the ANI-ID, nobody who has D-DCD(43) activated will hear us. The green light will come on because there’s radio signal, but no sound will be heard. However, if we set an ANI-ID that matches one of the walkie-talkies, it will immediately hear the audio without having to “pick up”.
The configuration parameters D-RSP(49) only apply to the receiving walkie-talkie:
- NULL: If the receiving walkie-talkie receives its ANI-ID(35), audio will be outputed through speakers. We could say it’s a phone with automatic answer.
- RING: It behaves exactly the same as with NULL, but additionally, it plays a ringing tone that will only stop when the receiver makes a transmission.
- REPLY: It behaves exactly the same as with NULL, but the receiving walkie-talkie also responds. This way, the transmitting walkie-talkie knows that the other side is active and will be able to hear the audio.
- BOTH: It behaves exactly the same as with NULL, but additionally, it plays a ringing tone and responds to the sender.
If transmission stops on the channel, the call will remain auto-picked up for the time configured in D-HOLD(40). To cancel a call, you’ll need to use one of the functions activated by the F key. However, if you want to delete a character in DTMF dialing mode, you must press SideKey1.
Calls can be made in various ways:
- Manual: Pressing the PTT, the ANI-ID of the walkie we want to call, * and our ANI-ID. For example, if our ID is 666 and we want to call 100, it would be: 100 * 666. But in my tests, only the receiver of the call could hear the audio, even with REPLY activated.
- Automatically: Pressing *, the ANI-ID of the walkie we want to call, and the PTT. In this mode, our ANI-ID is also sent, but it’s done automatically.
To call a group, you need to define the Local code character from the PC. Assuming it is #, calling 12# would be calling 120-129, with 1## calling 100-199, and ### calling 000-999, all possible users. But when calling a group, the REPLY function won’t work; the transmitter will speak blindly.
We must keep in mind that this is still an open channel. Anyone can receive and anyone can transmit on our frequency once a call is auto-accepted. That means if a colleague calls a walkie, it opens communications. If, at that moment, a third party unrelated to the group transmits on that frequency, the two “friendly” walkies will hear the third one, and of course, this third party has always been able to hear the audio from the “friendly” walkies.
I leave a demonstrative video with DTMF contacts configured and the D-RSP(49) set to BOTH. On the left, we have the K5(8), and on the right, the K6.
Depending on whether the walkie-talkie is the caller or receiver of the call, the display lines will show specific information.
| Emitter | Receiver | |
|---|---|---|
| Top line | Information about the call’s status. | Source of the call. |
| Bottom line | Destination of the call. | Destination of the call. |
NOTE: If two devices are configured with the same ANI-ID(35), both will respond to the call. Upon answering the call, both devices behave as if the D-DCD(43) configuration had not been set, allowing them to speak and listen, as well the initiator of the call as the two receivers.
Scrambling:
Conversations can be “encrypted” using scrambling SCR(11), which is essentially a code used to encrypt the signal. A walkie-talkie that does not have it configured will hear a distorted version of the audio.
We can observe the effect on the following video:
We must remember that encrypting any communication is illegal, at least in Spain, so we must be very careful with this option. If we want to be safe and ensure that it is never activated by mistake, we can access the extended menu and disable the possibility of activation through:
SideKey1 + PTT + Power On
SCREN: OFF
As we can see, the SCR option appears in the menu, but when activated, it does nothing. We can see that the letters SCR do not appear to the right below the frequency:
Air copy:
Clone all the configuration from one walkie to another, that is, make a clone. The steps are as follows:
- Both walkies: Press the PTT+SideKey2 buttons while starting up.
- Both walkies: Enter the frequency for the clone or leave it at the default.
- Receiver: Press Exit(D).
- Transmitter: Press M(A).
I leave a video showing how it works:
If the process encounters any error, we will see the counter E: increase on reception. In that case, we should restart the process.
Frequency scanner:
This walkie-talkie has a very interesting feature called Frequency Scanner: FC, which allows us to determine the frequency and the tone/code that another walkie-talkie is using. To activate this function, simply press F+4(FC) and wait for the other walkie-talkie to transmit a signal. Then, we can save the configuration in a memory slot as a channel by pressing M(A). This is very useful when working with inexperienced people in the world of radio who may not know what parameters are configured on their radio.
Another related functionality with FC is the Tone/Code scanner. If we know the frequency on which the counterpart is transmitting but are unaware of its tone/code, we can press F+*(Scan), and it will automatically detect the tone/code. Finally, we can save the configuration in a memory slot as a channel by pressing M(A).
| Frequency scanner: F+4(FC) | Tone/Code scanner: F+*(Scan) |
|---|---|
Remote kill:
It’s possible to disable a walkie-talkie by sending it a sequence of DTMF tones(Kill code), known as remote kill. If the lost walkie-talkie is later located, it can be re-enabled using another sequence of DTMF tones(Revive code). However, for this to work, the active channel must have the D-DCD(43) option enabled.
The configuration to enable this function and set the codes can only be done from the PC .
Common setting: Permit remote kill
DTMF setting -> Local code: 666
DTMF setting -> Kill code: 66066
DTMF setting -> Revive code: 66166
To kill the walkie-talkie 666 we must call: ANI-ID(Local code)*Kill code, in this case 666*66066
To revive it: ANI-ID(Local code)*Revive code, in this case 666*66166
I leave a video showing how it works:
NOTE If multiple walkie-talkies have the same kill code, they will both be blocked. If the one sending the kill code has the same kill code, it does NOT self-block.
Frequency unlock:
This walkie-talkie allows transmitting on various bands (not all), but I don’t recommend it as we can irreversibly damage the equipment, and the signal power outside the amateur radio range will be poor.
Remember the supported frequency bands:
FM:            F1 50∽76 MHz
FM:            F2 108∽135.9975 MHz
FM:            F3 136∽173.9975 MHz
FM:            F4 174∽349.9975 MHz
FM:            F5 350∽399.9975 MHz
FM:            F6 400∽469.9975 MHz
FM:            F7 470∽599.9975 MHz
AM:            F2 108∽135.9975 MHz
To perform the configuration, we need to access the extended menu.
SideKey1 + PTT + Power On
We must take into account some aspects:
- By default, we can listen on all bands. The only exception is F5, which is controlled through the option
350EN. - The rest of the options control transmission on the different bands.
F-LOCKenables typical ranges according to geographical region.- XXXTX enables additional bands when
F-LOCKis OFF.
F-LOCK - Assigns the allowed bands for transmission.
    FCC (144-148, 420-450)
    CE (144-146, 430-440)
    GB (144-148, 430-440)
    430 (137-174, 400-430)
    438 (137-174, 400-438)
    OFF - Enables the bands: F3 (136∽173.9975 MHz) and F6 (400∽469.9975 MHz) with the possibility of expansion through 200TX, 350TX, and 500TX.

200TX - Enables TX on 200MHz F4.
350TX - Enables TX on 350MHz F5.
500TX - Enables TX on 500MHz F7.

350EN - Enables RX on 350MHz F5.
In my case, I’m going to enable only the amateur radio frequencies, the corresponding configuration options are:
F-LOCK: OFF
Tx 200 - OFF
Tx 350 - OFF
Tx 500 - OFF
350 En - ON
As you can see, with this configuration, we can listen to all bands but only transmit on the amateur radio bands:
Keep in mind that despite unlocking the frequencies, they will always be FM; we can never transmit in AM. Also, the transmission power outside the amateur radio band will be very poor, as the electronics were not designed for other ranges.
Aquí tienes la traducción al inglés del fragmento solicitado:
Software Prerequisites:
To use the management software
CPS
,
CHIRP
, and the
Updater
, we need to have Mono and the USB cable driver installed. On my Linux system, I will use Wine since the software provided by Quansheng is only compatible with Windows. On Windows systems, you just need to install the driver directly.
Wine-mono: Linux
Let’s verify that we can manually load the cable module:
When we plug in the cable, we should see this in dmesg:
[ 61.867011] usb 1-1: ch341-uart converter now attached to ttyUSB0
And a new device will appear under /dev:
crw-rw---- 1 root dialout 188, 0 Feb 23 23:08 /dev/ttyUSB0
Now install Wine32. The 64-bit version won’t work with this software:
apt-get update
apt-get install wine32
apt-get install winetricks zenity ttf-mscorefonts-installer
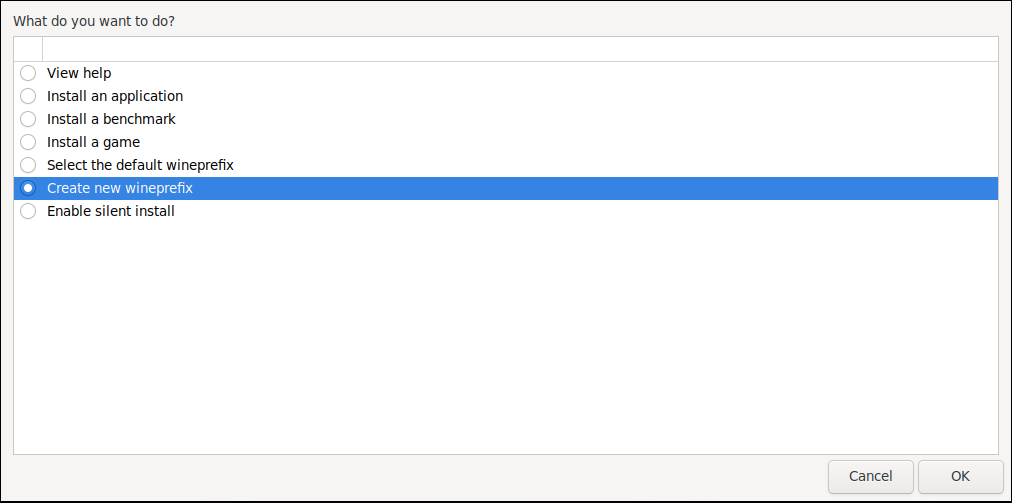
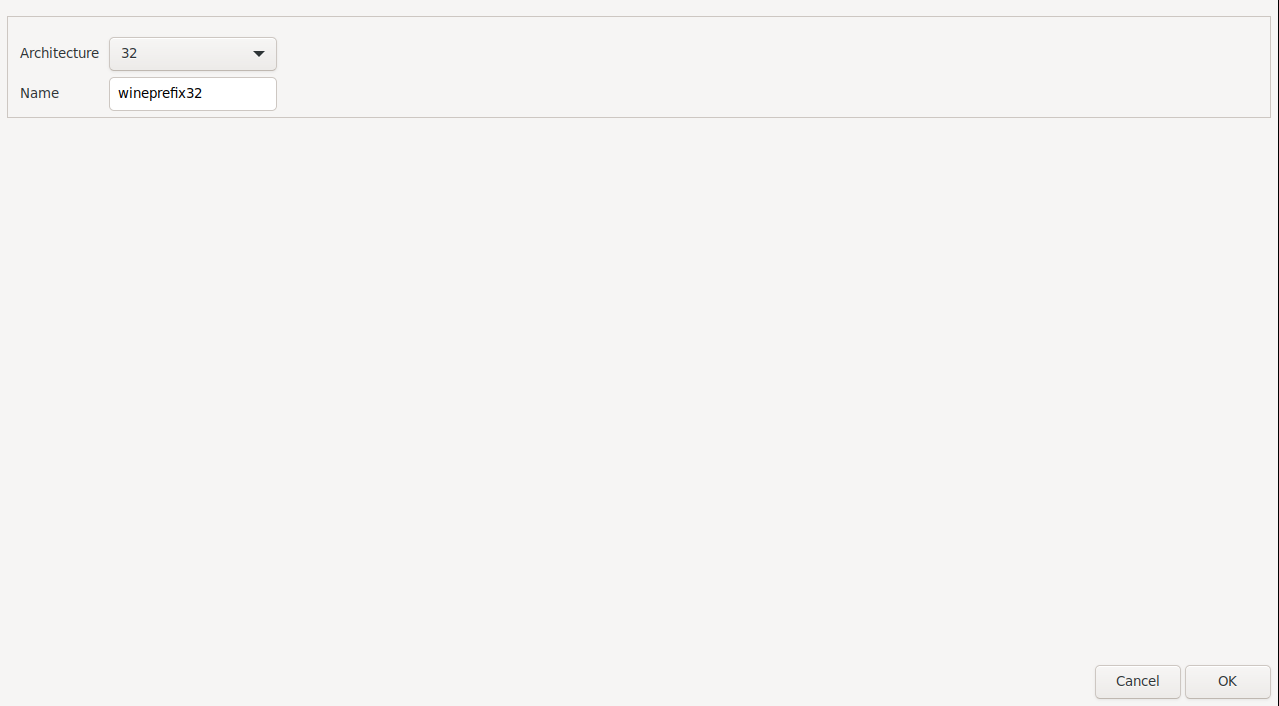
Create a 32-bit wineprefix:
Create new wineprefix
Architecture: 32
Name: wineprefix32
/home/ubuntu/.local/share/wineprefixes/wineprefix32
|
|
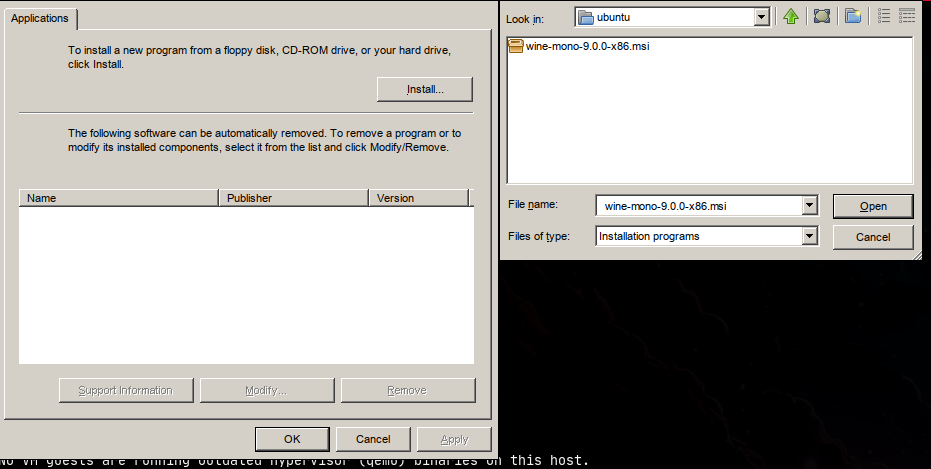
We will need to install wine-mono within Wine:
Install it using:
Click Install:
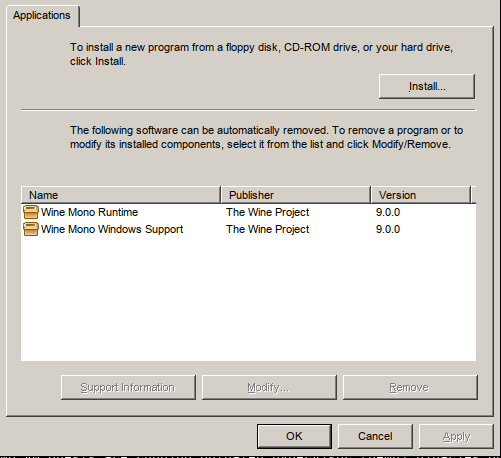
It may seem like nothing was installed, but if you click OK and open it again, you will see it listed:
Install all fonts to avoid rendering issues:
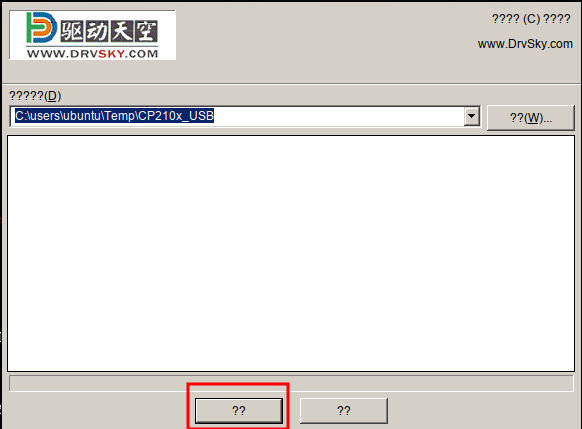
Cable Driver: Linux/Windows
Install the Windows driver for the cable:
https://en.qsfj.com/support/downloads/3268
: UV-K5(8) Firmware
Click the button on the left:
We can check which COM port is correctly mapped in Wine:
lrwxrwxrwx 1 ubuntu ubuntu 12 Feb 23 18:03 /home/ubuntu/.local/share/wineprefixes/wineprefix32/dosdevices/com33 -> /dev/ttyUSB0
The correct port is COM33.
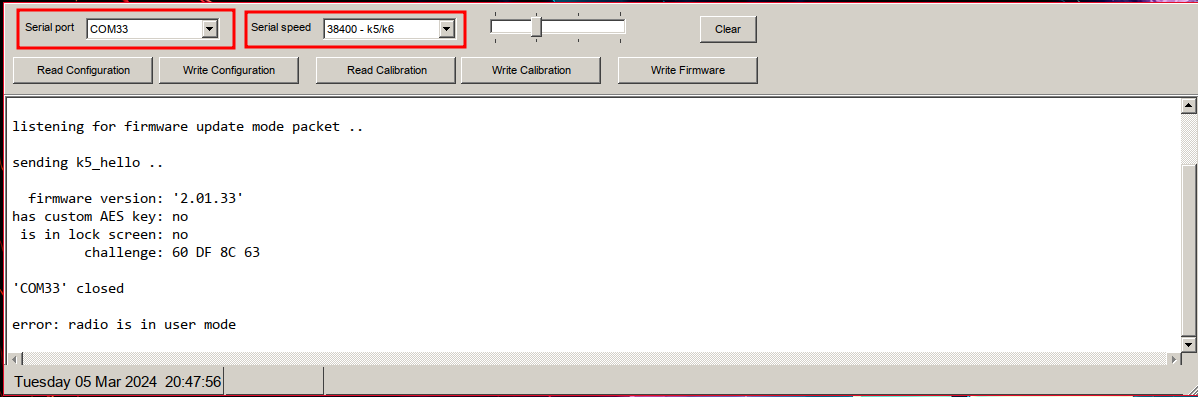
Backup of Configuration/Calibration Files:
The walkie-talkie comes calibrated and configured in a specific way. This information is stored in the EEPROM, and its contents are unique to each device, so the smartest thing to do—especially if you plan on experimenting with custom firmware—is to make a backup beforehand.
First, download the
k5prog-win
software:
Turn on the walkie-talkie, connect the cable, and run the software:
Specify the COM port and the baud rate (38400 - K5/K6):
| Read Configuration | Save Configuration |
|---|---|
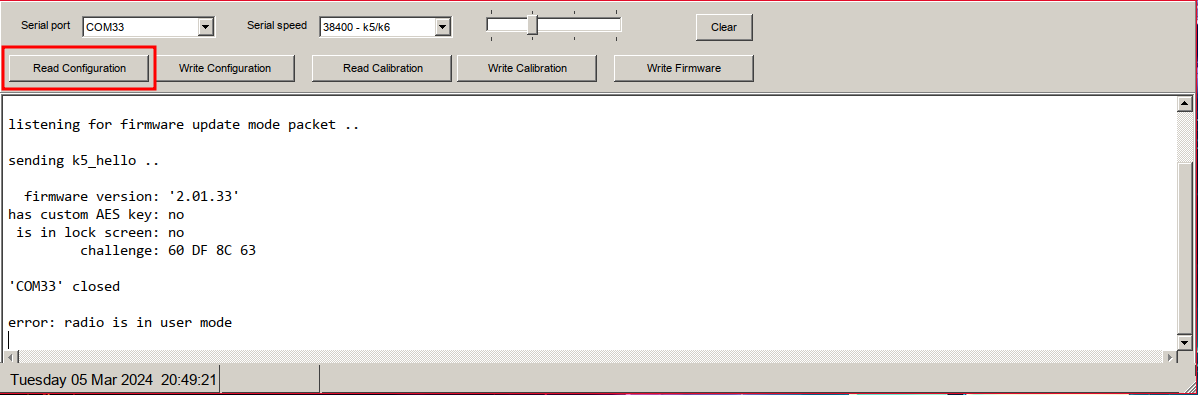
|
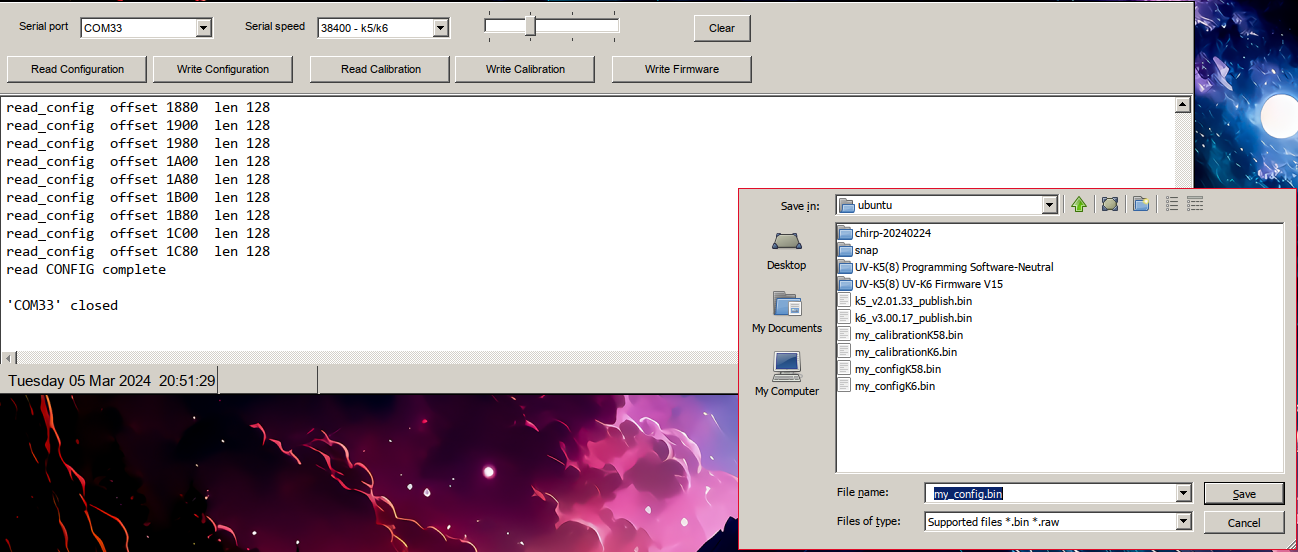
|
| Read Calibration | Save Calibration |
|---|---|
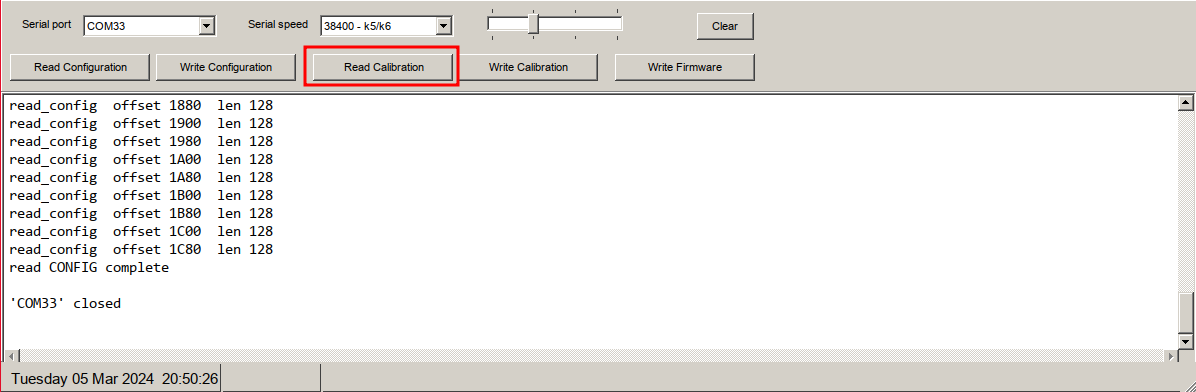
|
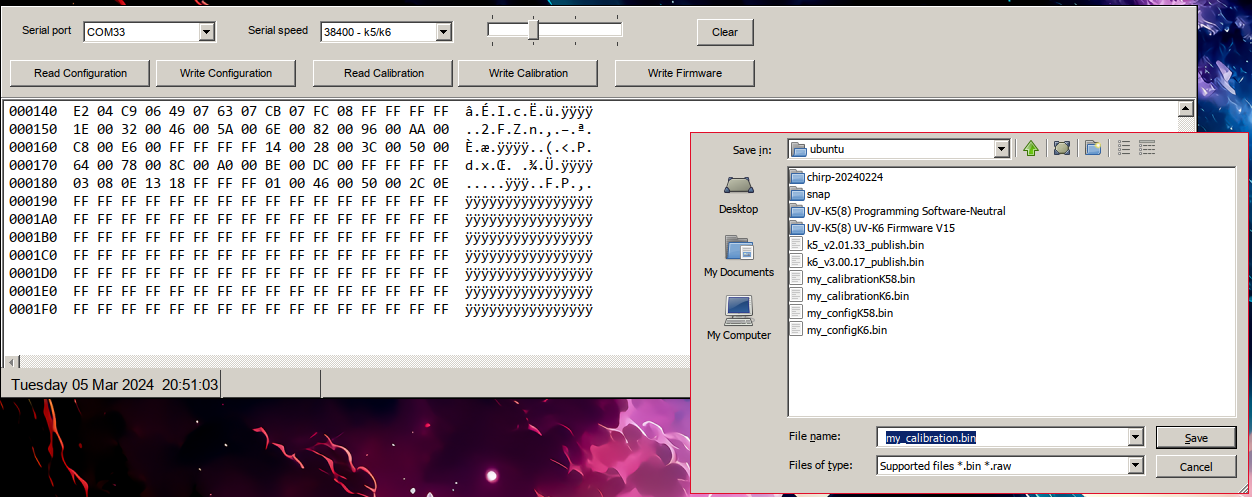
|
Download the files and keep them in a safe place.
Updater:
Download the update software:
https://en.qsfj.com/support/downloads/3268
: UV-K5(8) Firmware
The archive includes several EXE files and some additional files:
CP210x_USB.exe: USB cable driver.AnonymPSUpdater_Setup_EN.exe: Firmware update software.K6_V3.00.15.bin: Firmware image.Firmware Upgration Instruction Video.mp4: Video tutorial on how to update the firmware.UV-K5(8) UV-K6 Firmware Upgration Instruction.docx: Written guide for the firmware update procedure.
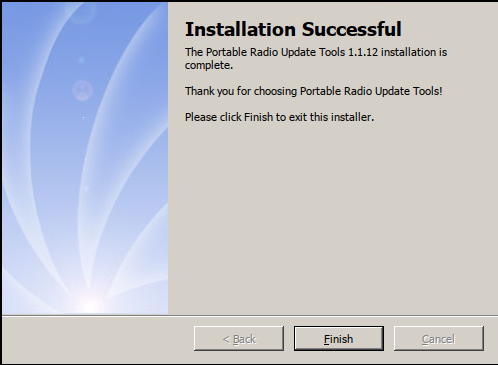
Install the updater software:
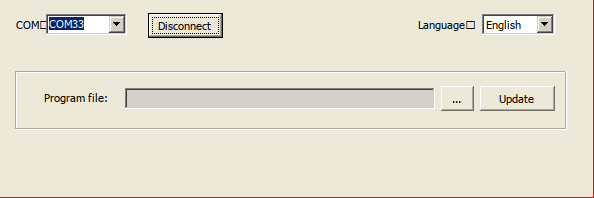
Launch the updater:
Install the program:

|
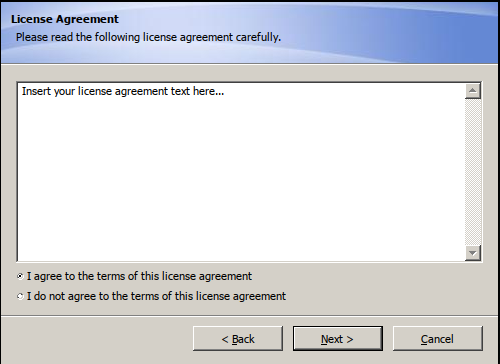
|
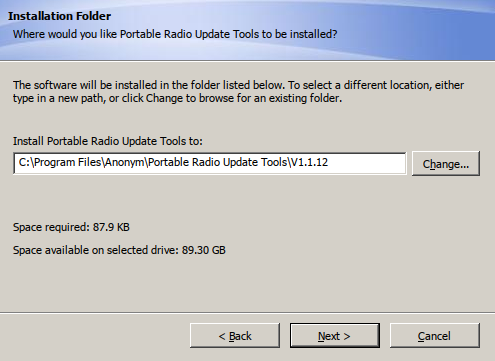
|
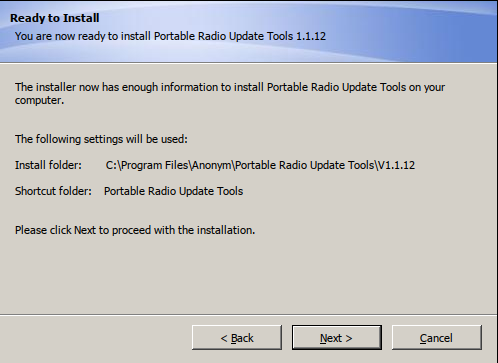
|
|
In this Facebook post by Quansheng , they confirm that if your model allows switching the menu text between two languages, you should use the K5(8) firmware. Otherwise, use the K5 firmware:
 1. If your menu is pure English menu, you need to use UV-K5 firmware V2.01.31;
 2. If your menu is Chinese&English selectable menu, you need to use UV-K58/UV-K6 firmware V3.00.15.
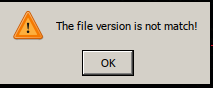
Although I haven’t personally seen that bilingual menu on either the K5(8) or the K6, if you try flashing K5(8) firmware on an incompatible model, the updater will notify you:
If you provide them with an email address, they’ll send you the latest firmware versions. As of 2024-02-24, they are:
k5_v2.01.33_publish.bin
k6_v3.00.17_publish.bin
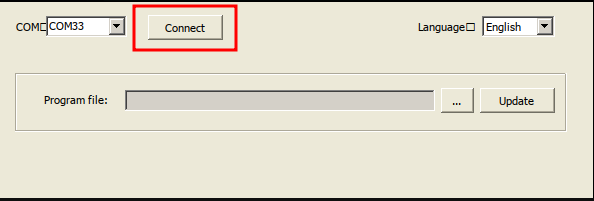
Launch the updater again:
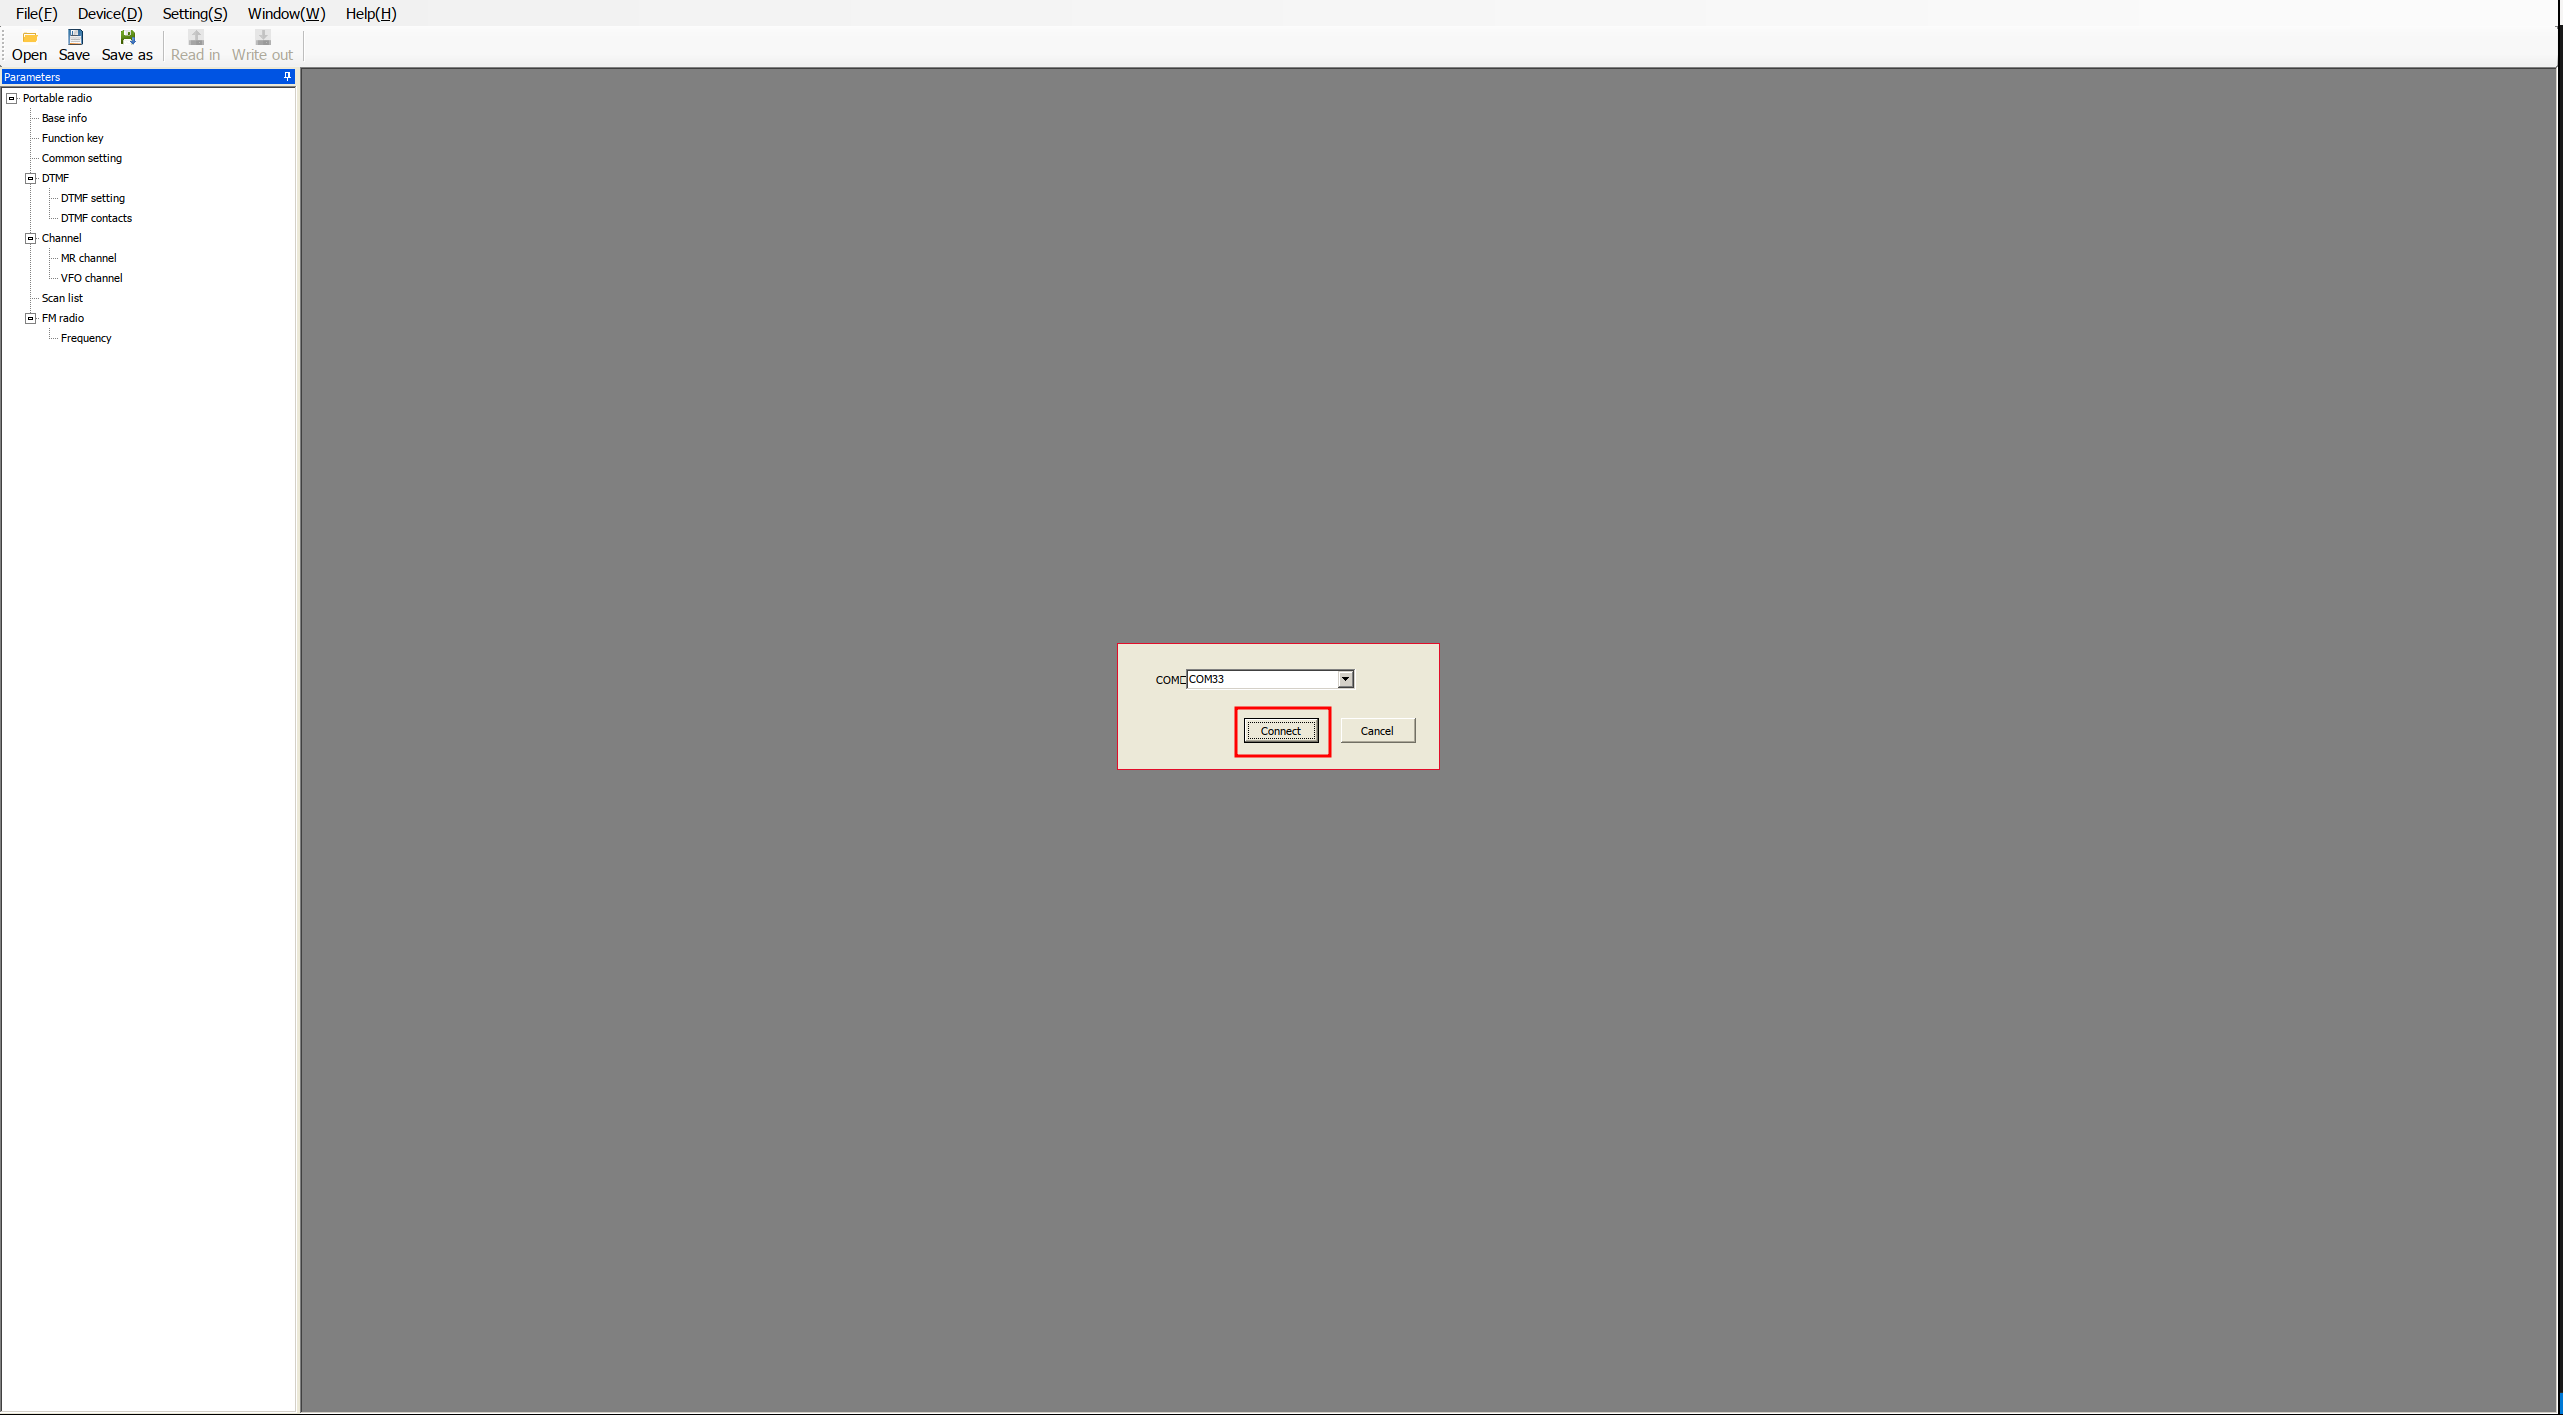
Press and hold the PTT button, then power on the radio (the screen will stay blank and the flashlight will turn on: reflashing mode). Connect the cable to the radio, select COM33, and click Connect:
|
|
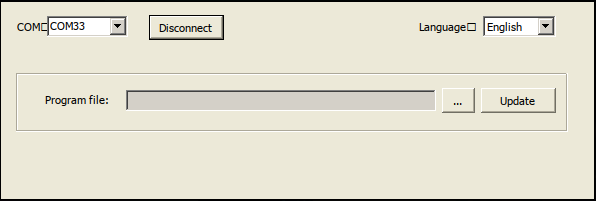
Click the three dots to select the firmware file:
|
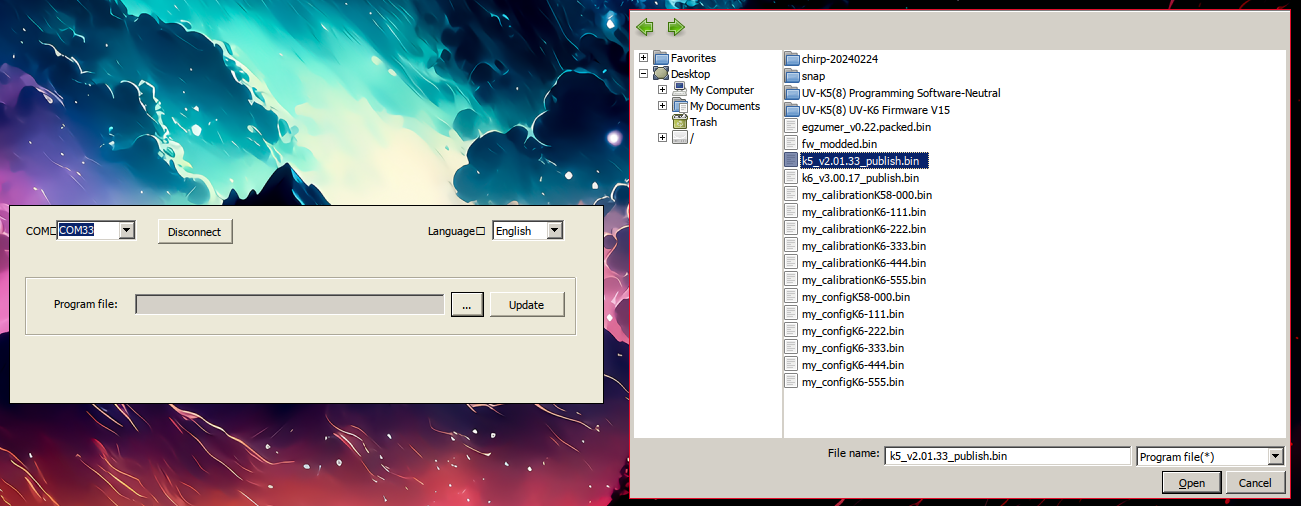
|
Now you can proceed with the firmware update by clicking “Update”. Before updating, check the battery level of the radio:
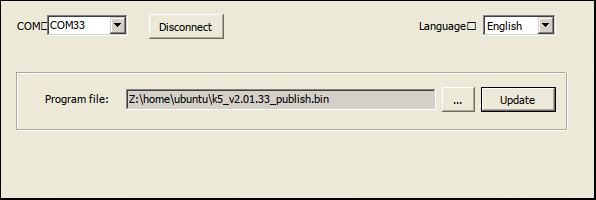
|
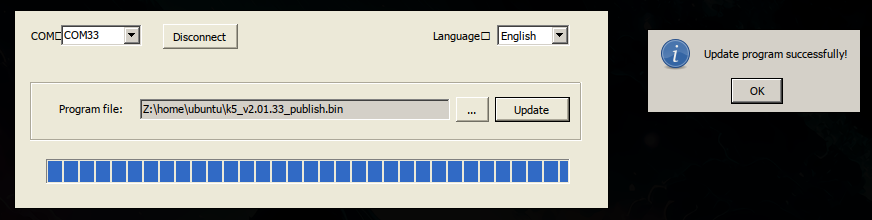
|
NOTE: If the “Update” button is unavailable, it means the radio is not in reflashing mode.
For convenience, I’ve created an alias to launch the updater more easily:
alias quanshengUpdate='WINEARCH=win32 WINEPREFIX=~/.local/share/wineprefixes/wineprefix32 wine ~/.local/share/wineprefixes/wineprefix32/drive_c/Program\ Files/Anonym/Portable\ Radio\ Update\ Tools/V1.1.12/Updater.exe'
CPS:
We download the management software:
https://en.qsfj.com/support/downloads/3268
: UV-K5(8) Programming Software-Neutral
The zip file contains several EXE files and some other files:
- CP210x_USB.exe: USB cable driver.
- PSCPS.exe: Management software.
- 20230522_144349.mp4: Instructional video on how to use the management software.
Serial port configuration:
Start it and configure the COM port, Settings -> COM Setting: COM33

|
|
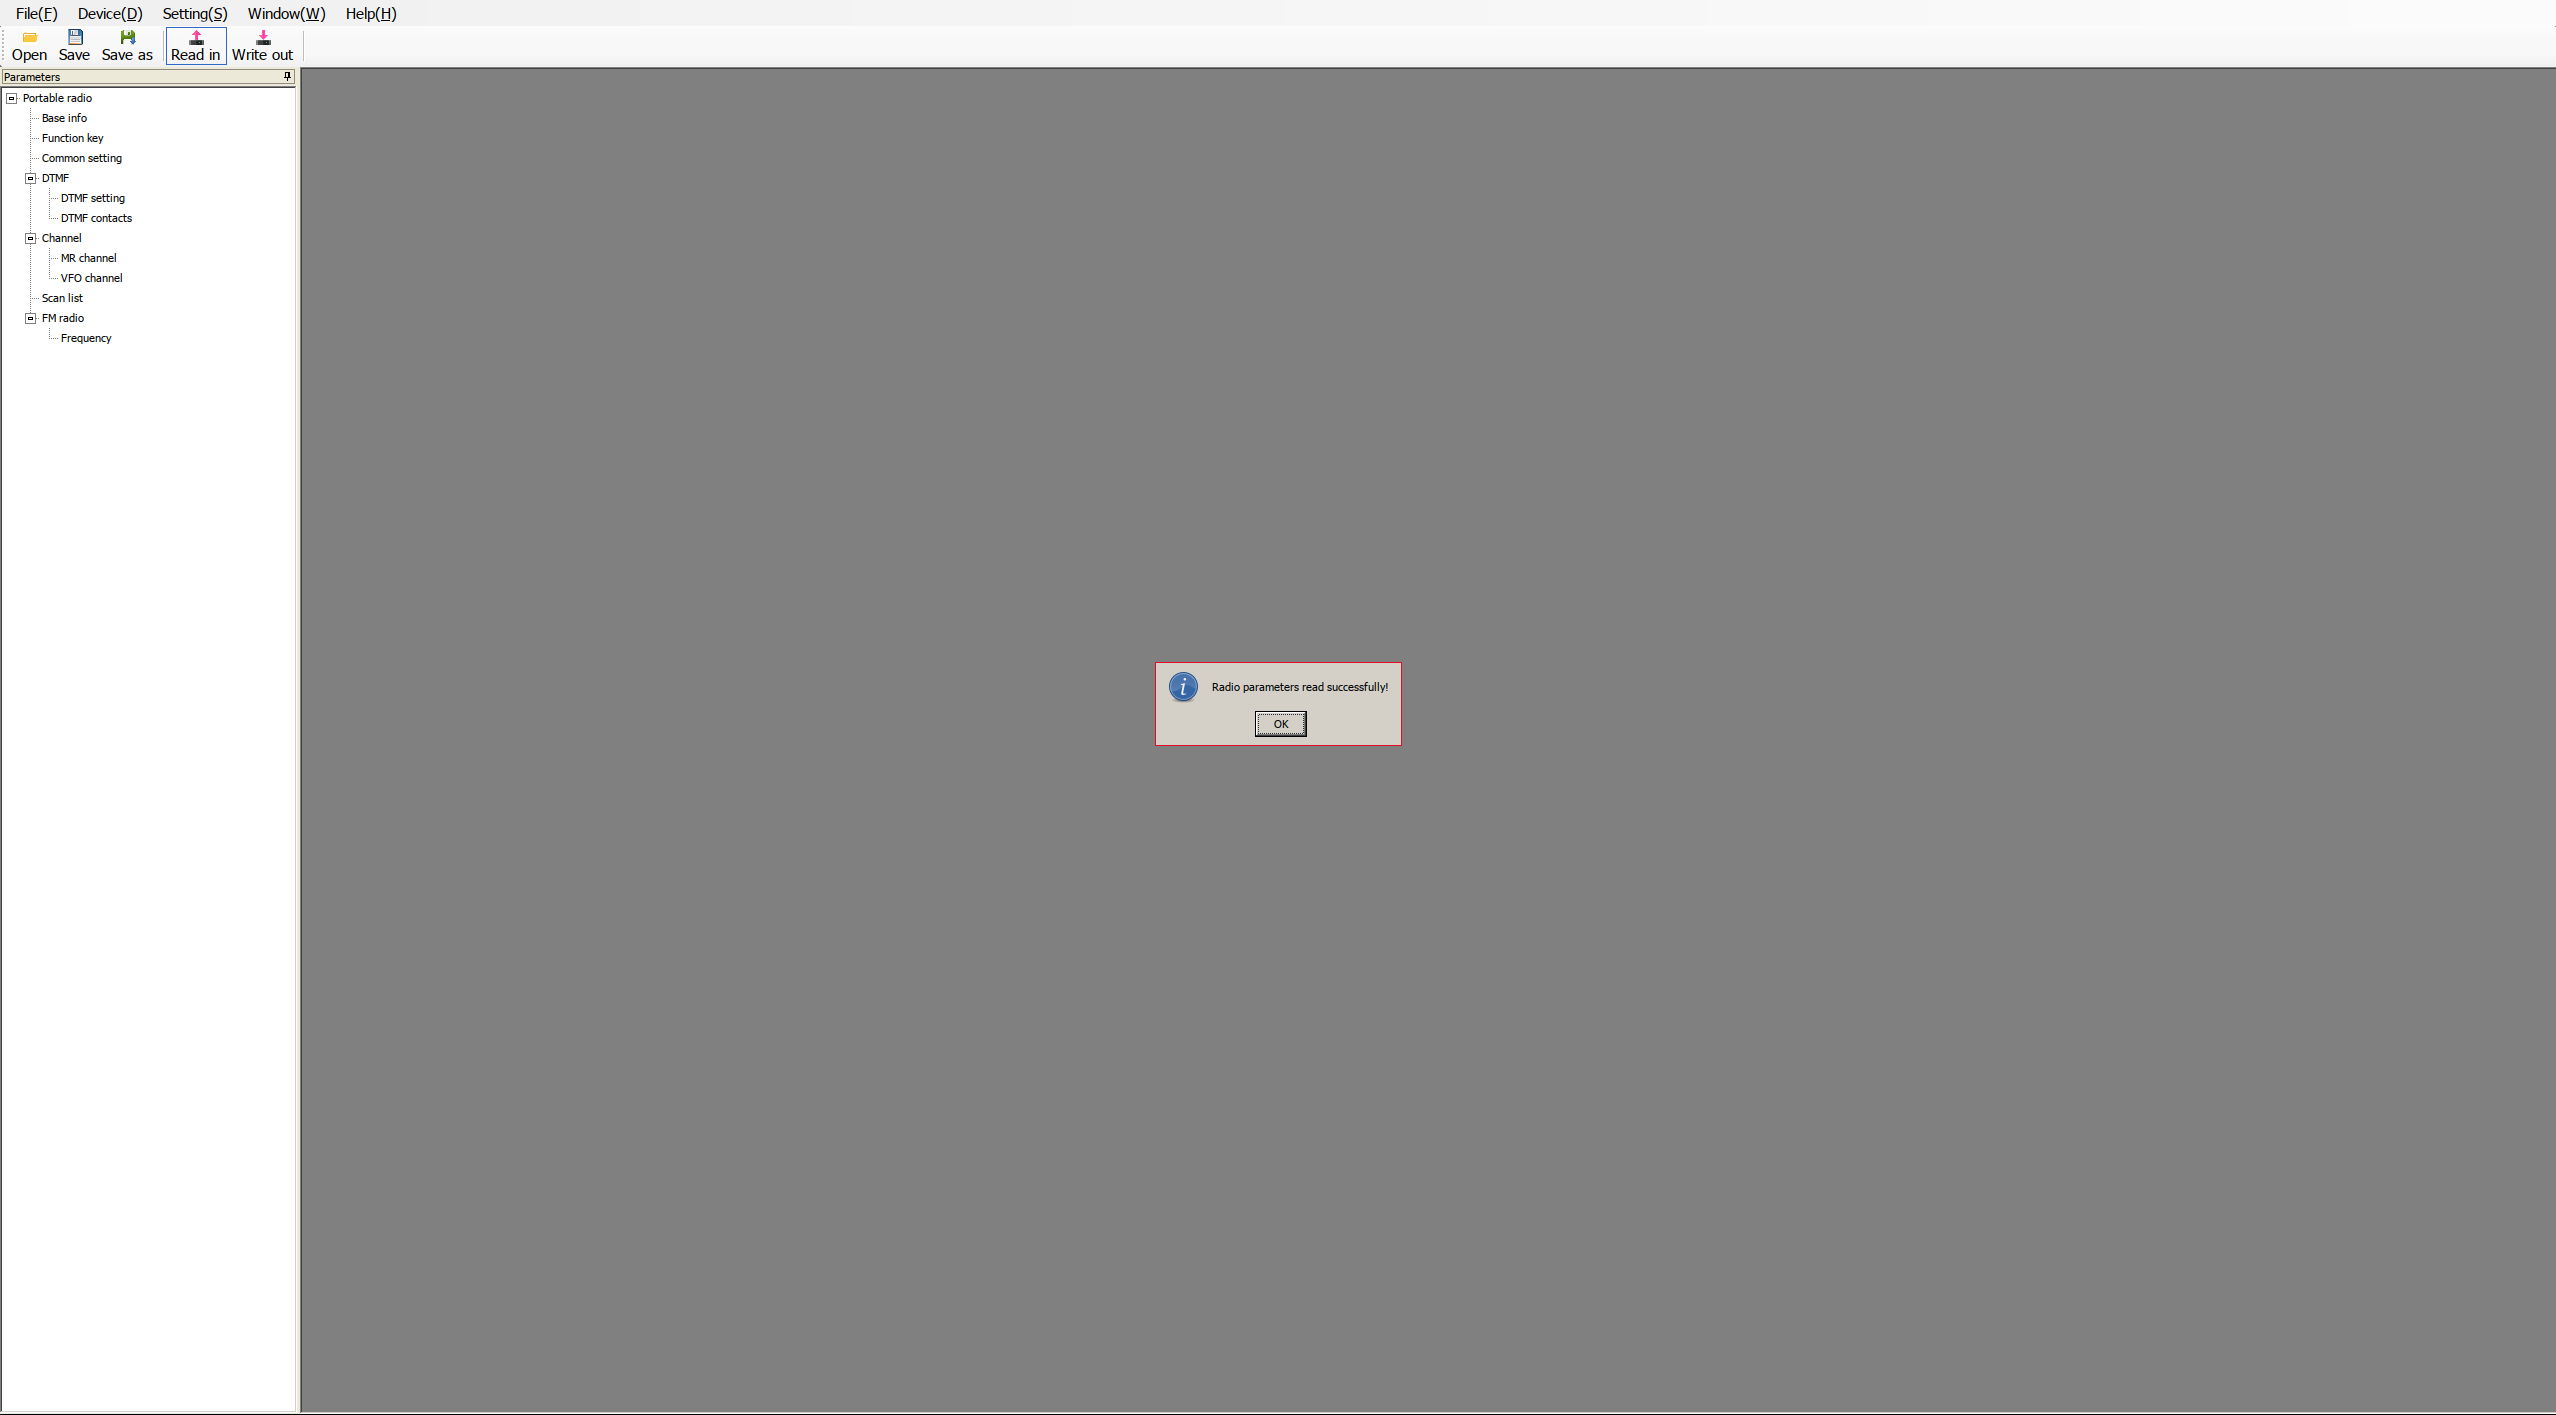
Read data from radio:
We can read the walkie-talkie configuration by clicking on Read in button.

|
|
Base info:
In the Base info section, we can query firmware version.

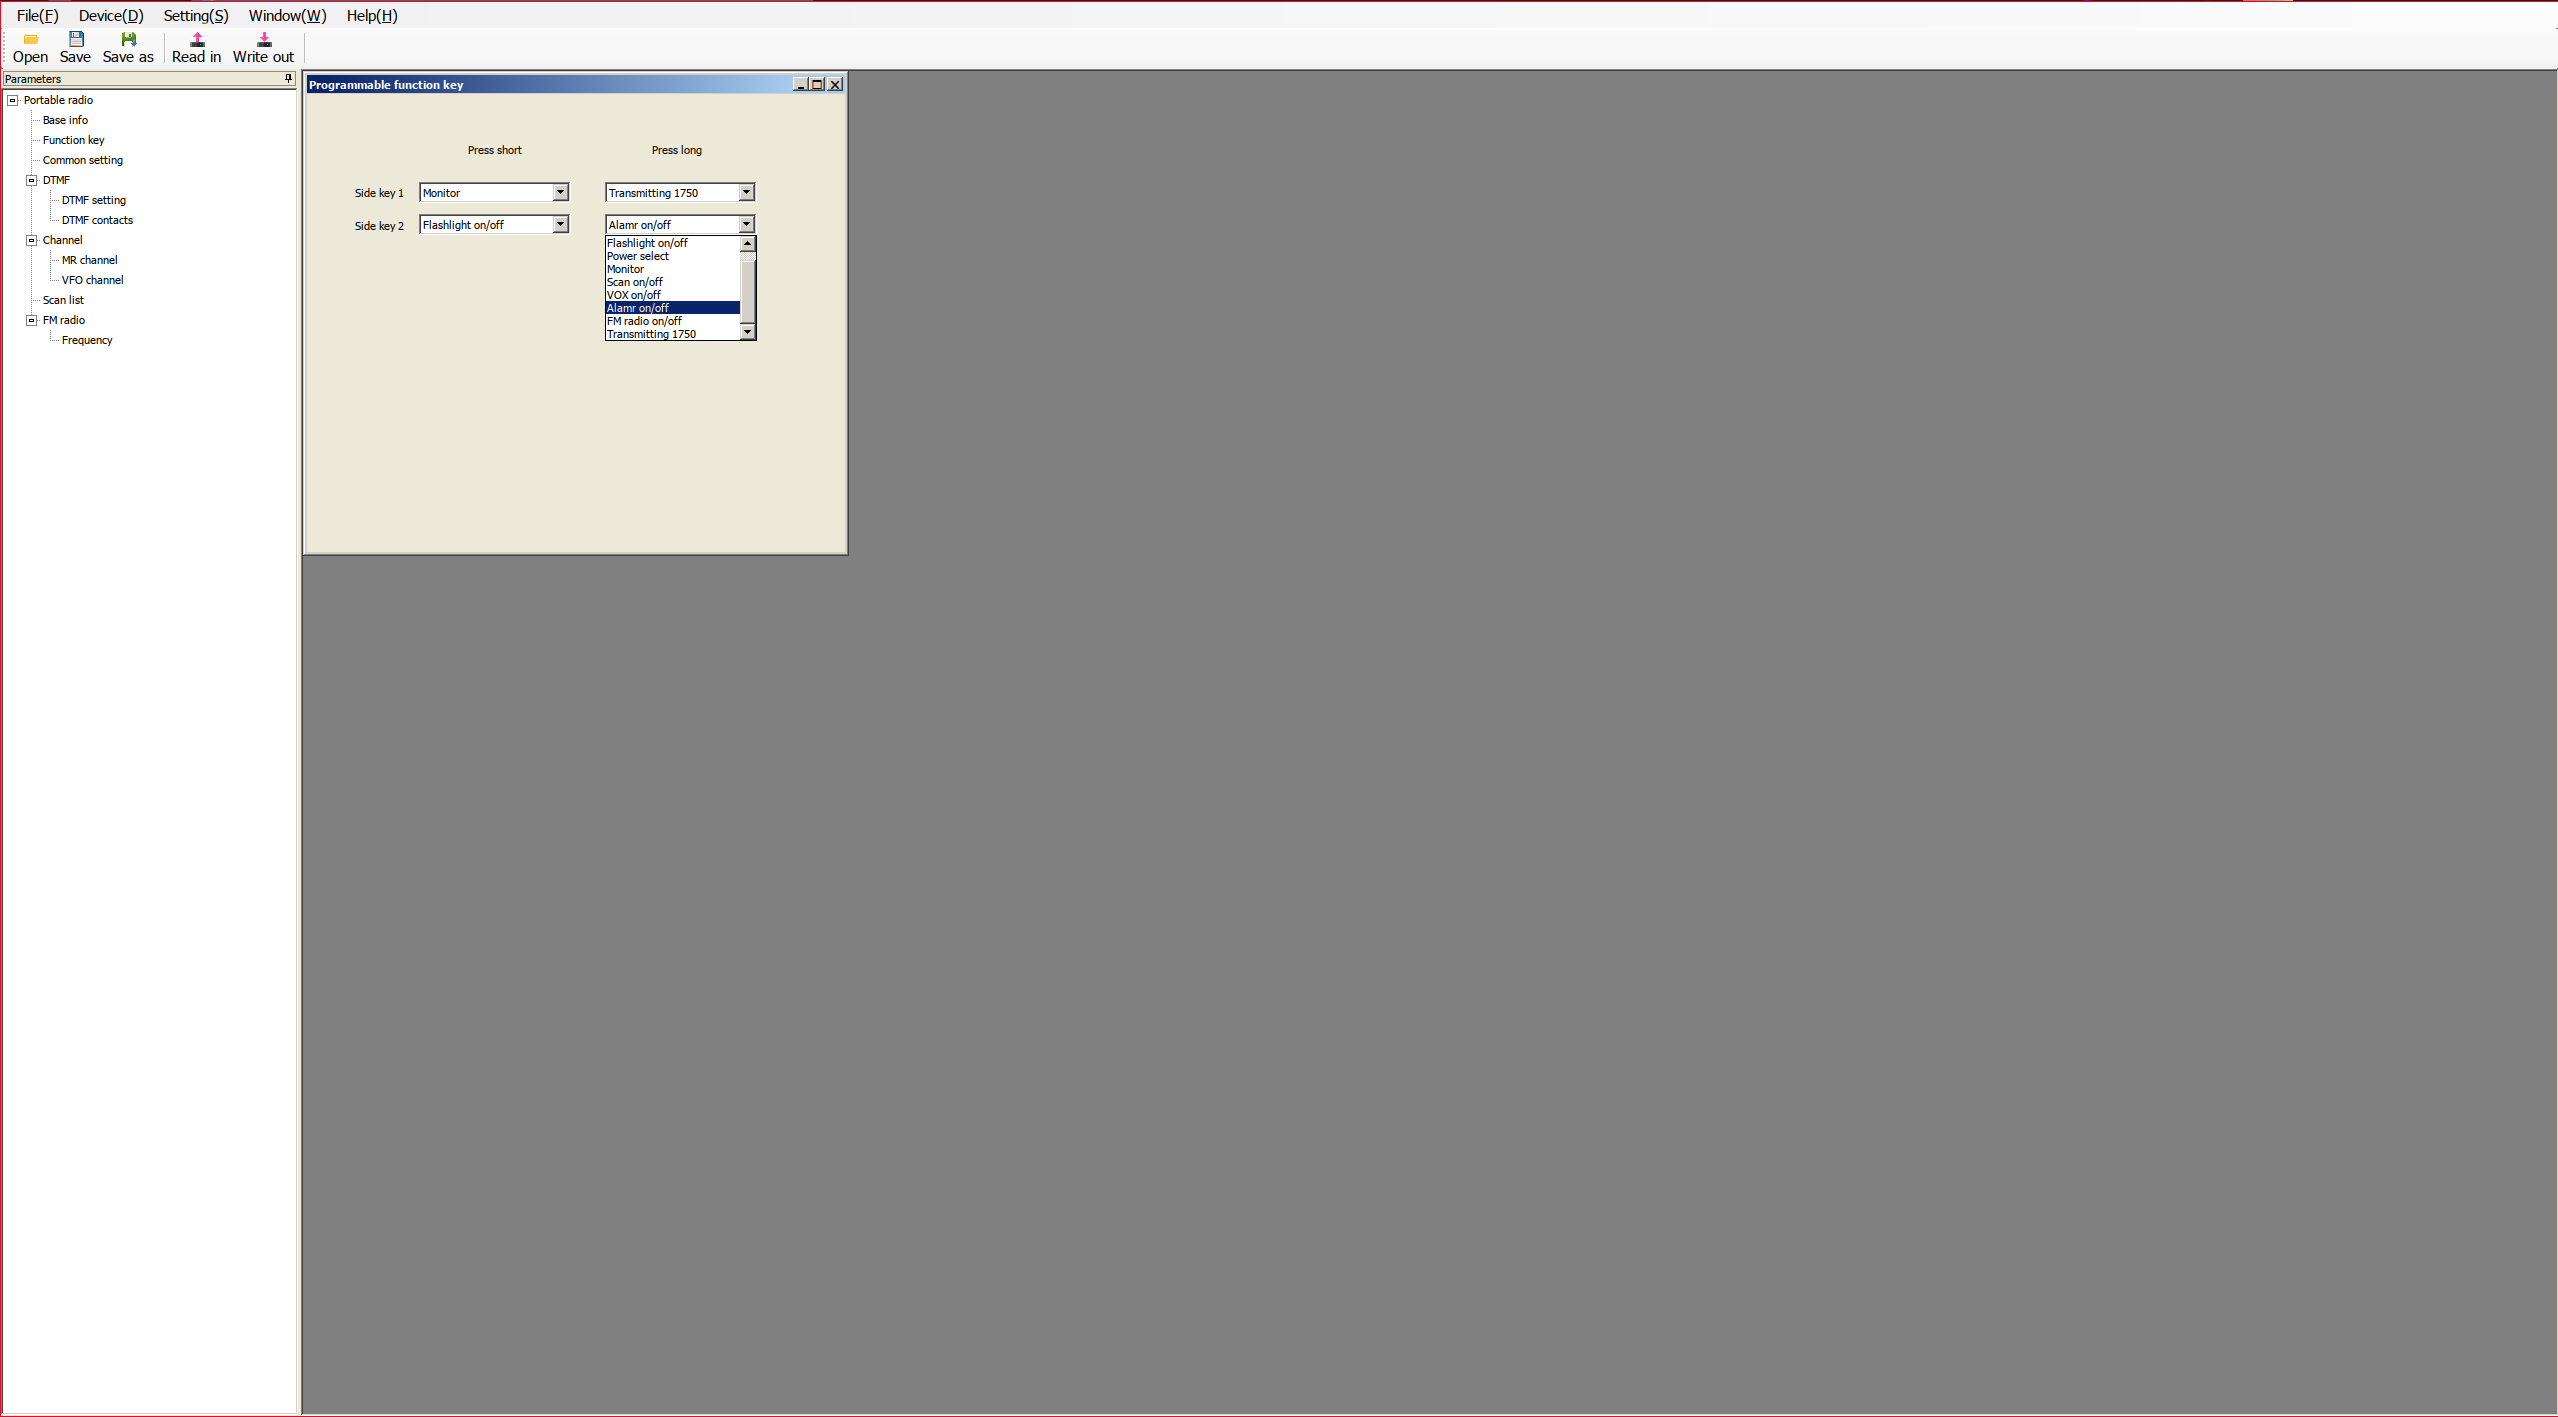
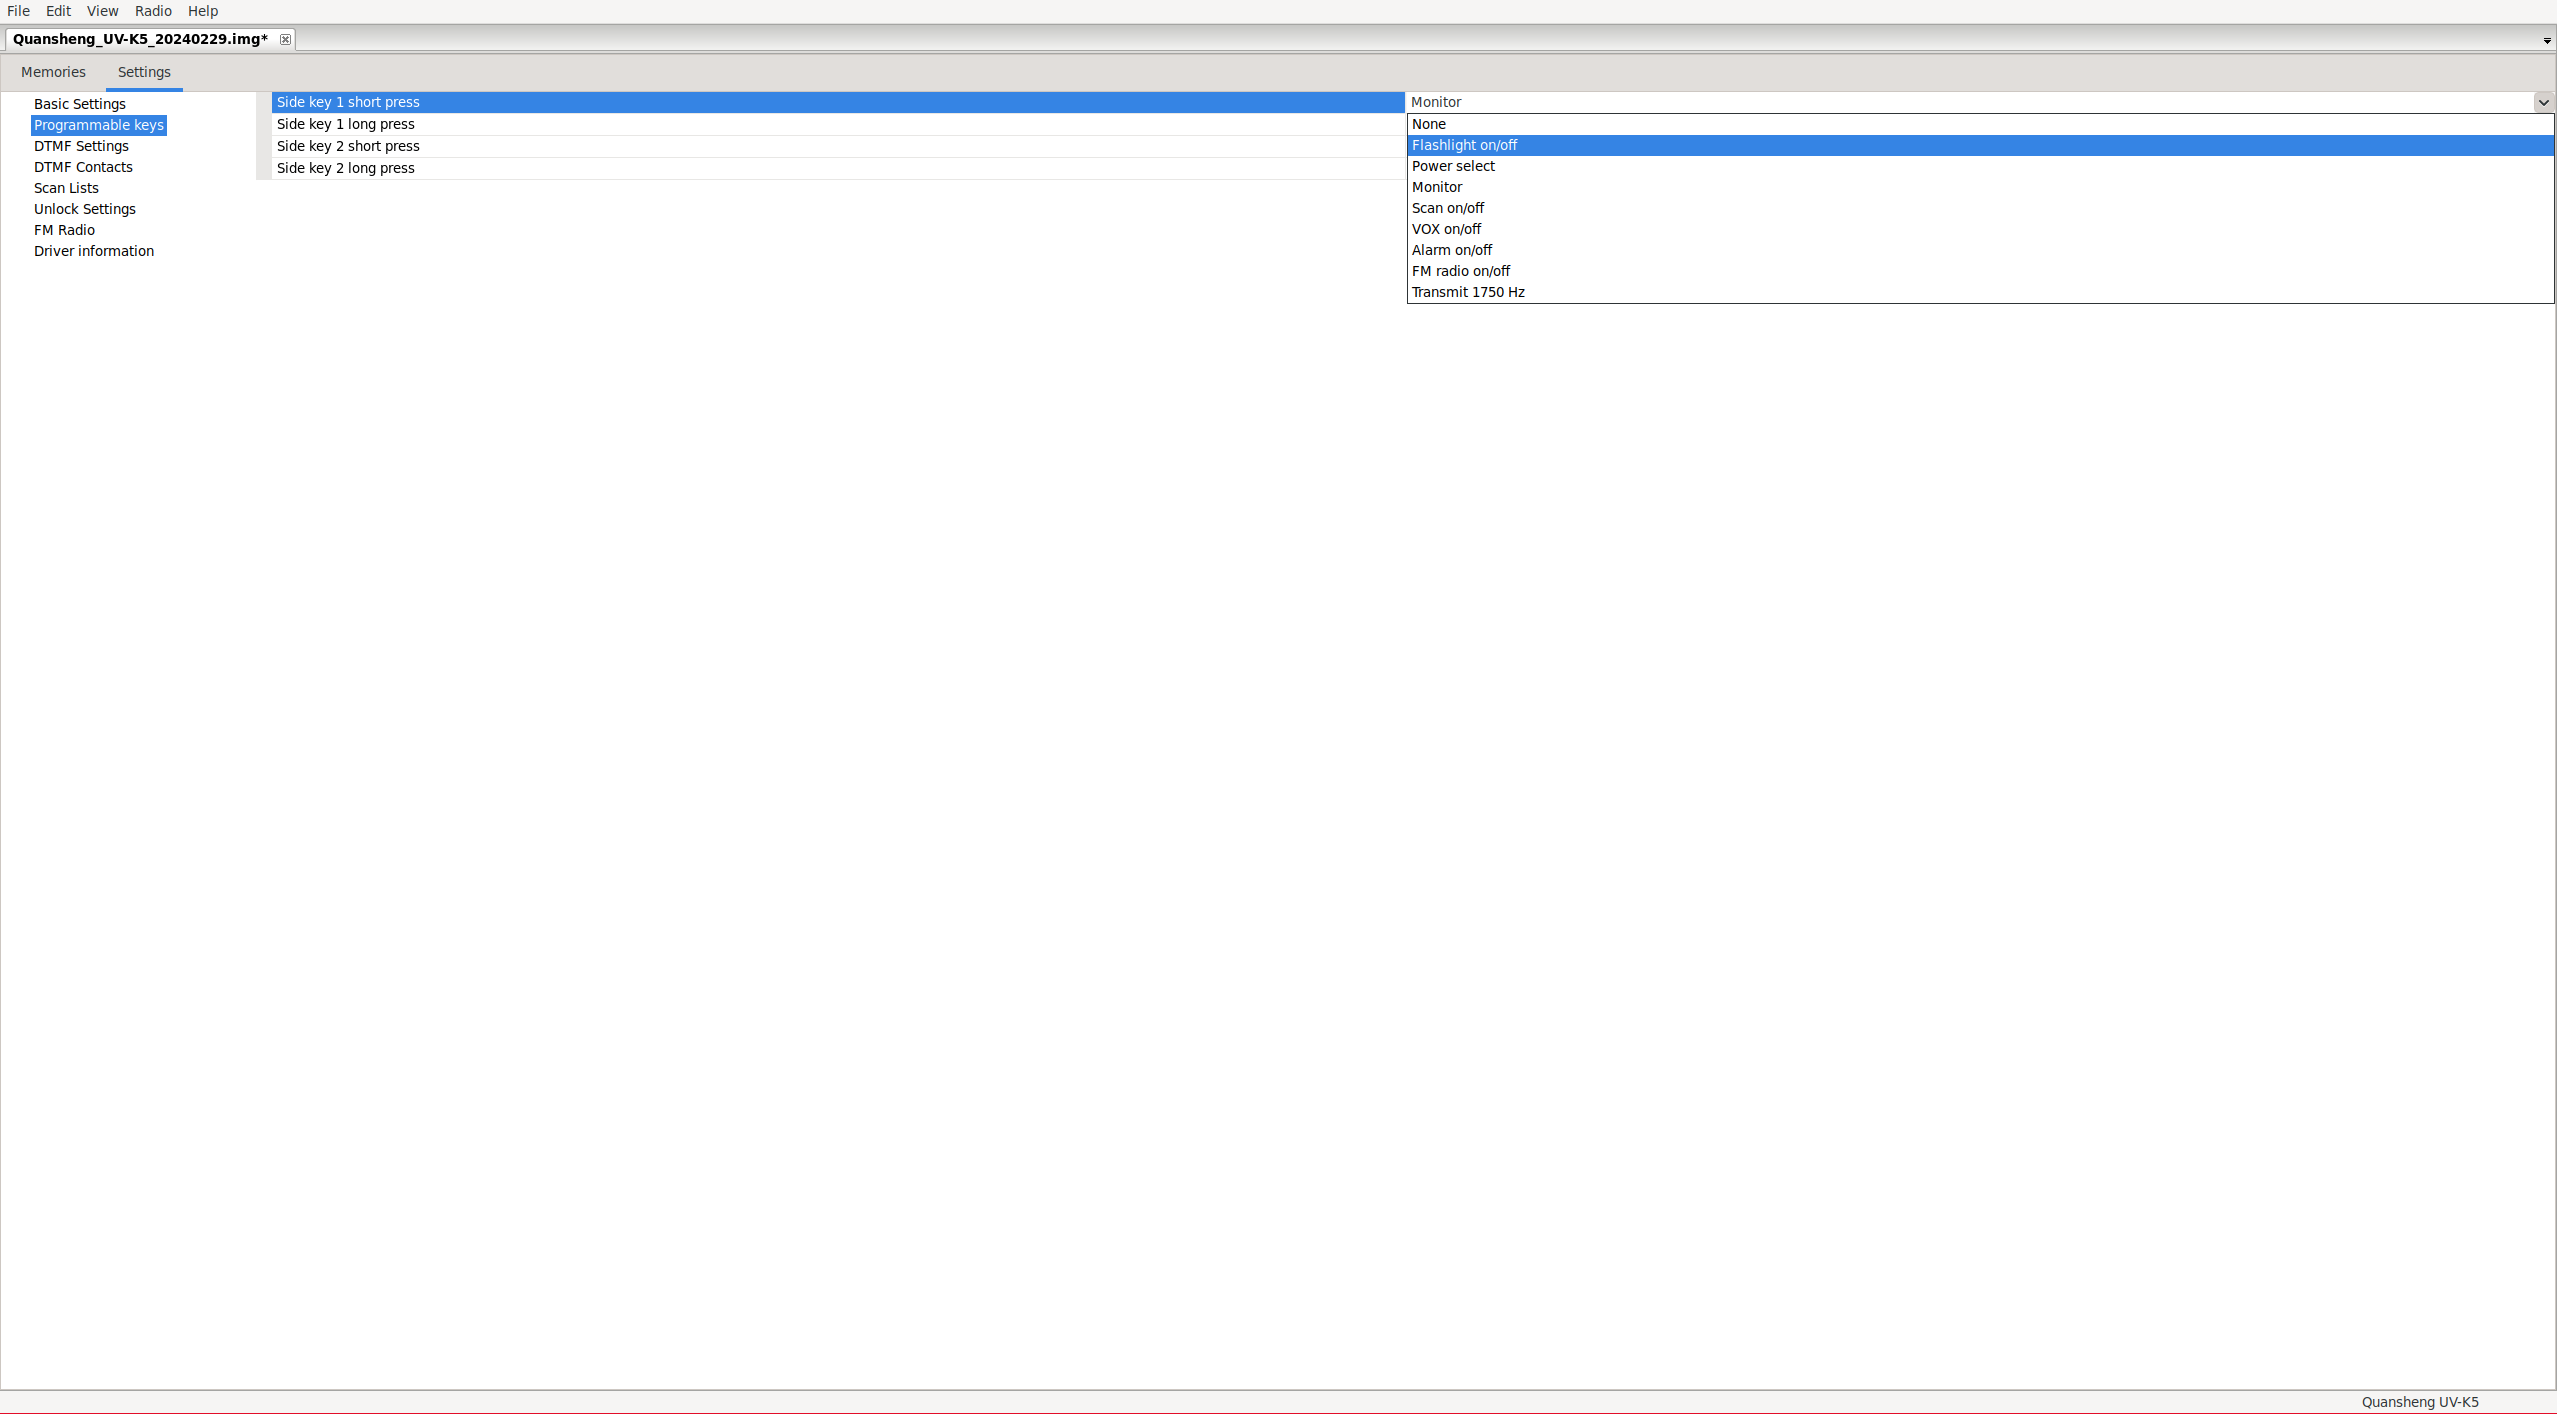
Function key:
In the Function key section, we can configure the SideKeys.
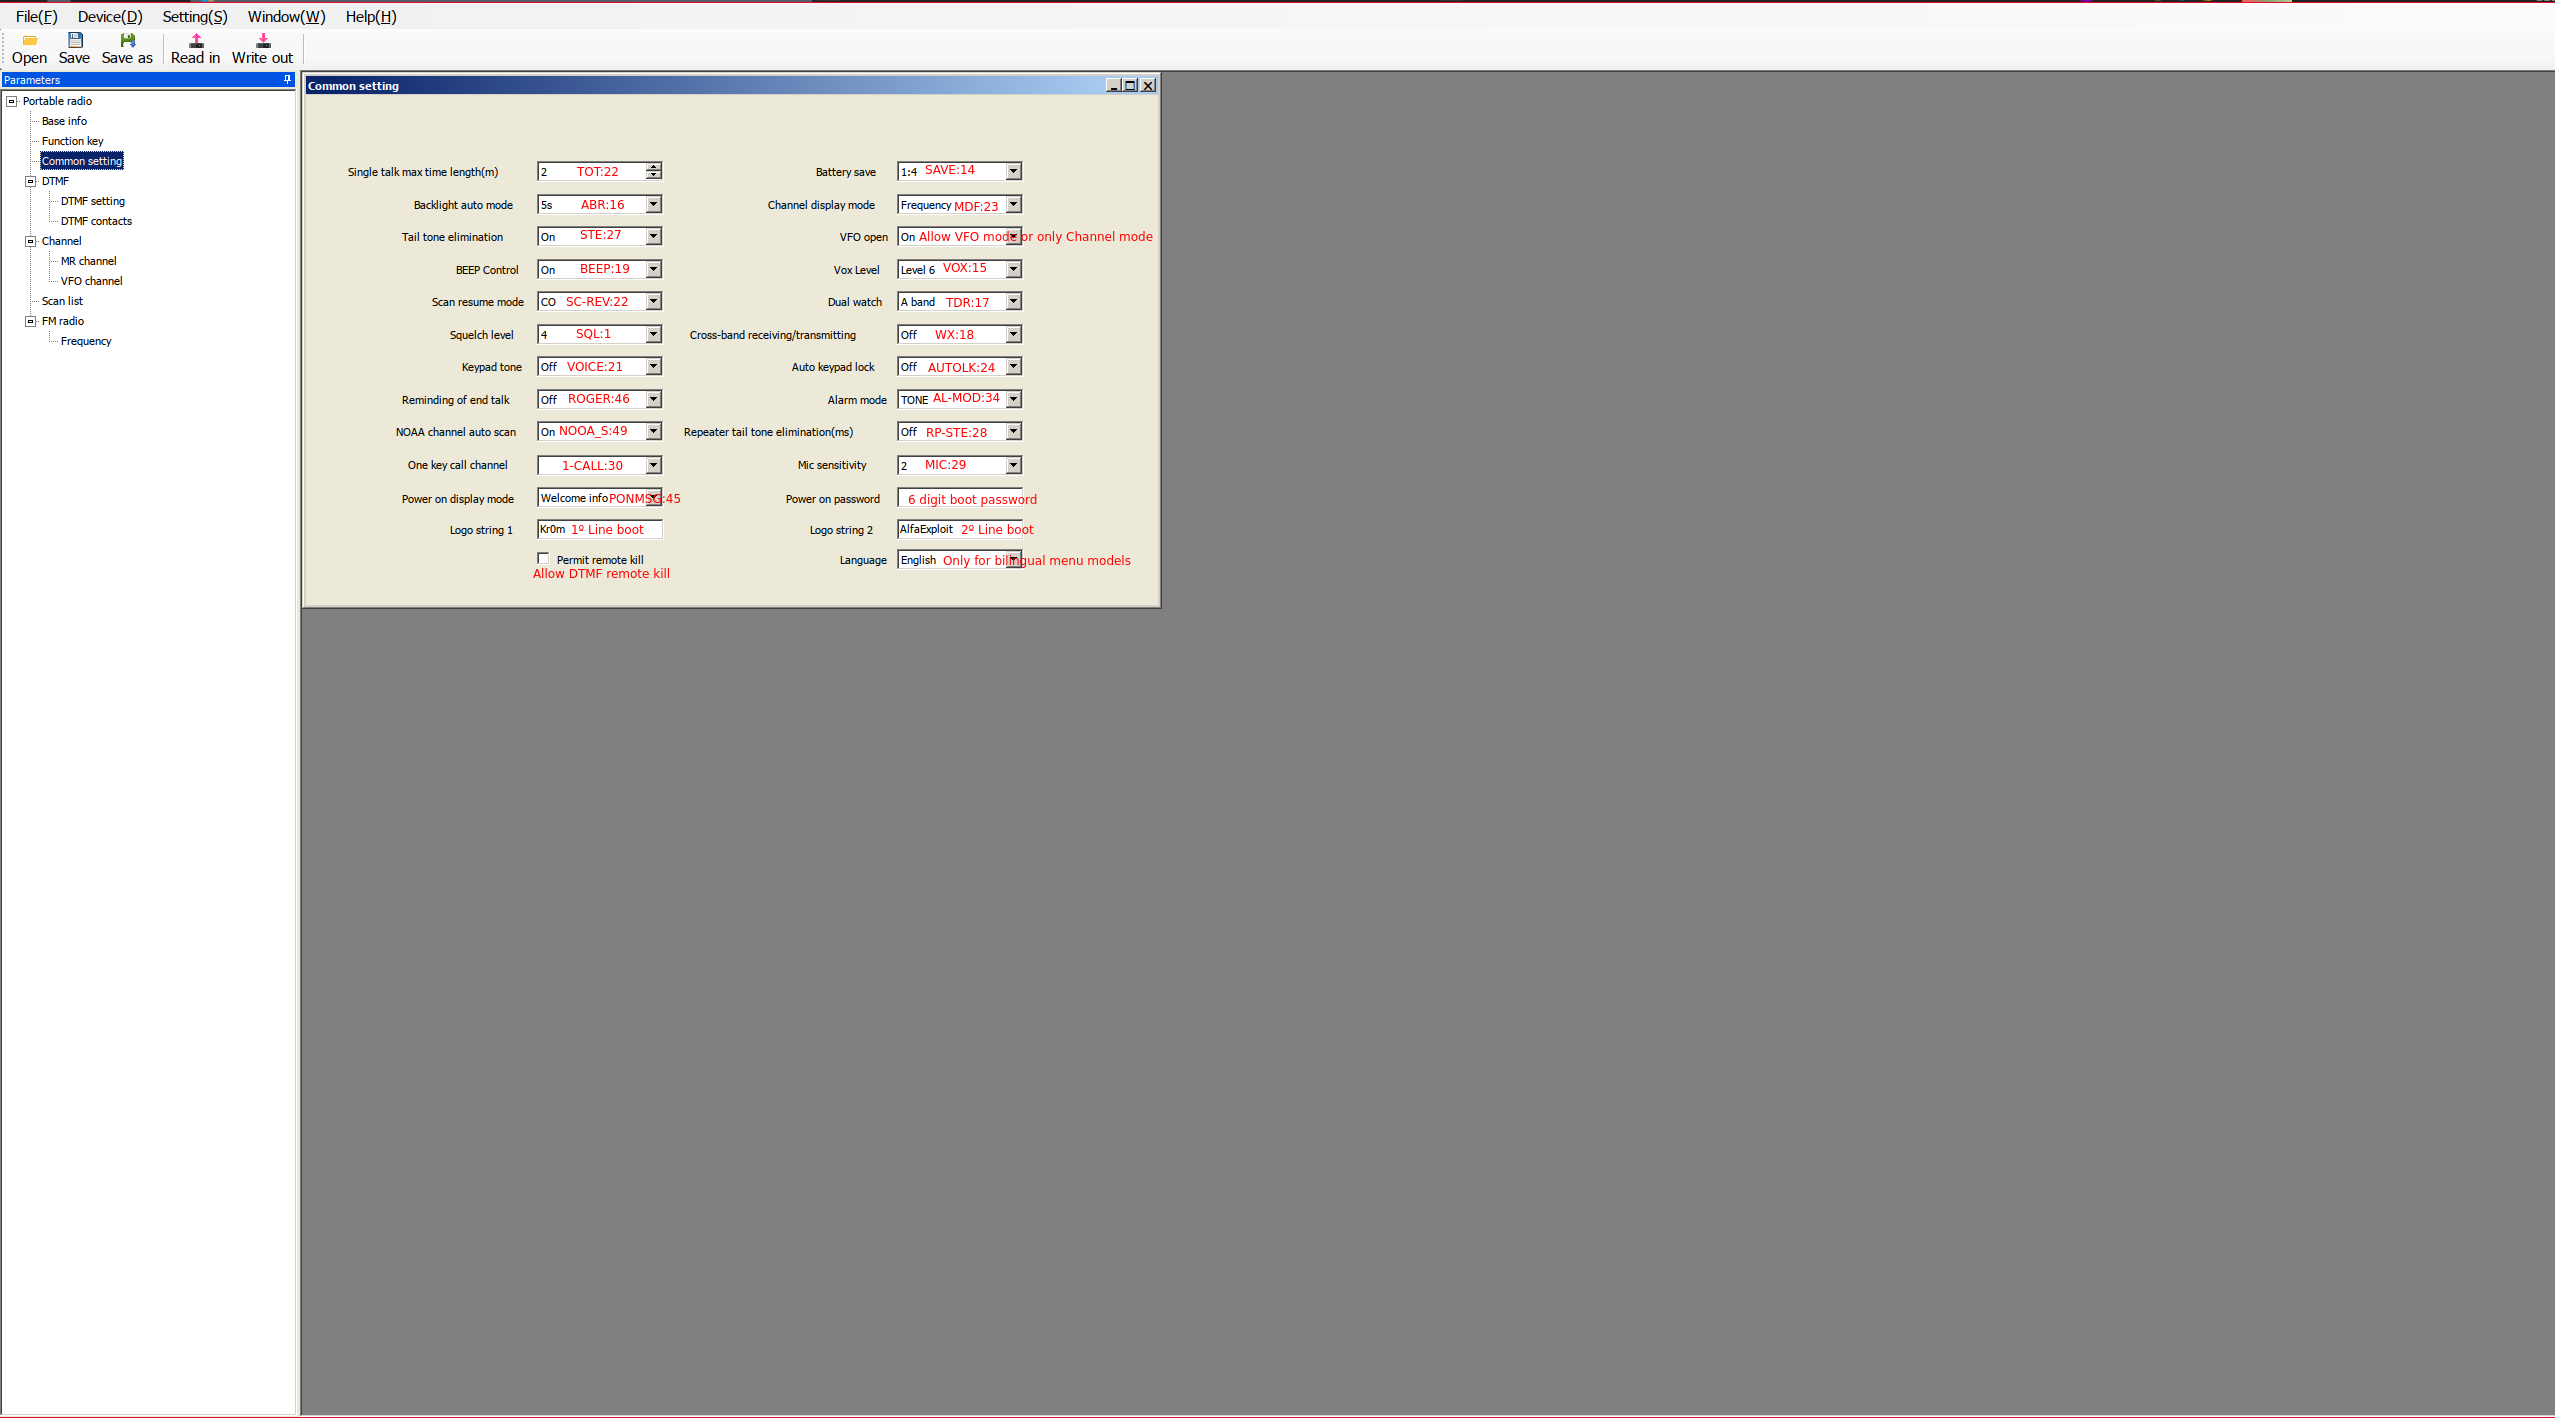
Common setting:
In the Common setting section, we can configure various aspects of the radio. I’ll indicate their equivalent from the firmware menu. If there’s no equivalent in the menu and it’s an option only configurable from the PC, I’ll provide a brief description.
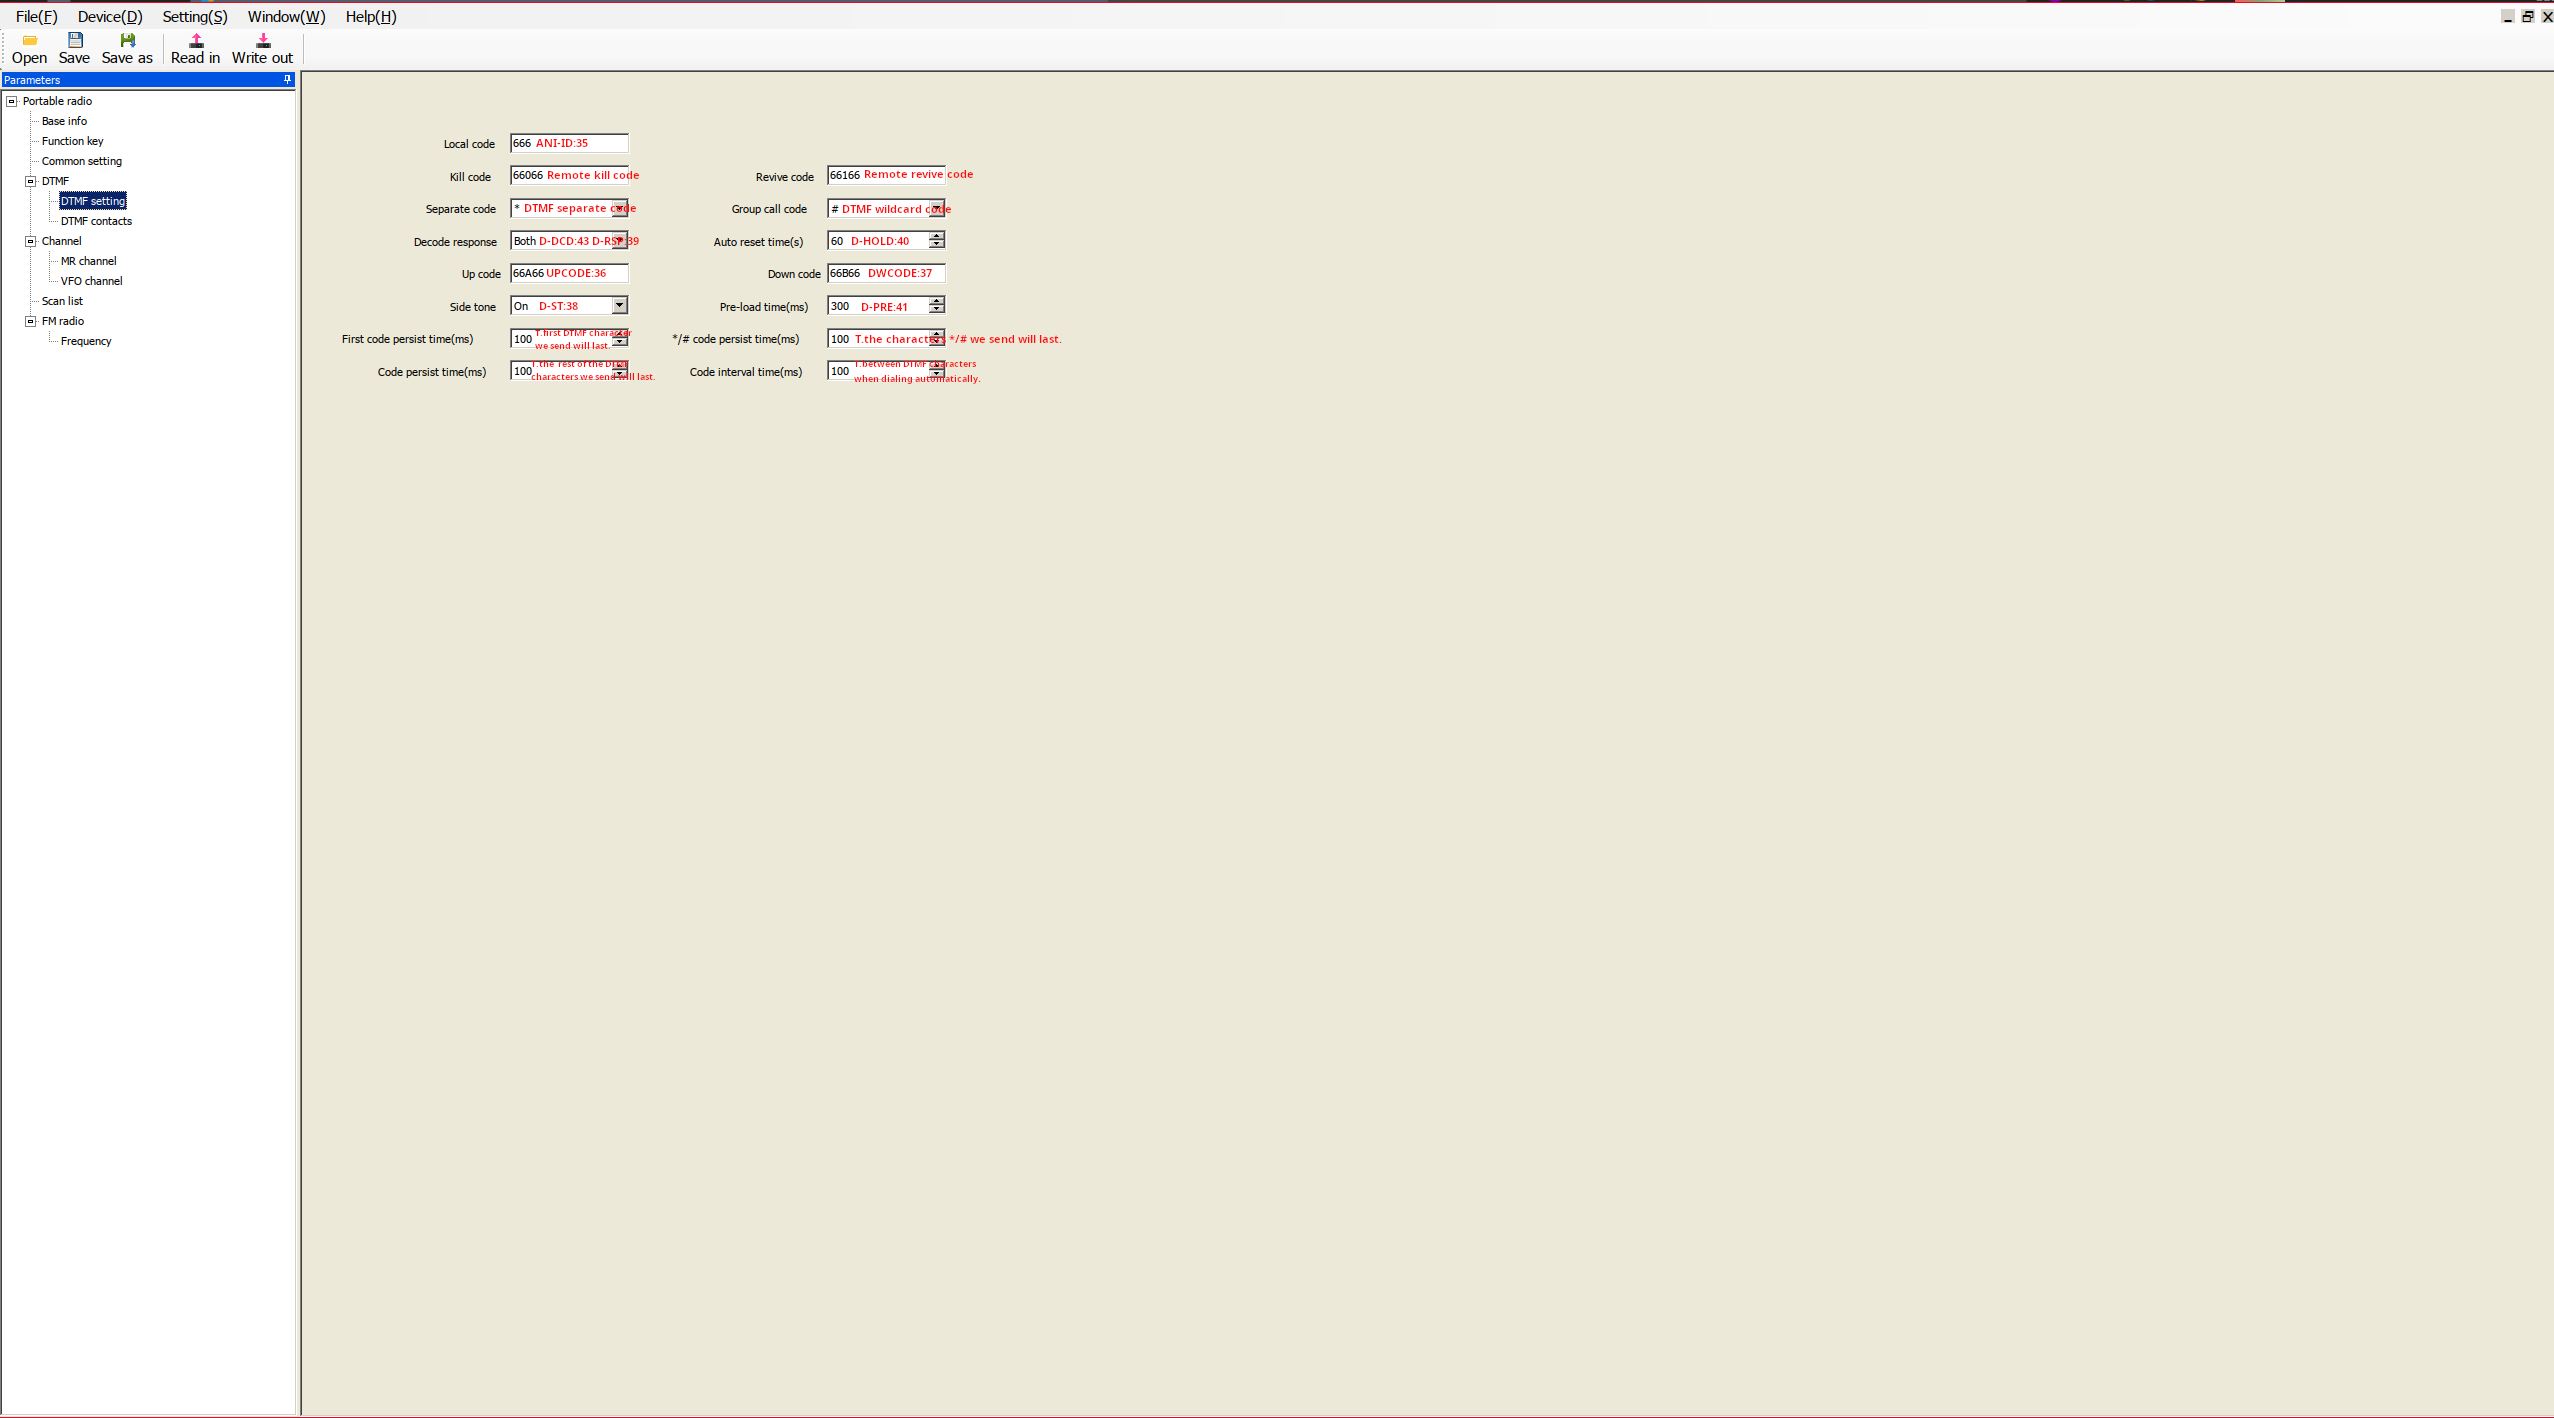
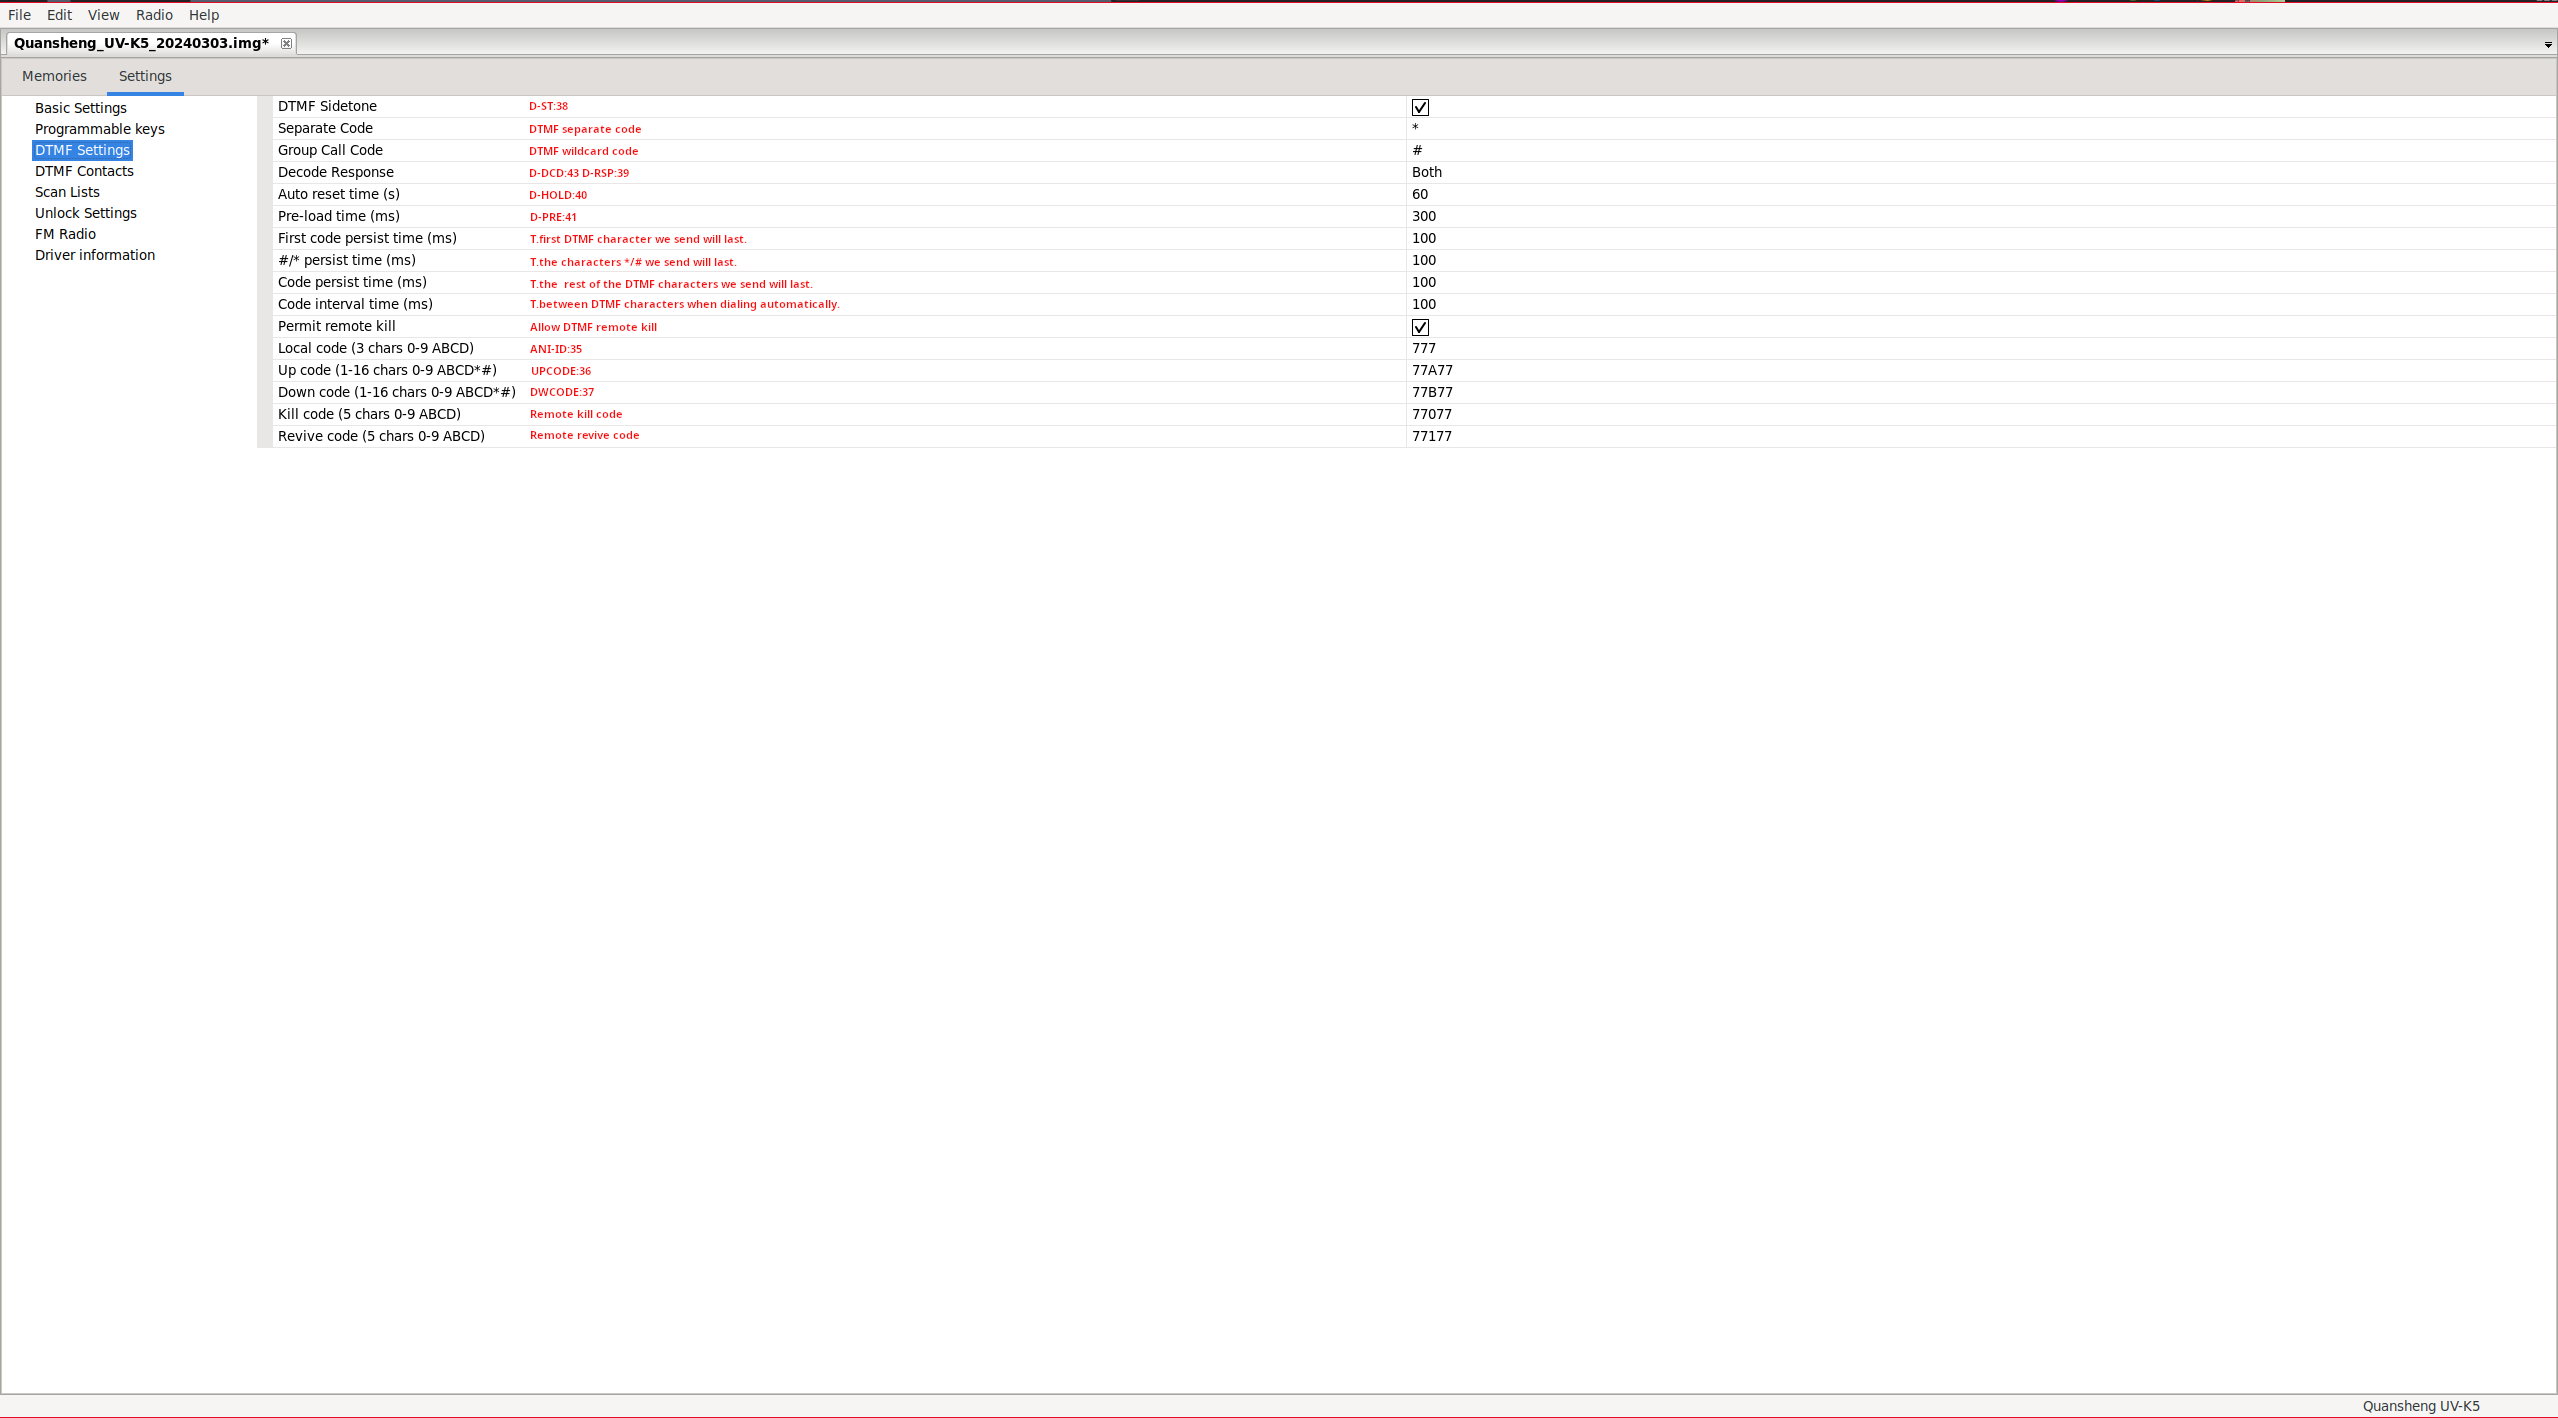
DTMF setting:
In the DTMF setting section, we can configure DTMF tone related parameters.
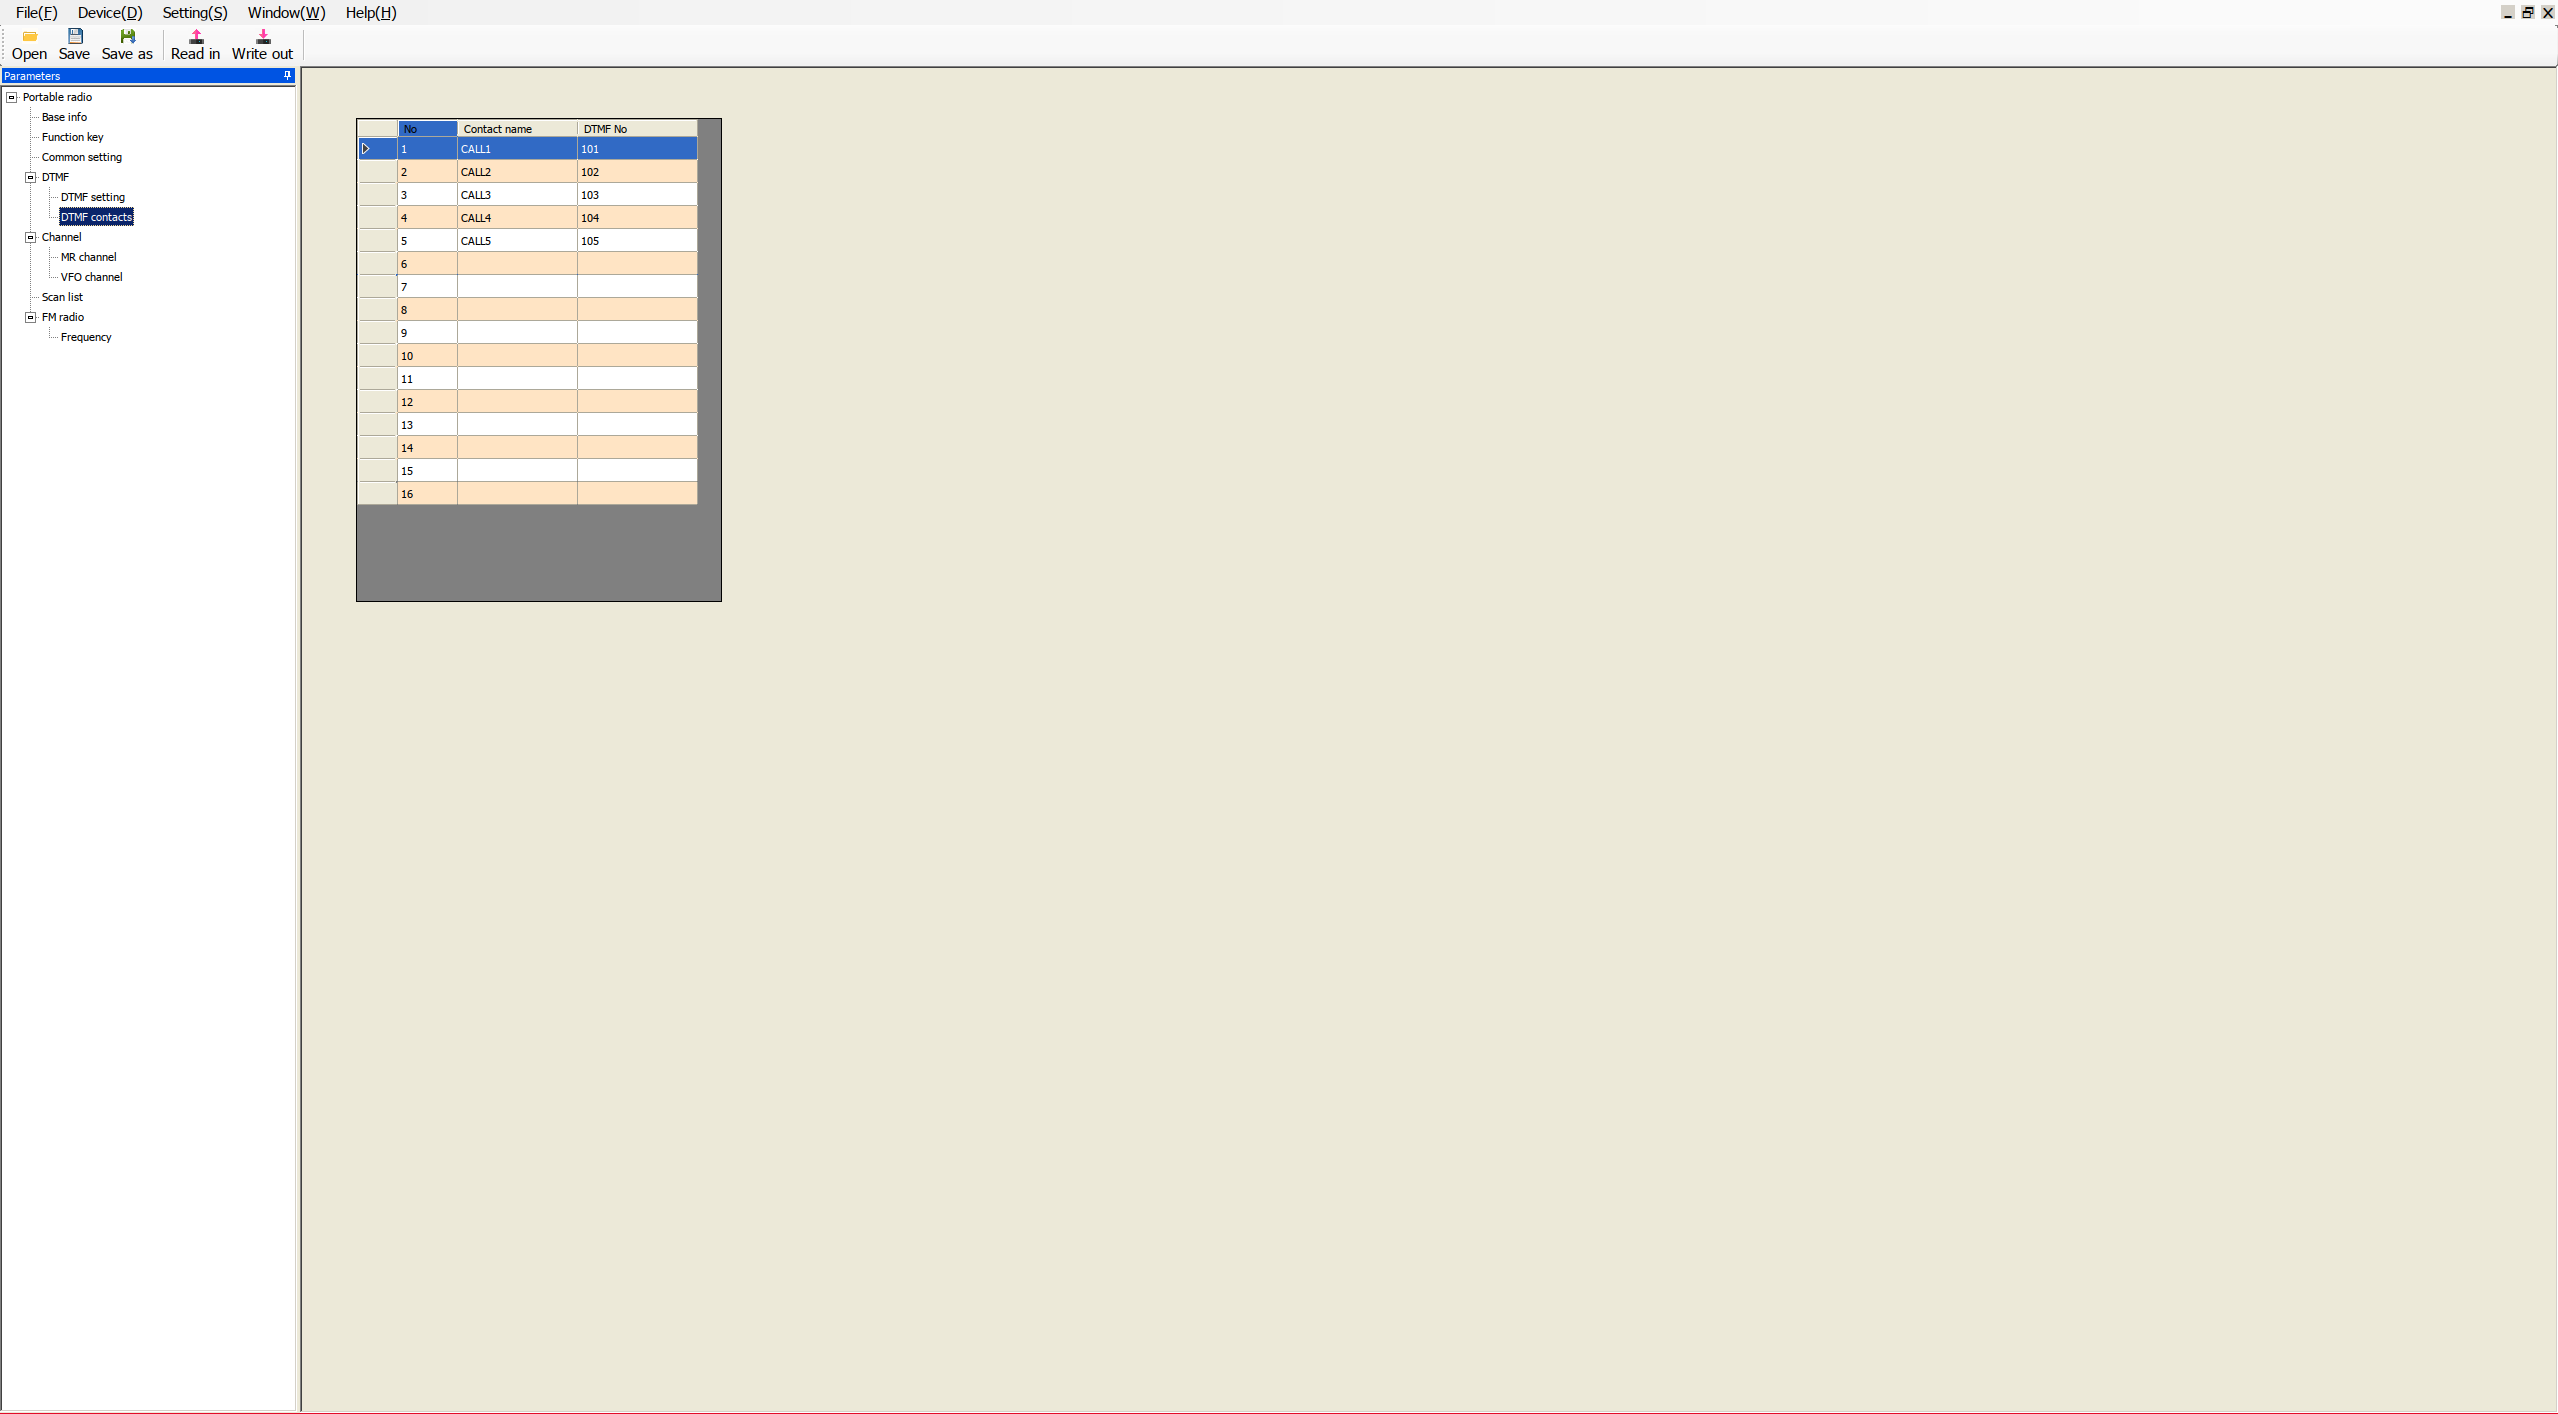
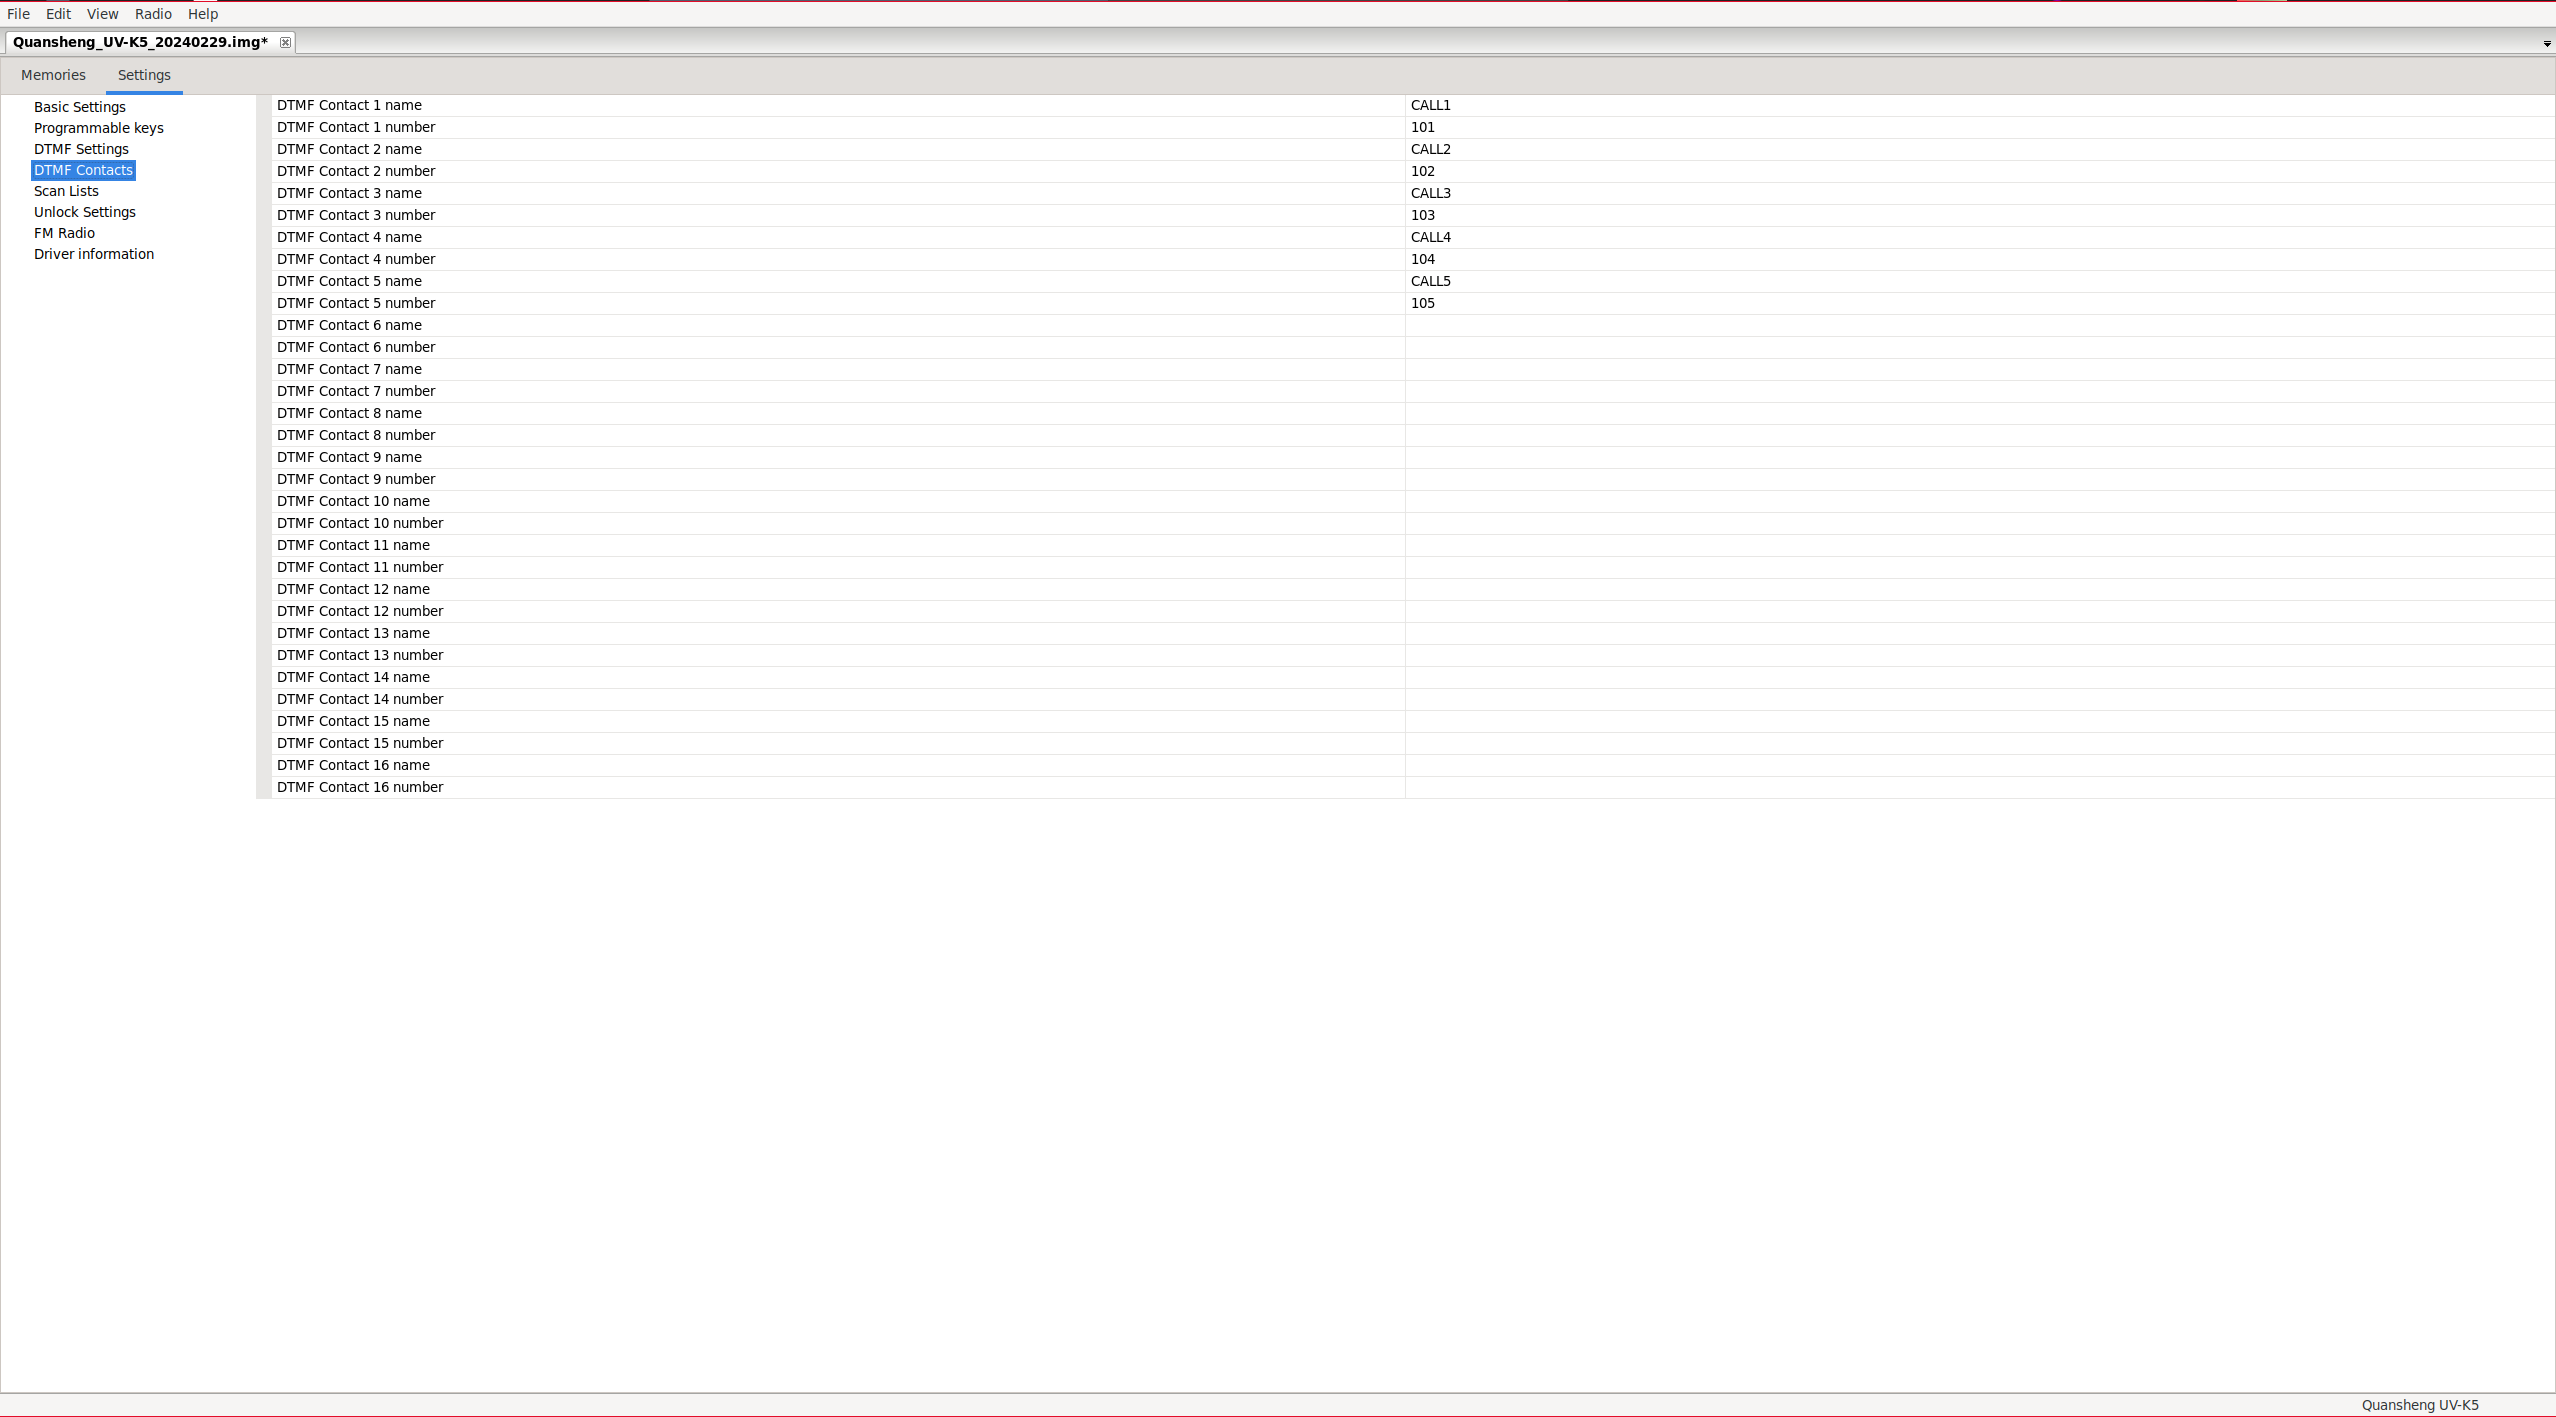
DTMF contacts:
In the DTMF contacts section, we can configure our DTMF contacts.
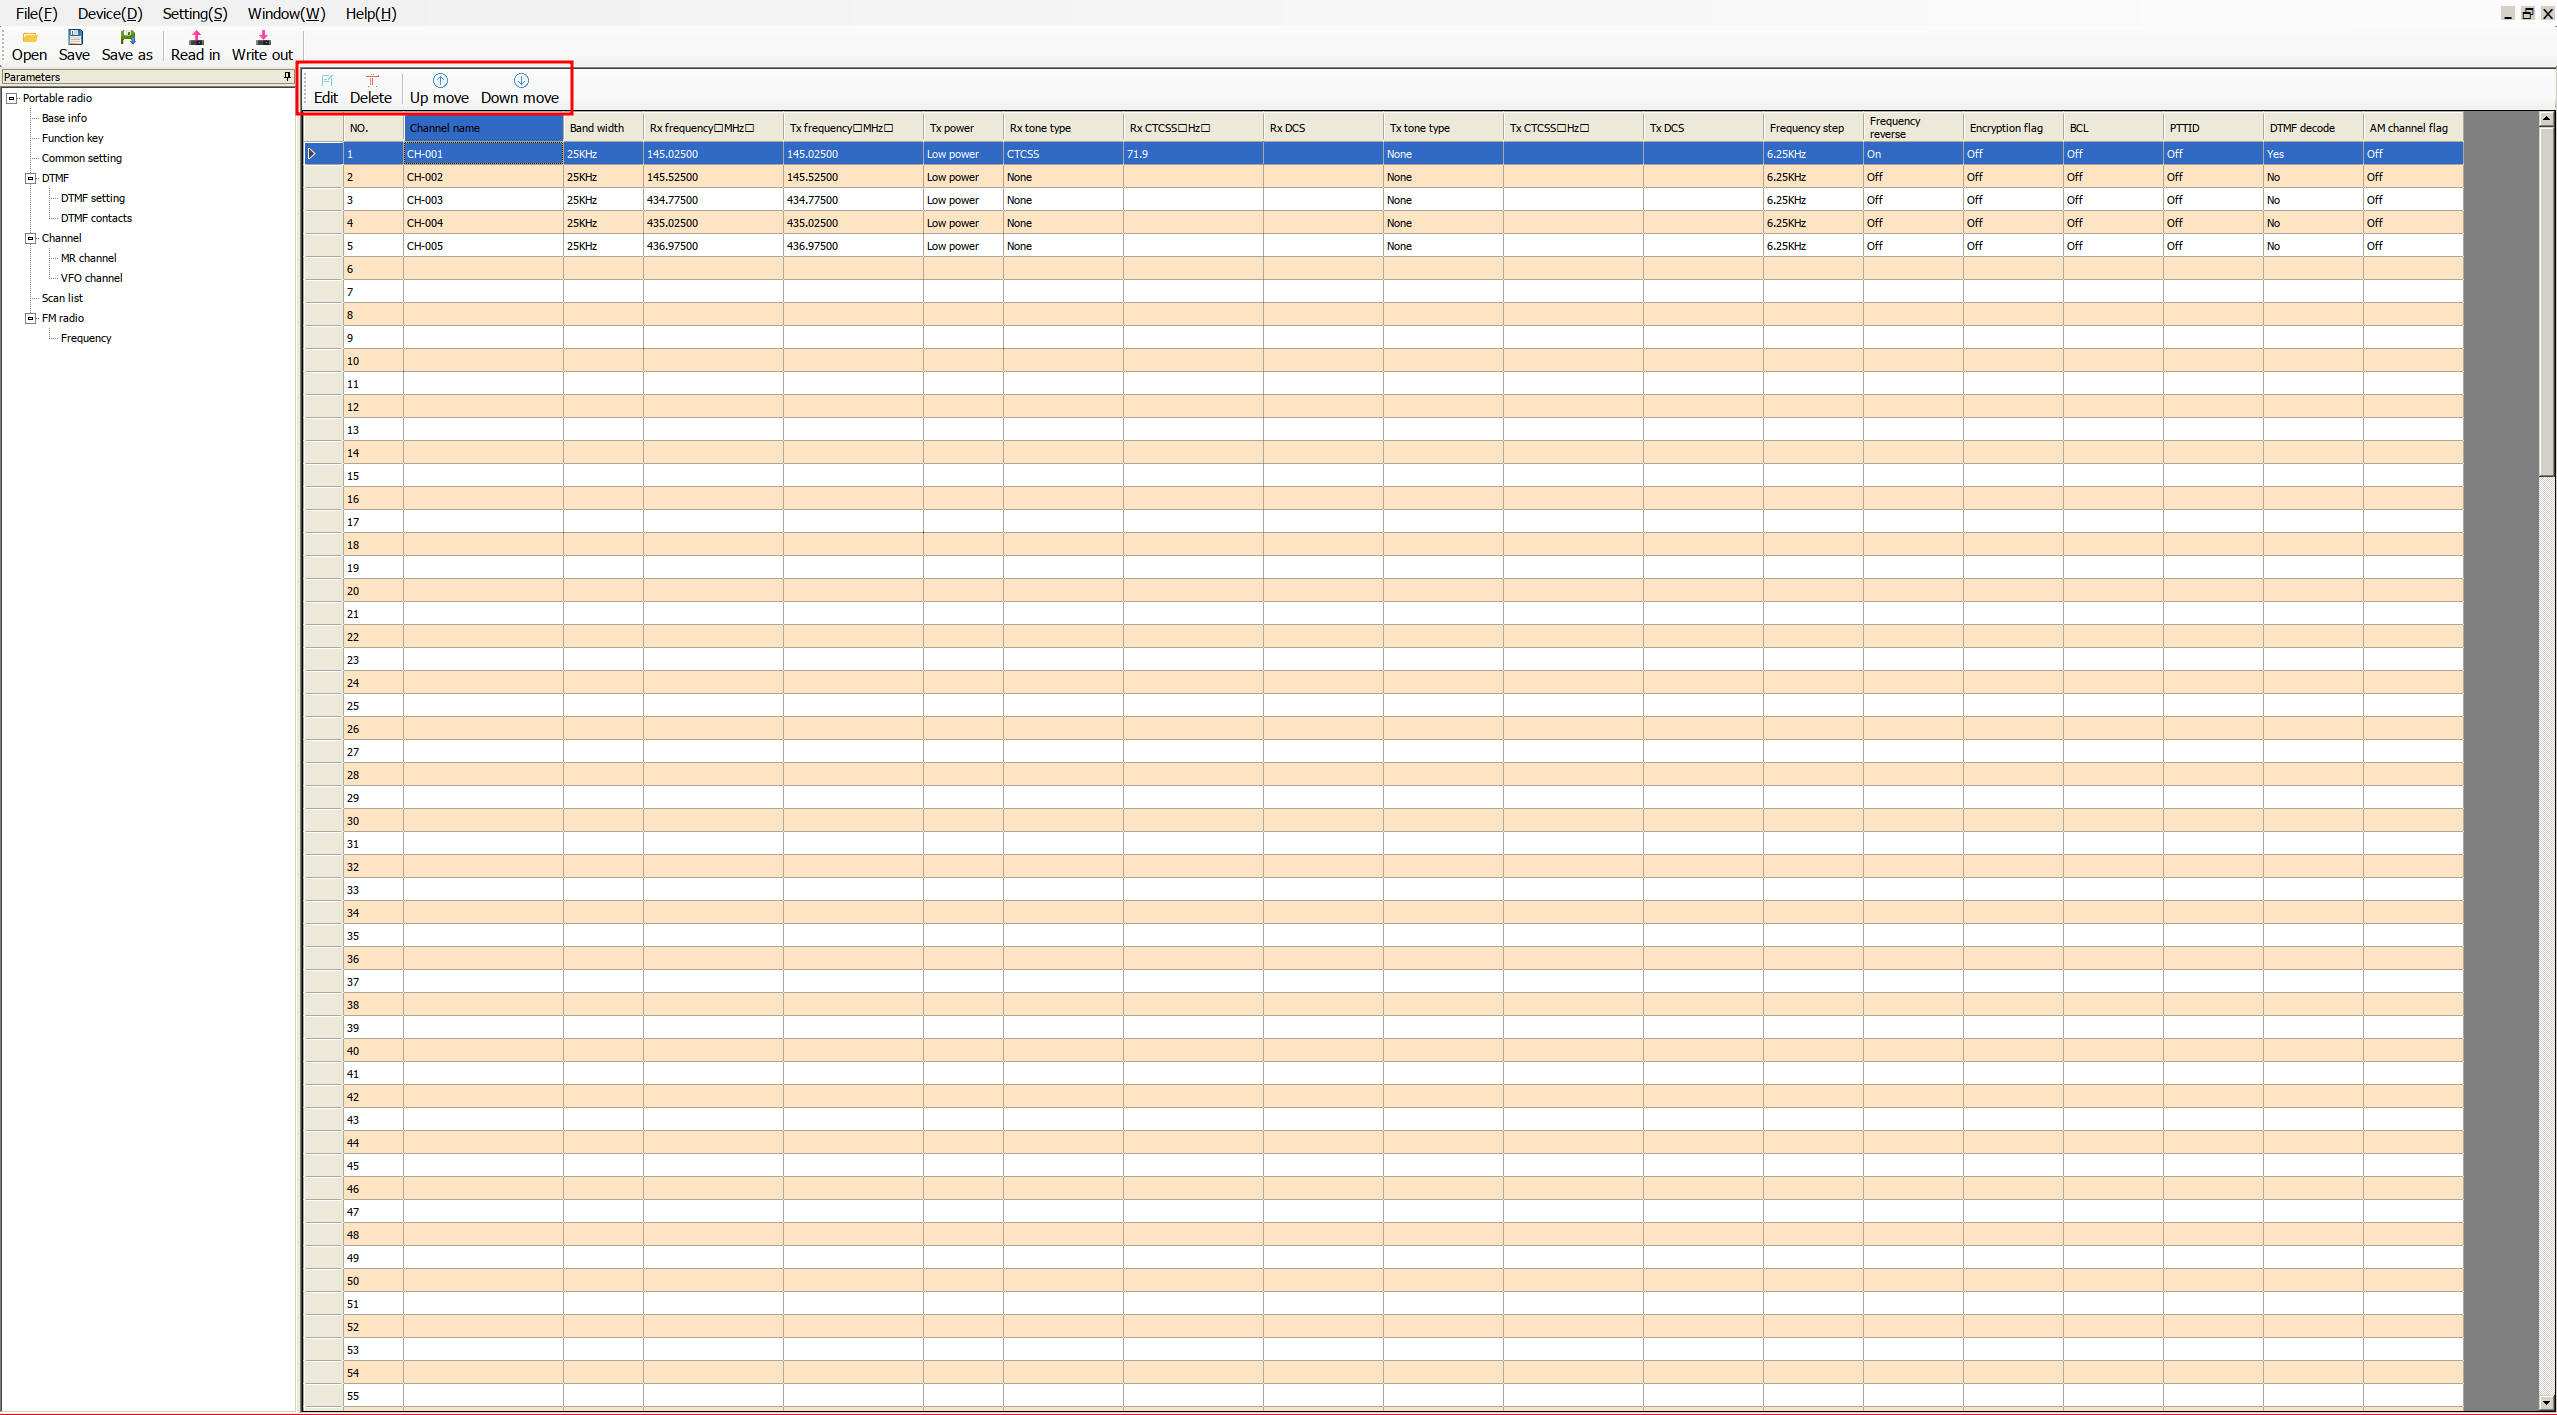
MR channel:
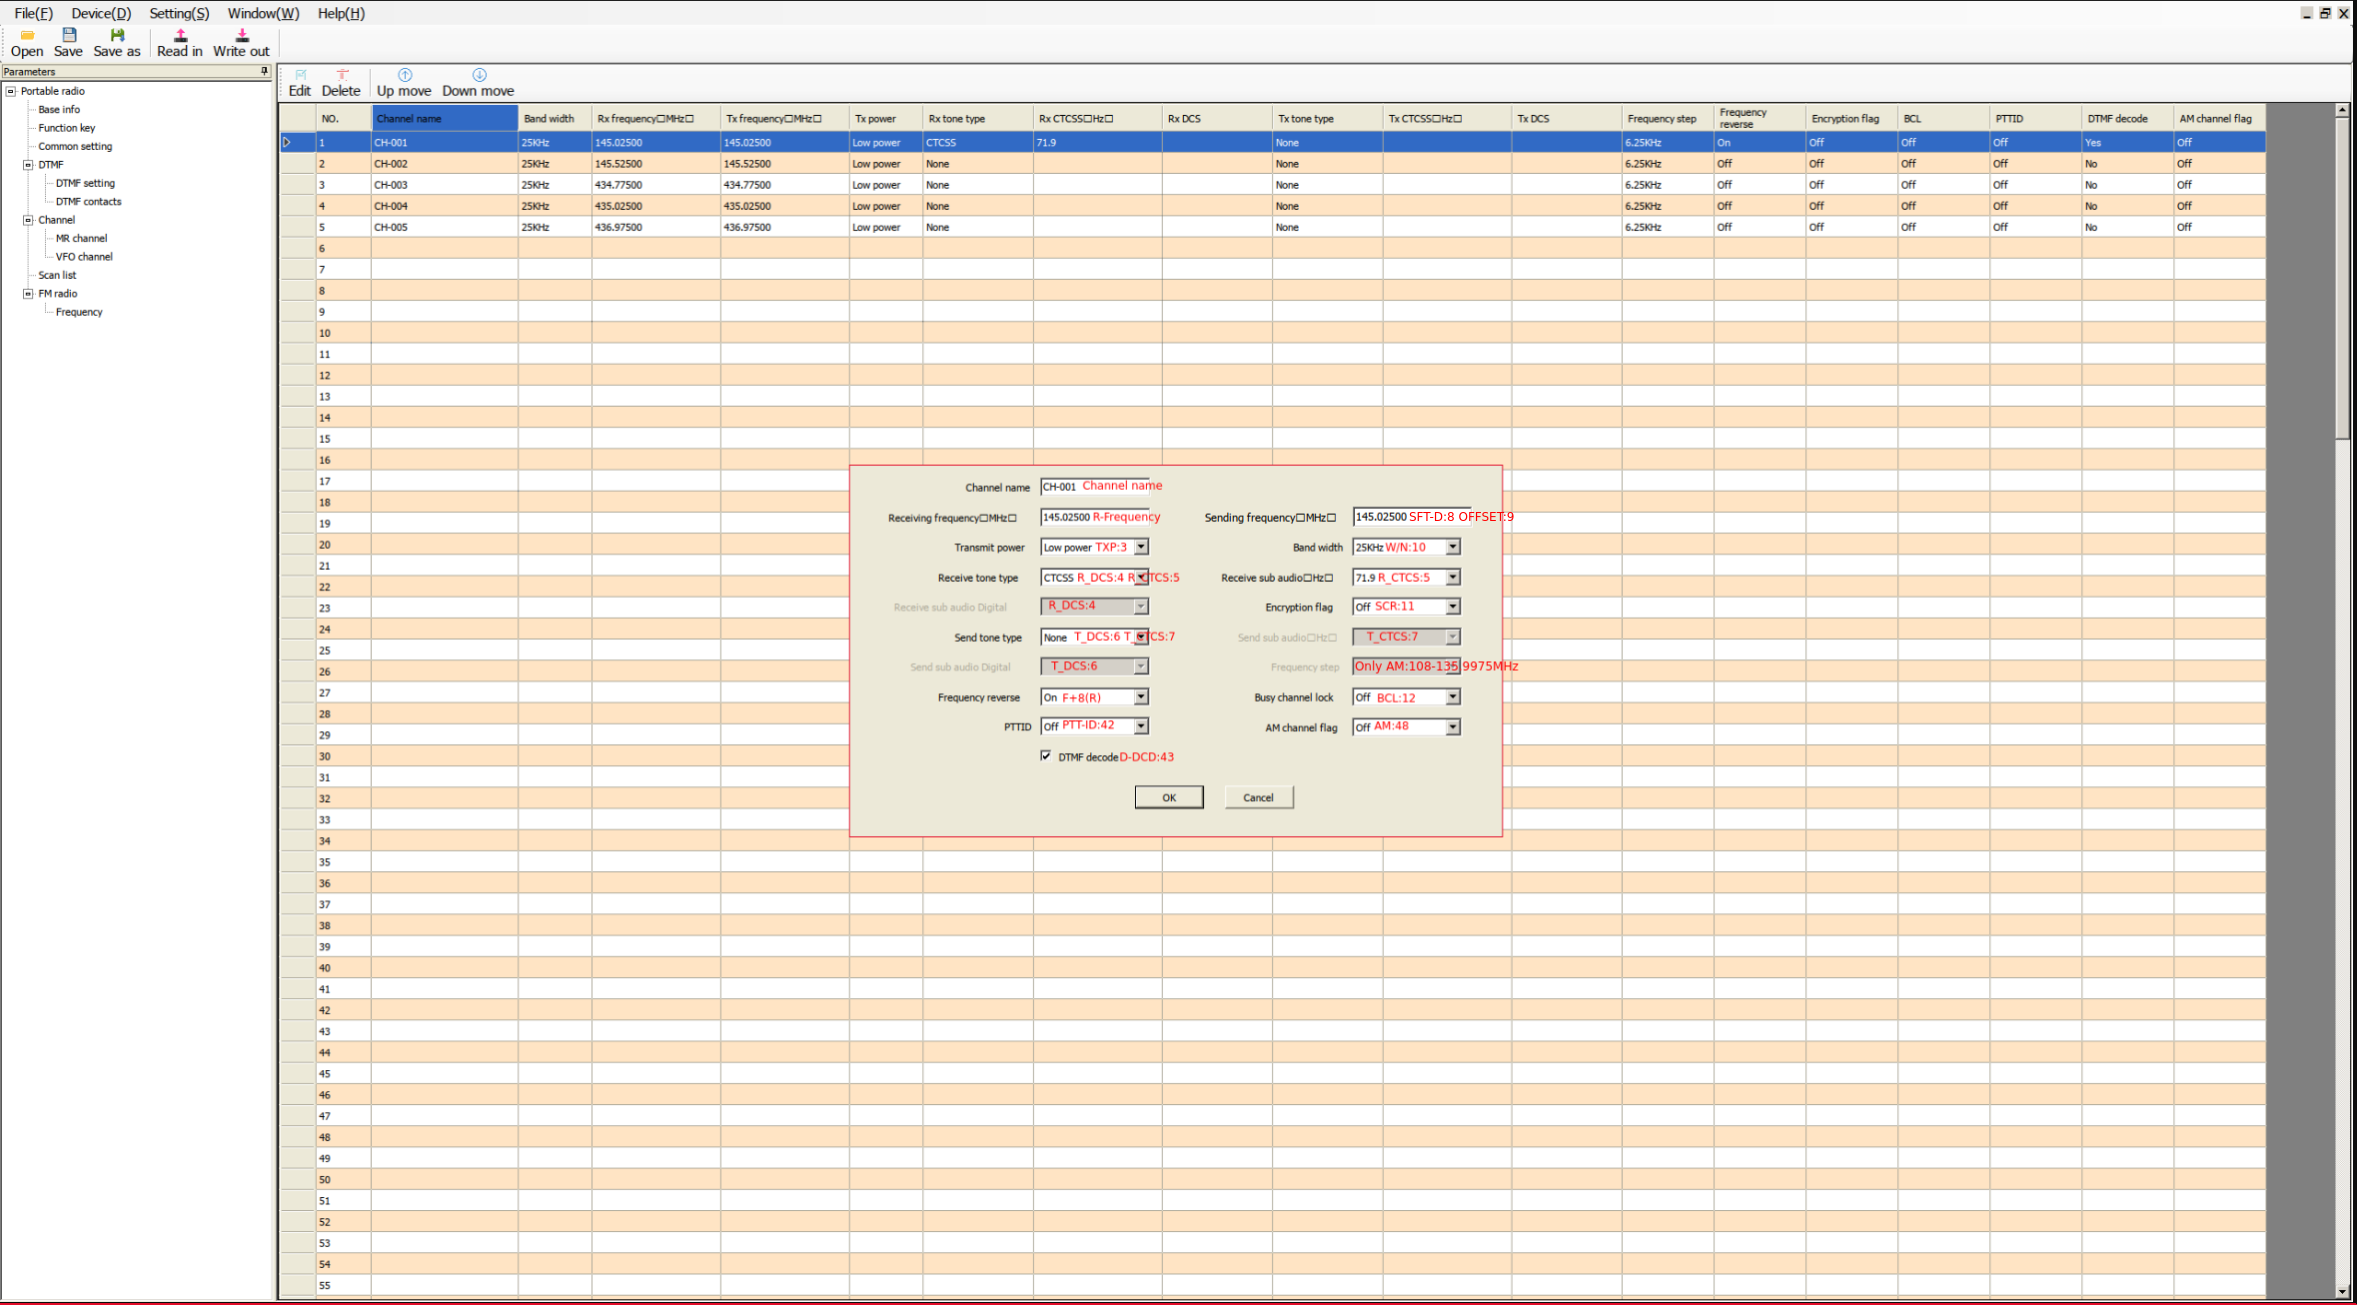
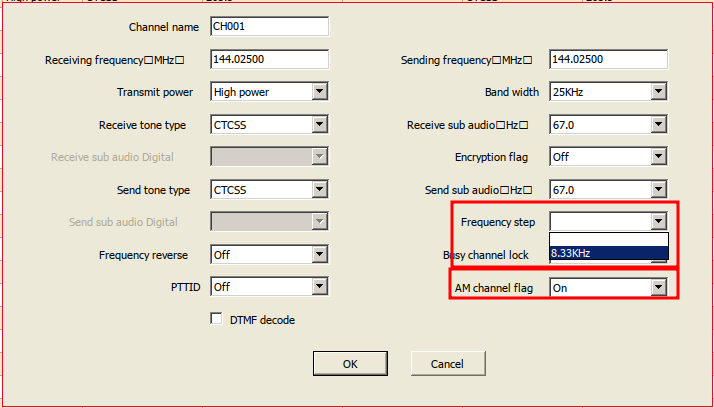
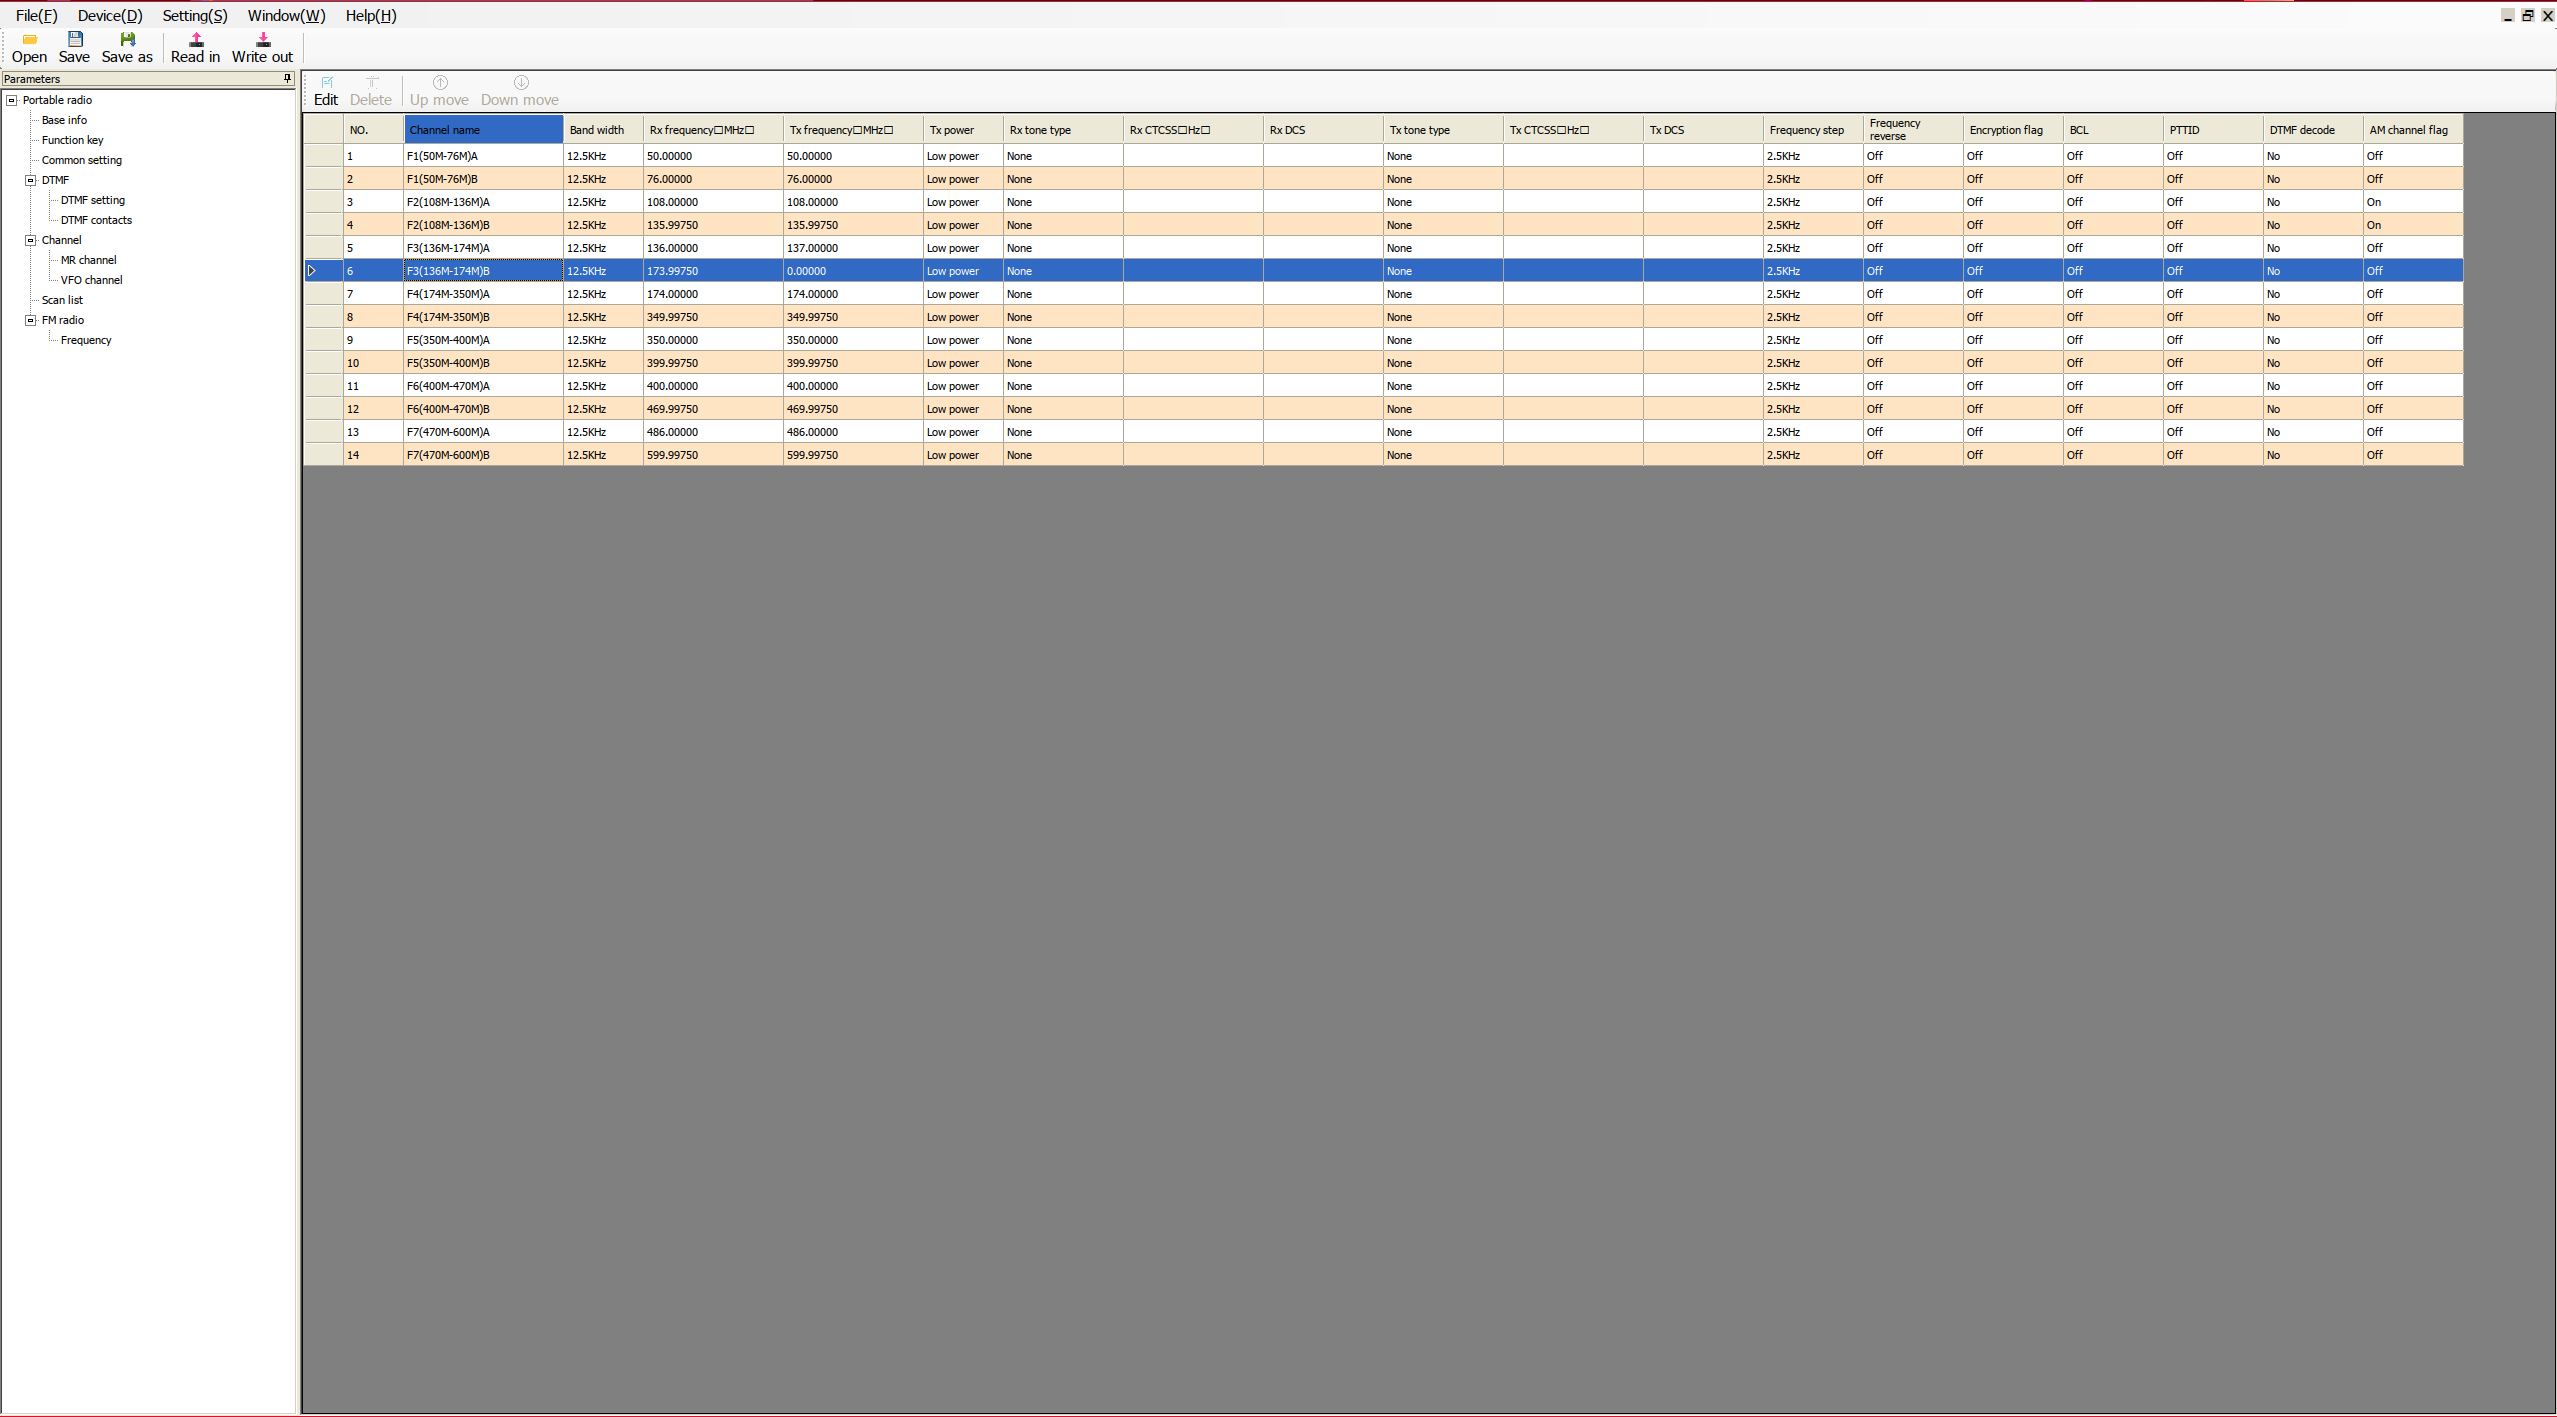
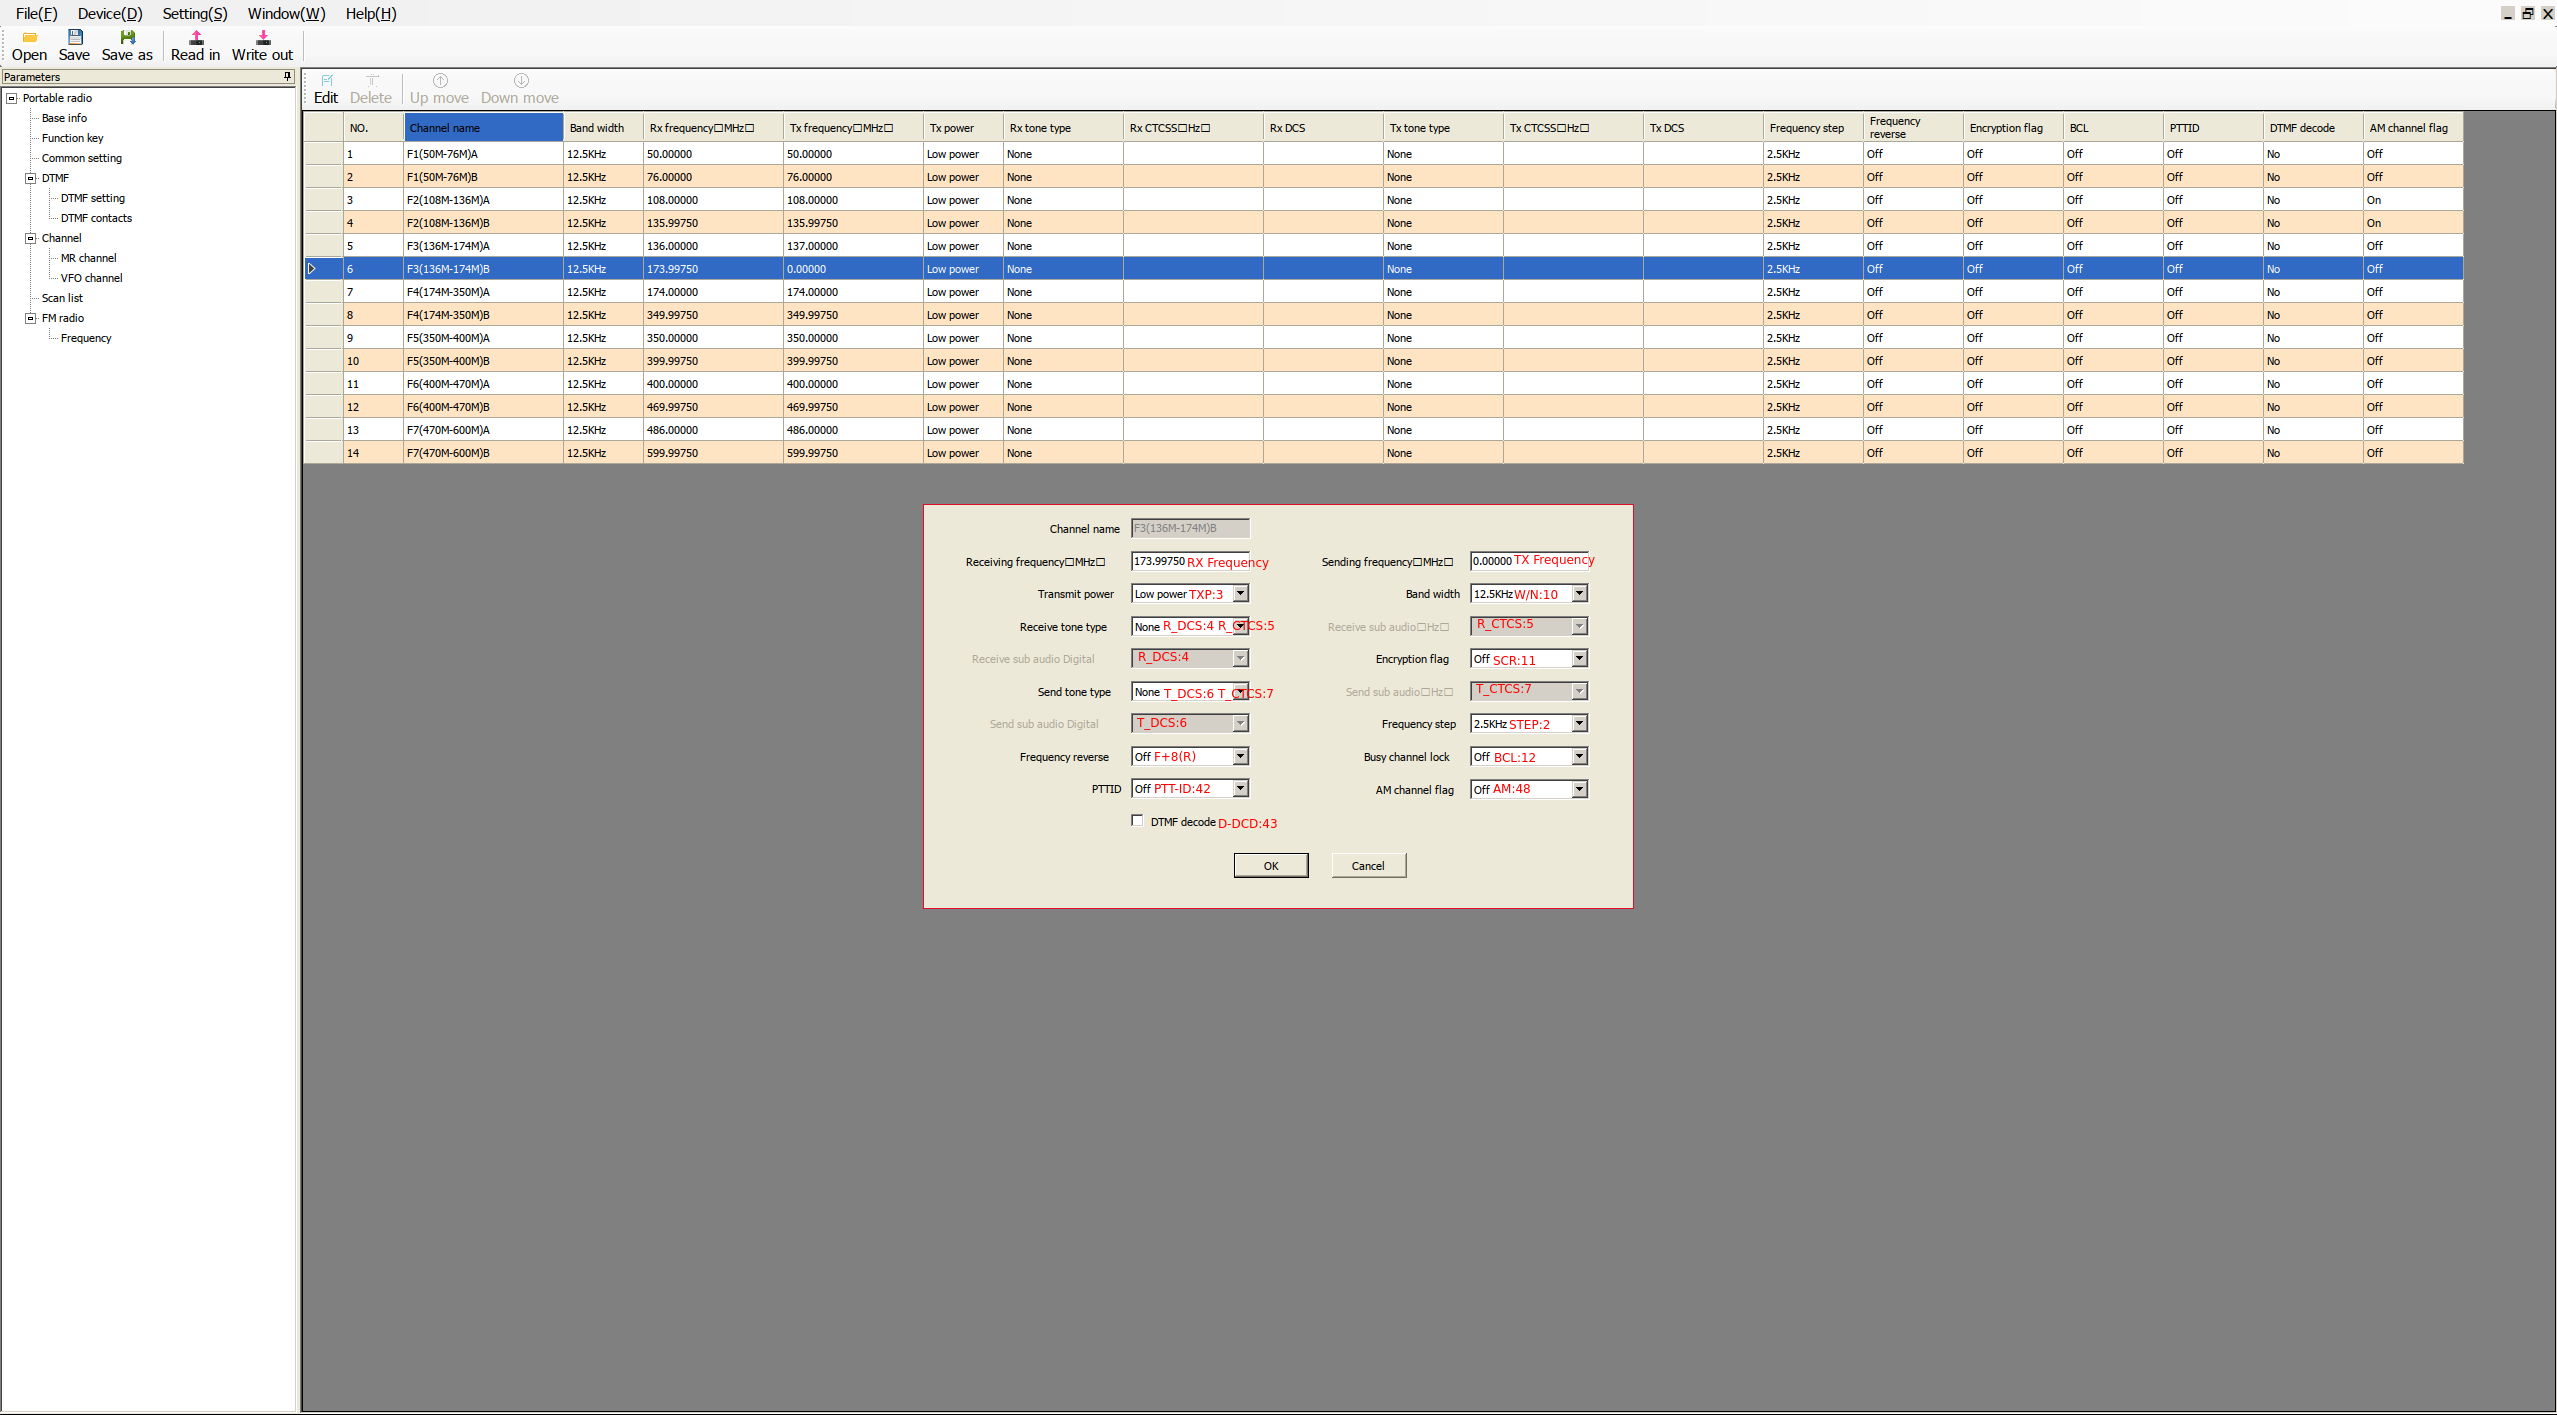
In the MR channel section, we can configure parameters related to the channels. From the main menu, we can edit, reorder, and delete channels. Double-clicking on a channel will also allow us to edit it.
|
|
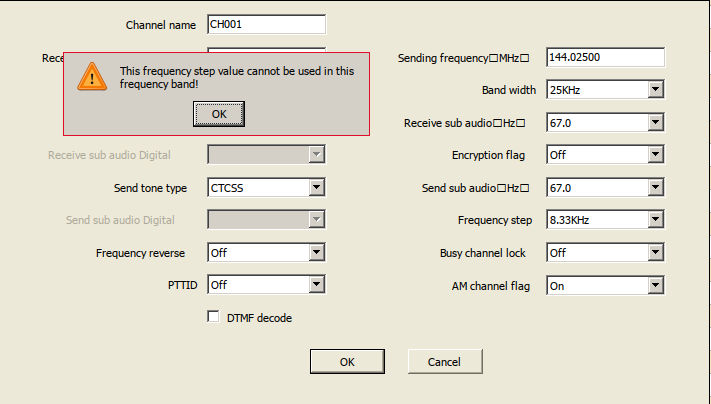
The Frequency step option will only be available for the AM airband: 108∽135.9975 MHz. If we try to configure it for another band, the following error will appear:
|
|
NOTE: In channel mode, the step parameter doesn’t seem to make sense to me either, neither in AM nor in FM.
VFO channel:
In the VFO channel section, we can configure parameters related to the bands. If we look closely, we can see the same band listed twice. The first entry indicates the starting frequency: A, and the second indicates the ending frequency of the band: B.
|
|
If we set a TX freq-A different from RX freq-A, we are configuring an offset in that band for transmission.
Exactly, if we have RX freq-A: 136.00000 MHz and TX freq-A: 137.00000 MHz, we have an offset of +1.00000 MHz.
Whenever we are between the frequencies RX freq-A and RX freq-B, when transmitting a signal, we will exit on the current frequency +/- the offset. For example, if we are on 136.12500 MHz, we would transmit on 137.12500 MHz.
The parameter TX freq-B doesn’t seem to have any utility.
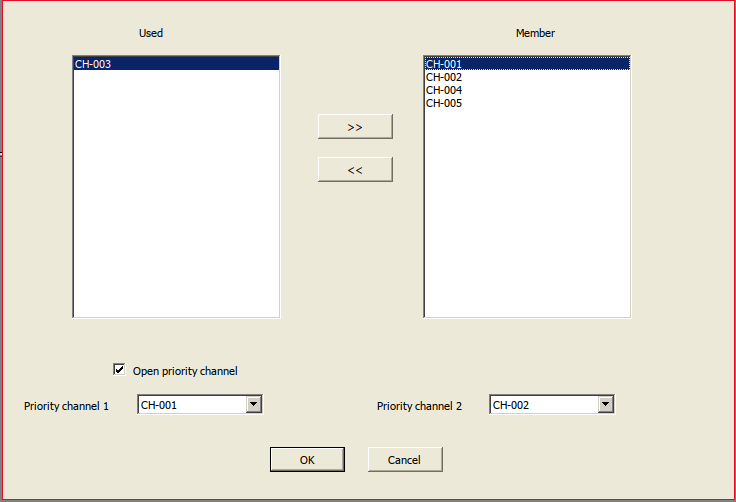
Scan list:
In the Scan list section, we can configure parameters related to scanning lists. From here, we can edit them, and we can also set one as the default. When we initiate scanning in channel mode, this will be the list used.
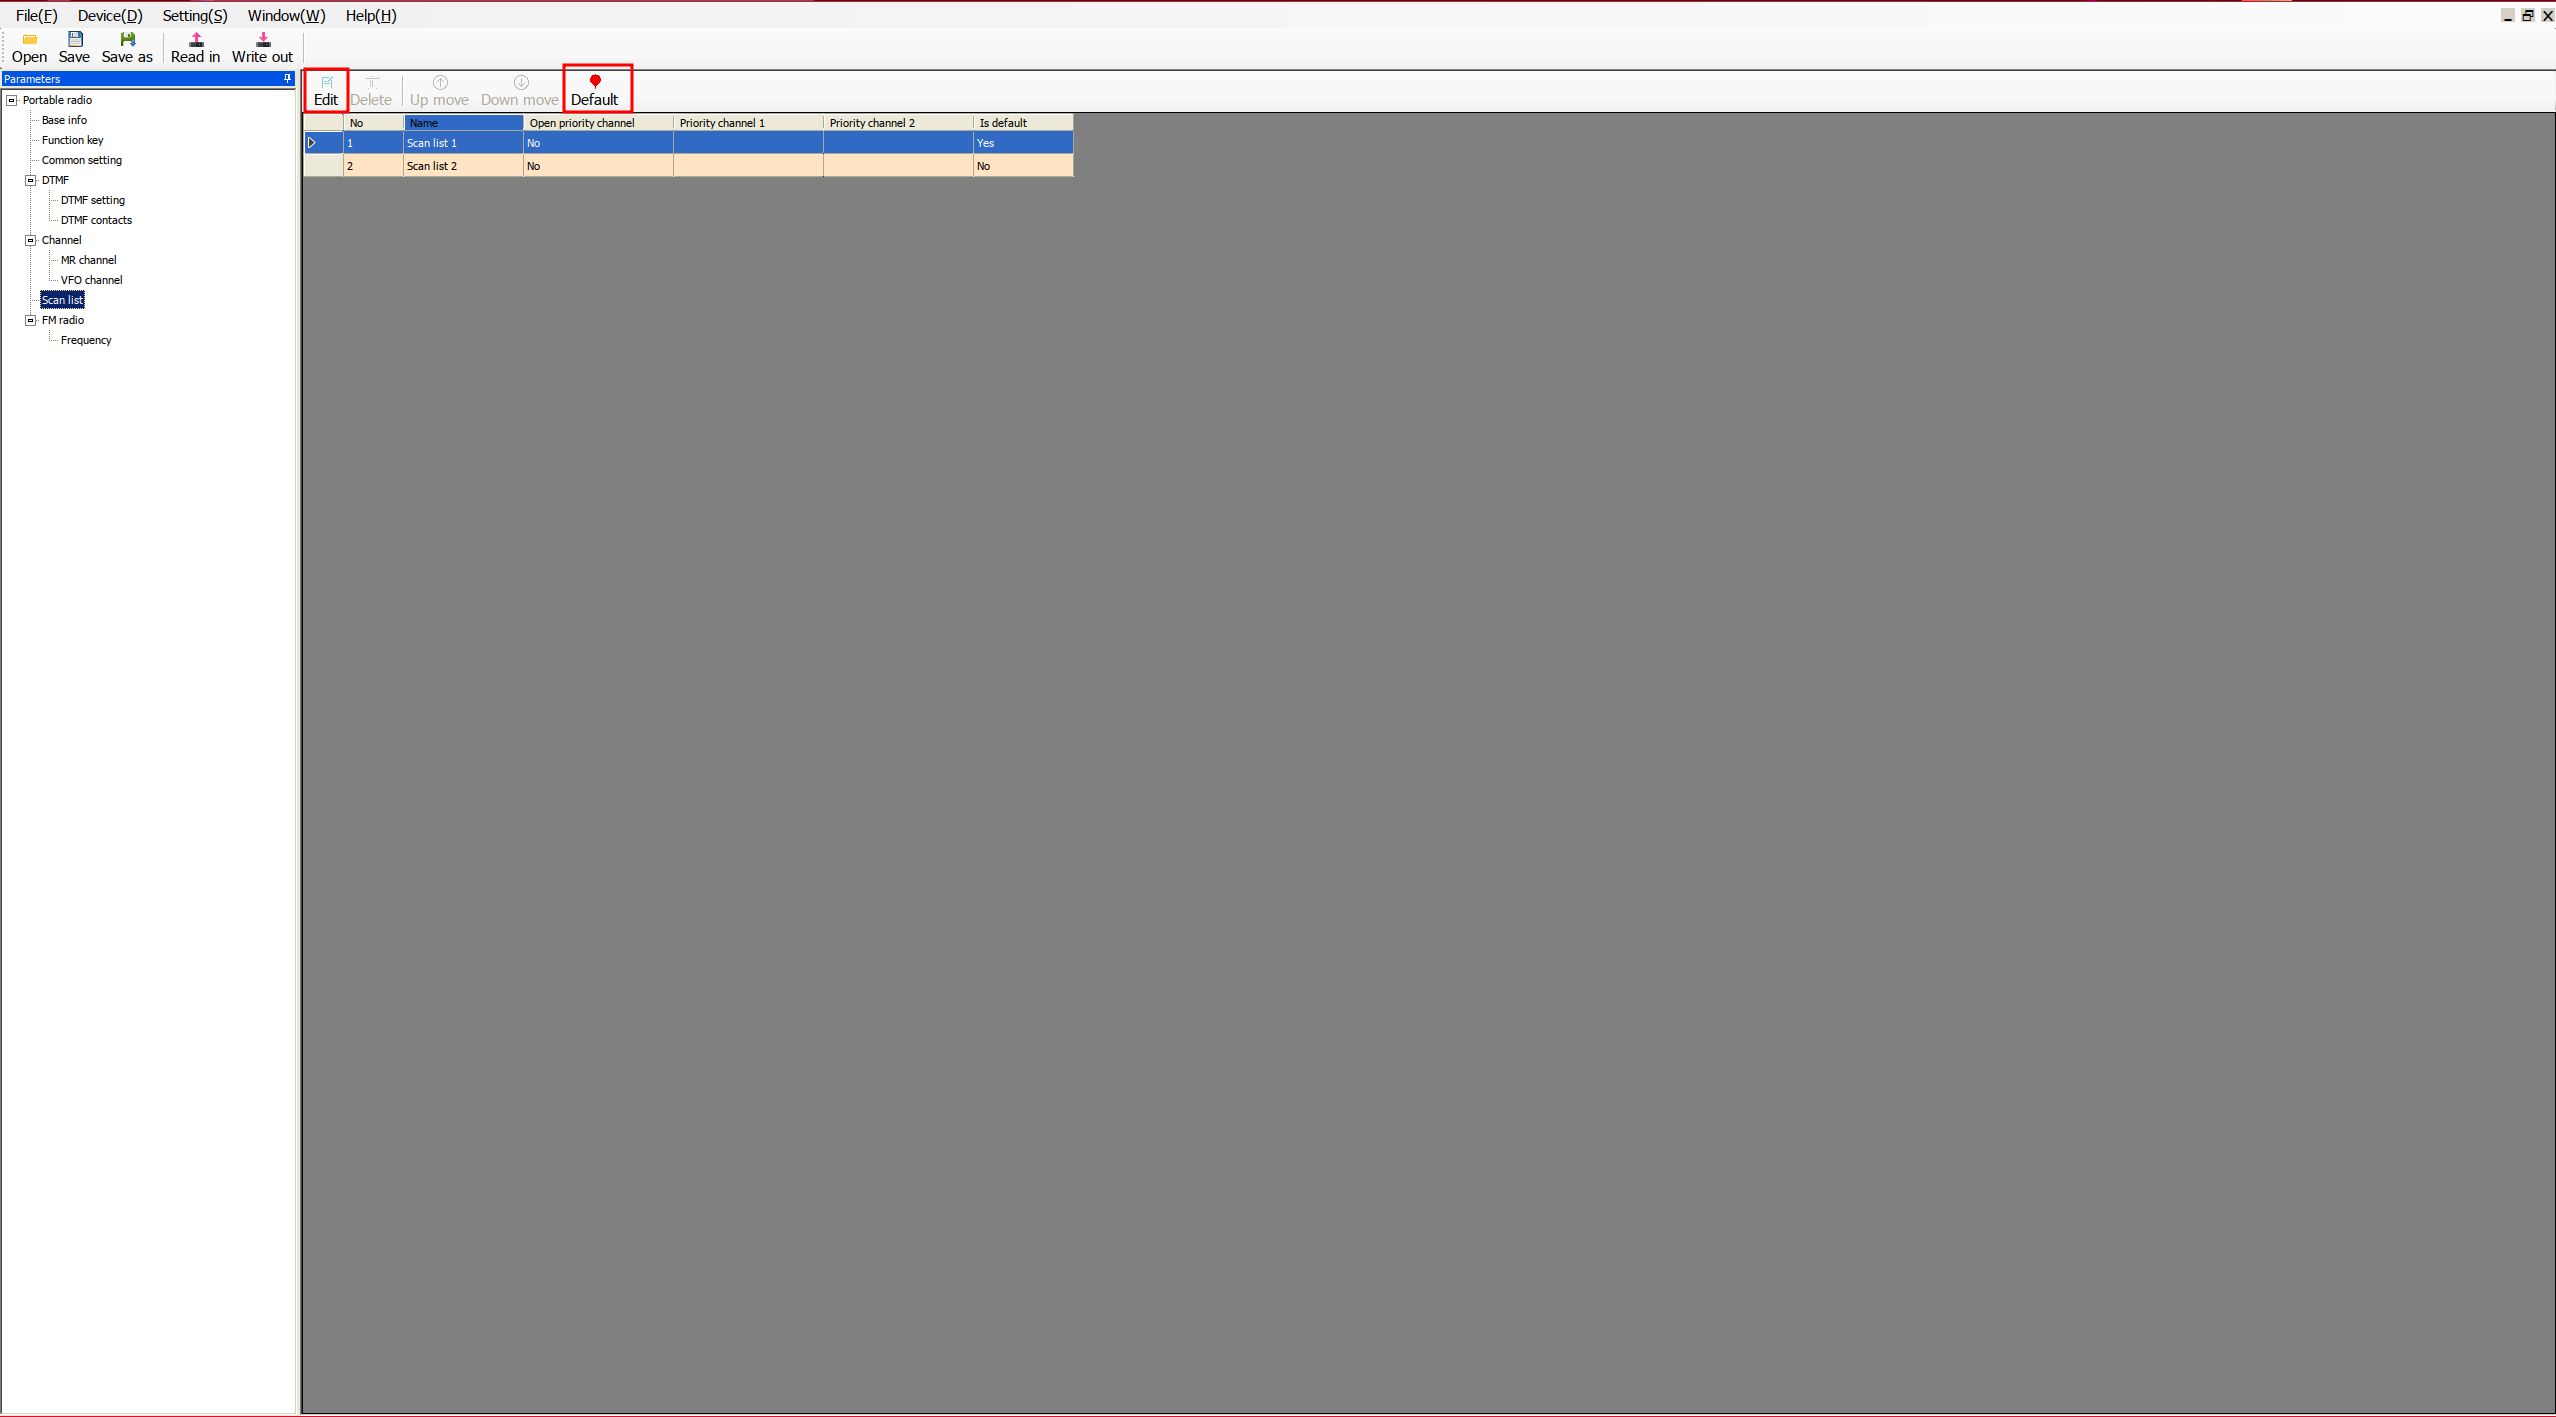
In list editing, we can define priority channels, which are channels scanned more frequently than non-priority channels. This is useful for scanning a large number of channels without overlooking reception on a priority channel while the radio is scanning non-priority ones.
For example, if we have a list with channels 1, 2, 4, and 5, with priorities set for 1 and 2, all channels will be scanned, but channels 1 and 2 will be scanned more frequently. This ensures that if there is activity on channels 1 or 2 while scanning channels 3 and 4, it won’t be missed.
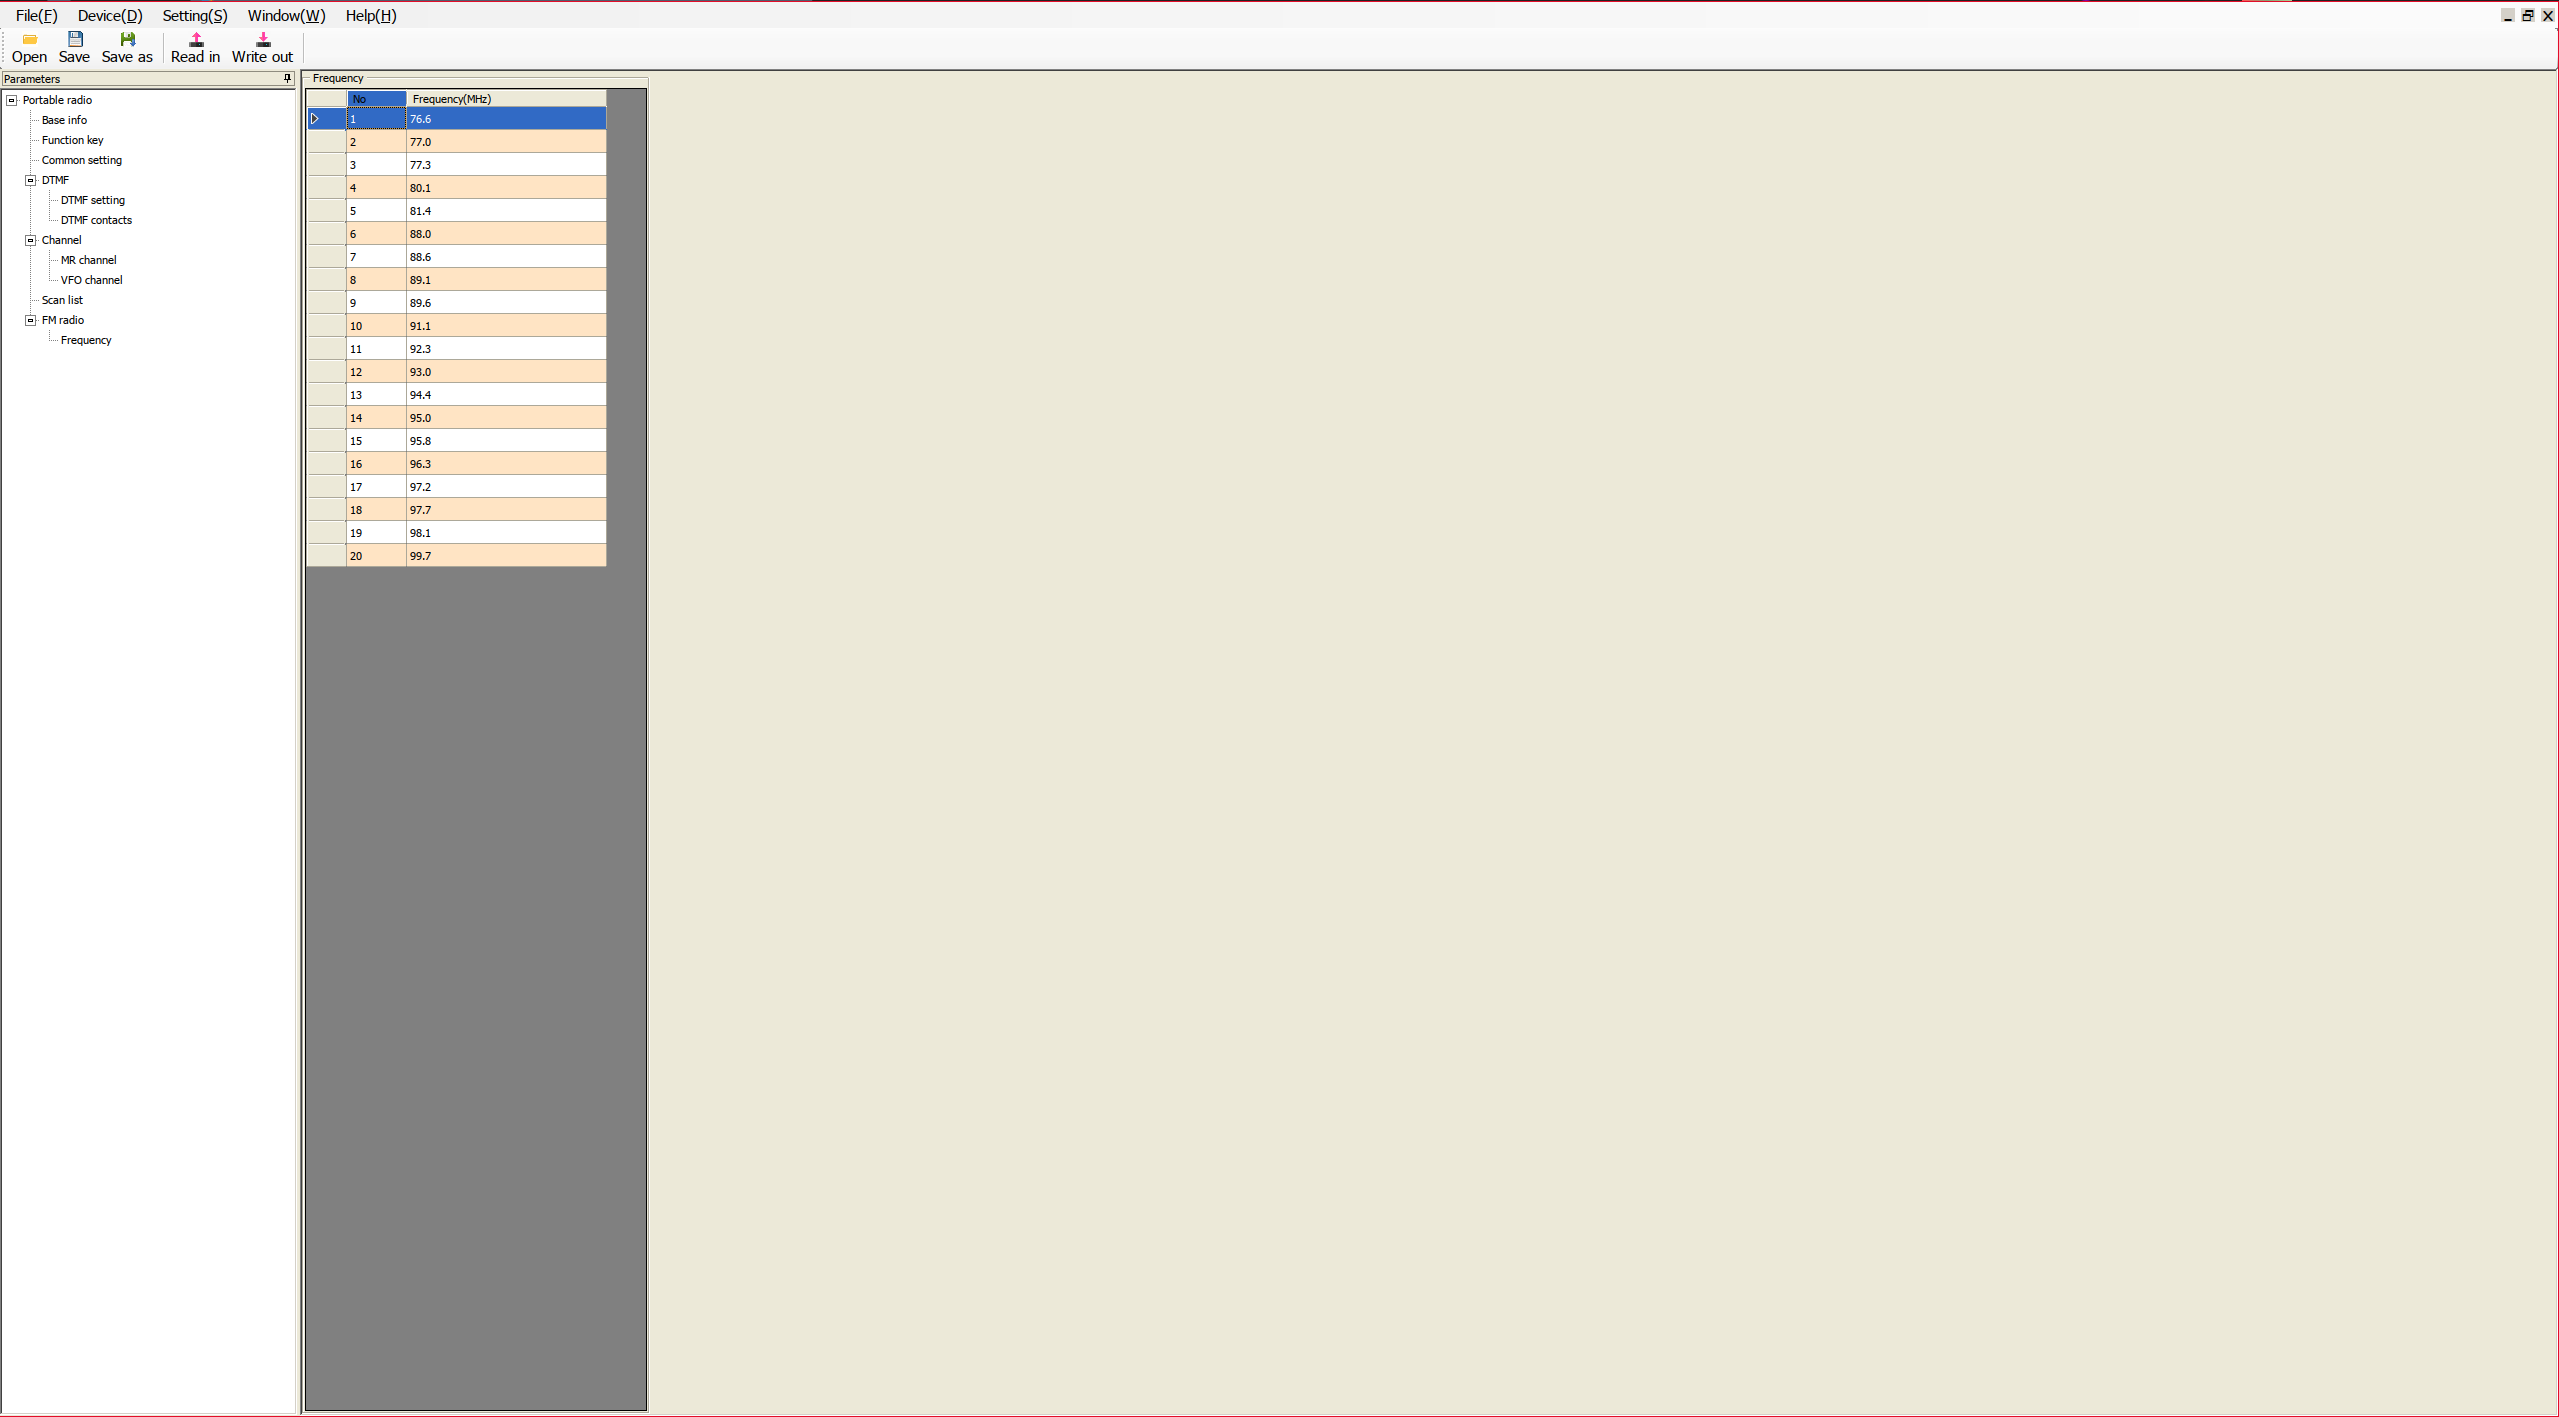
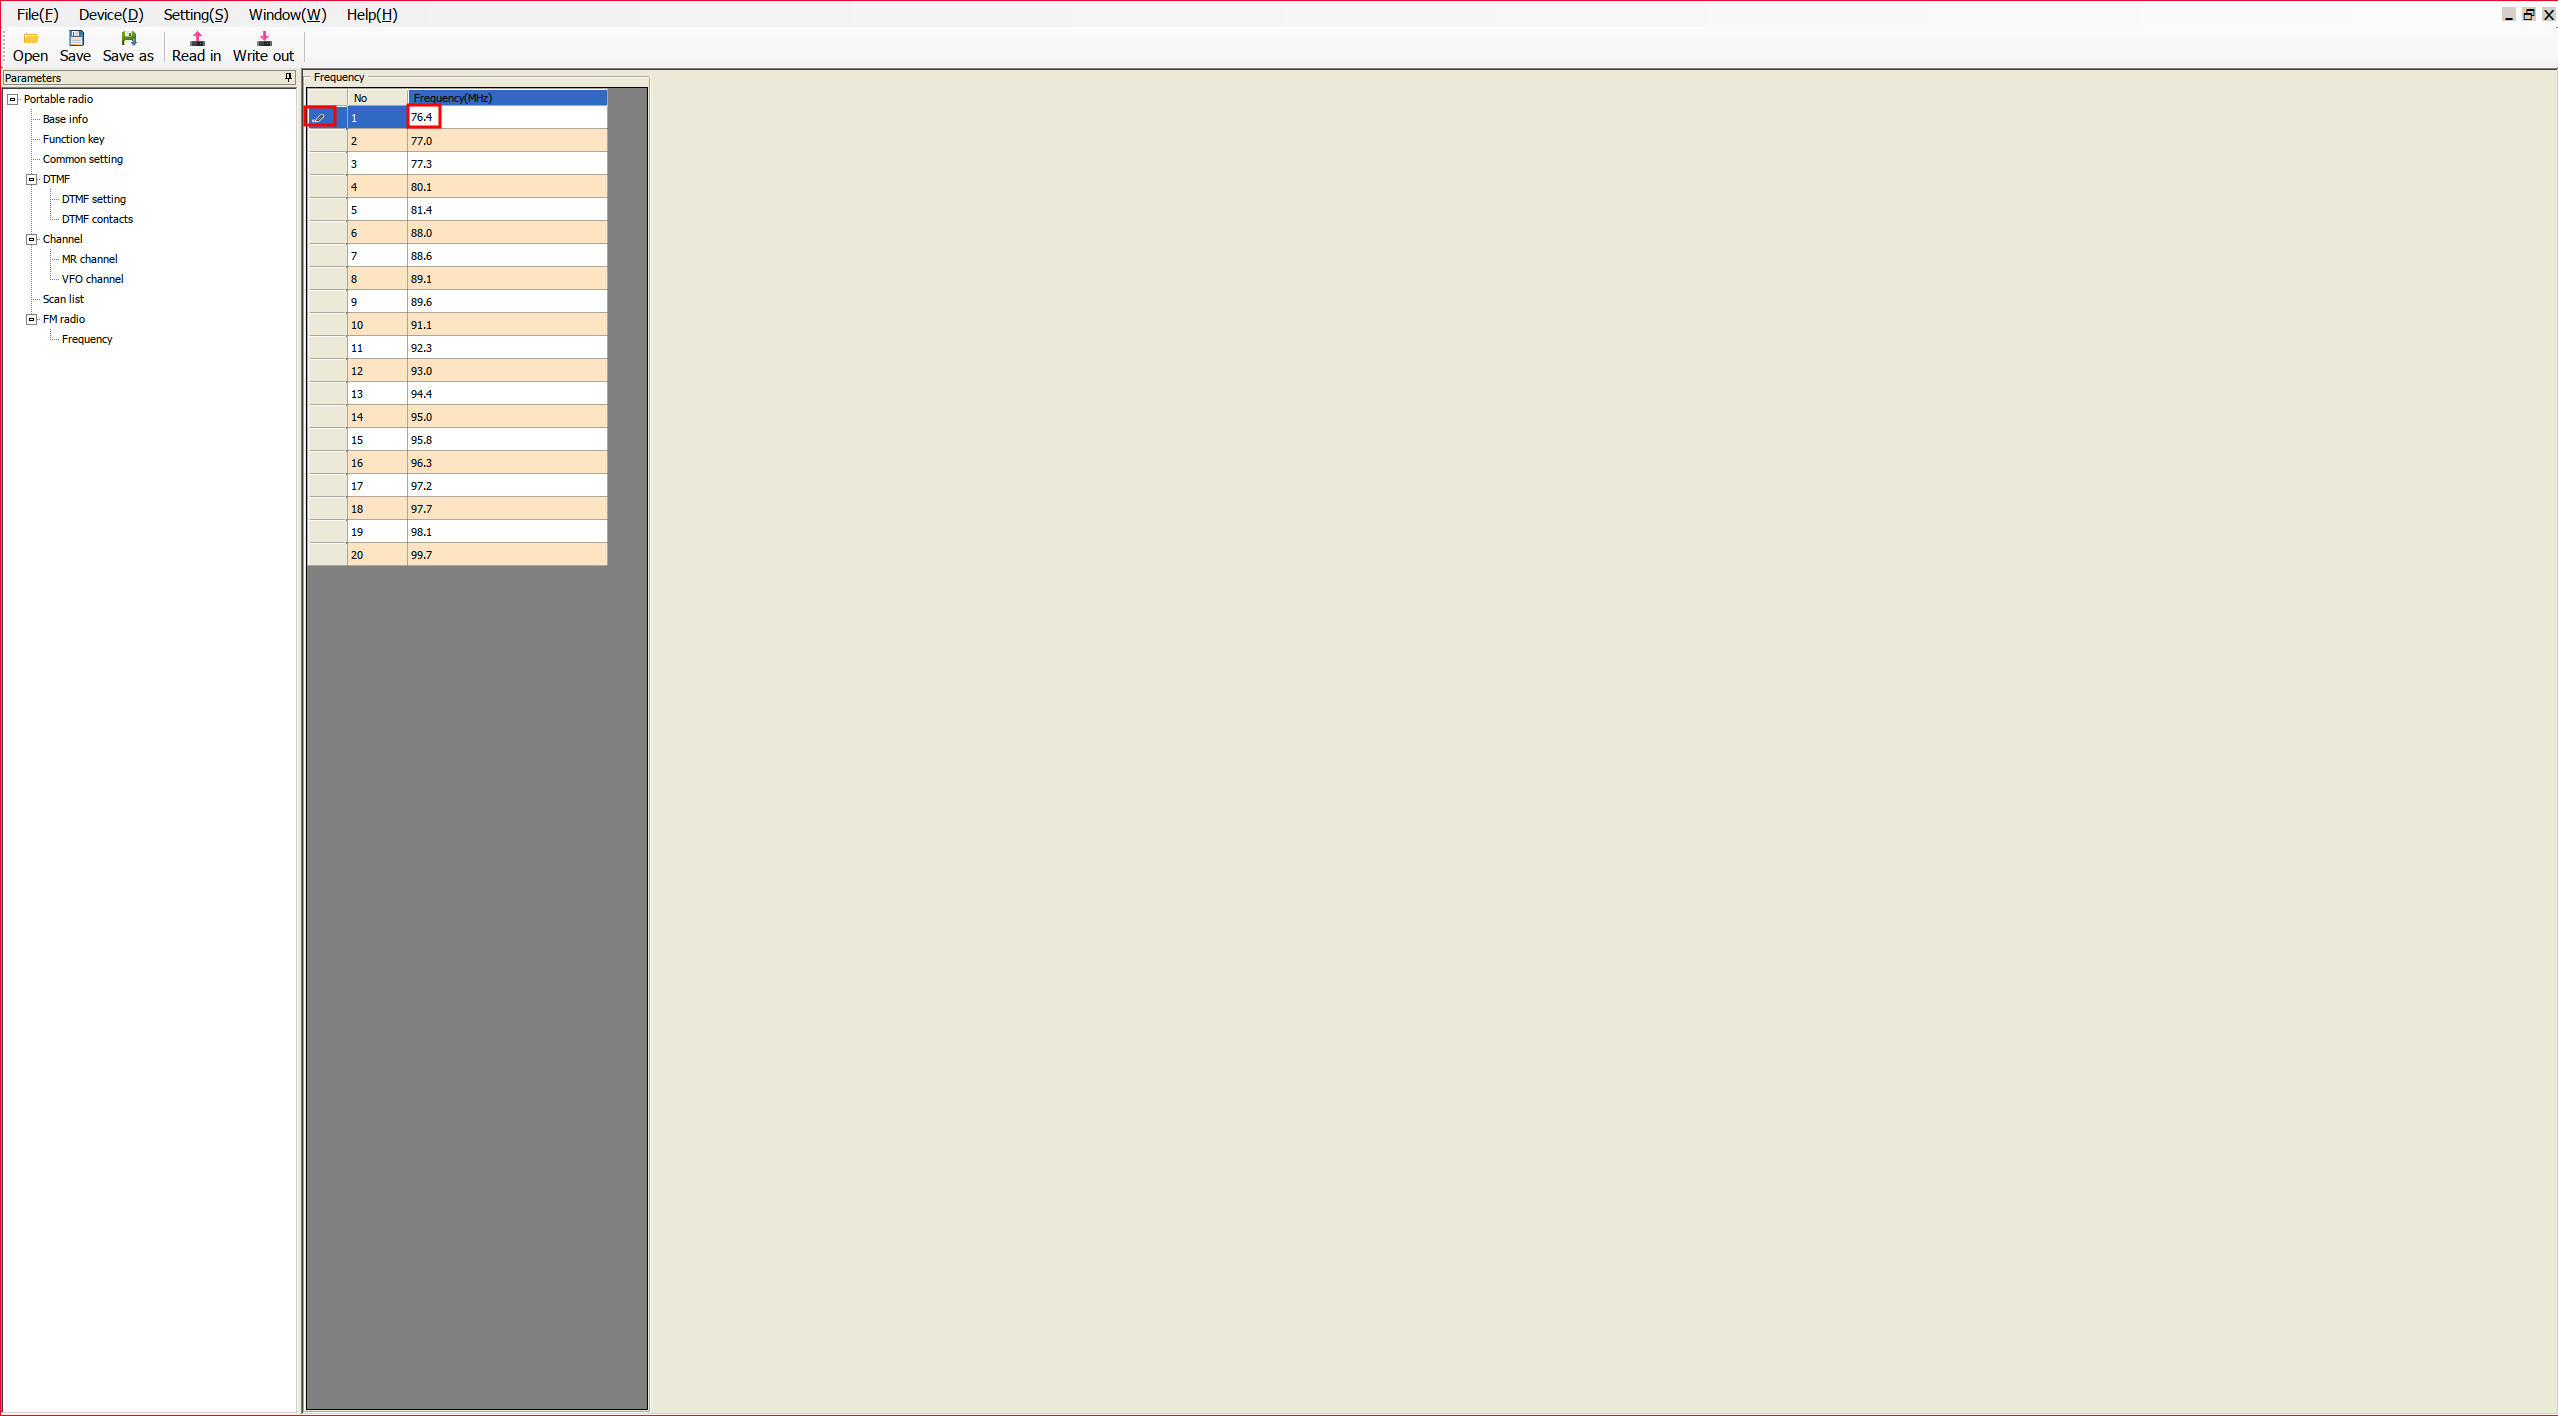
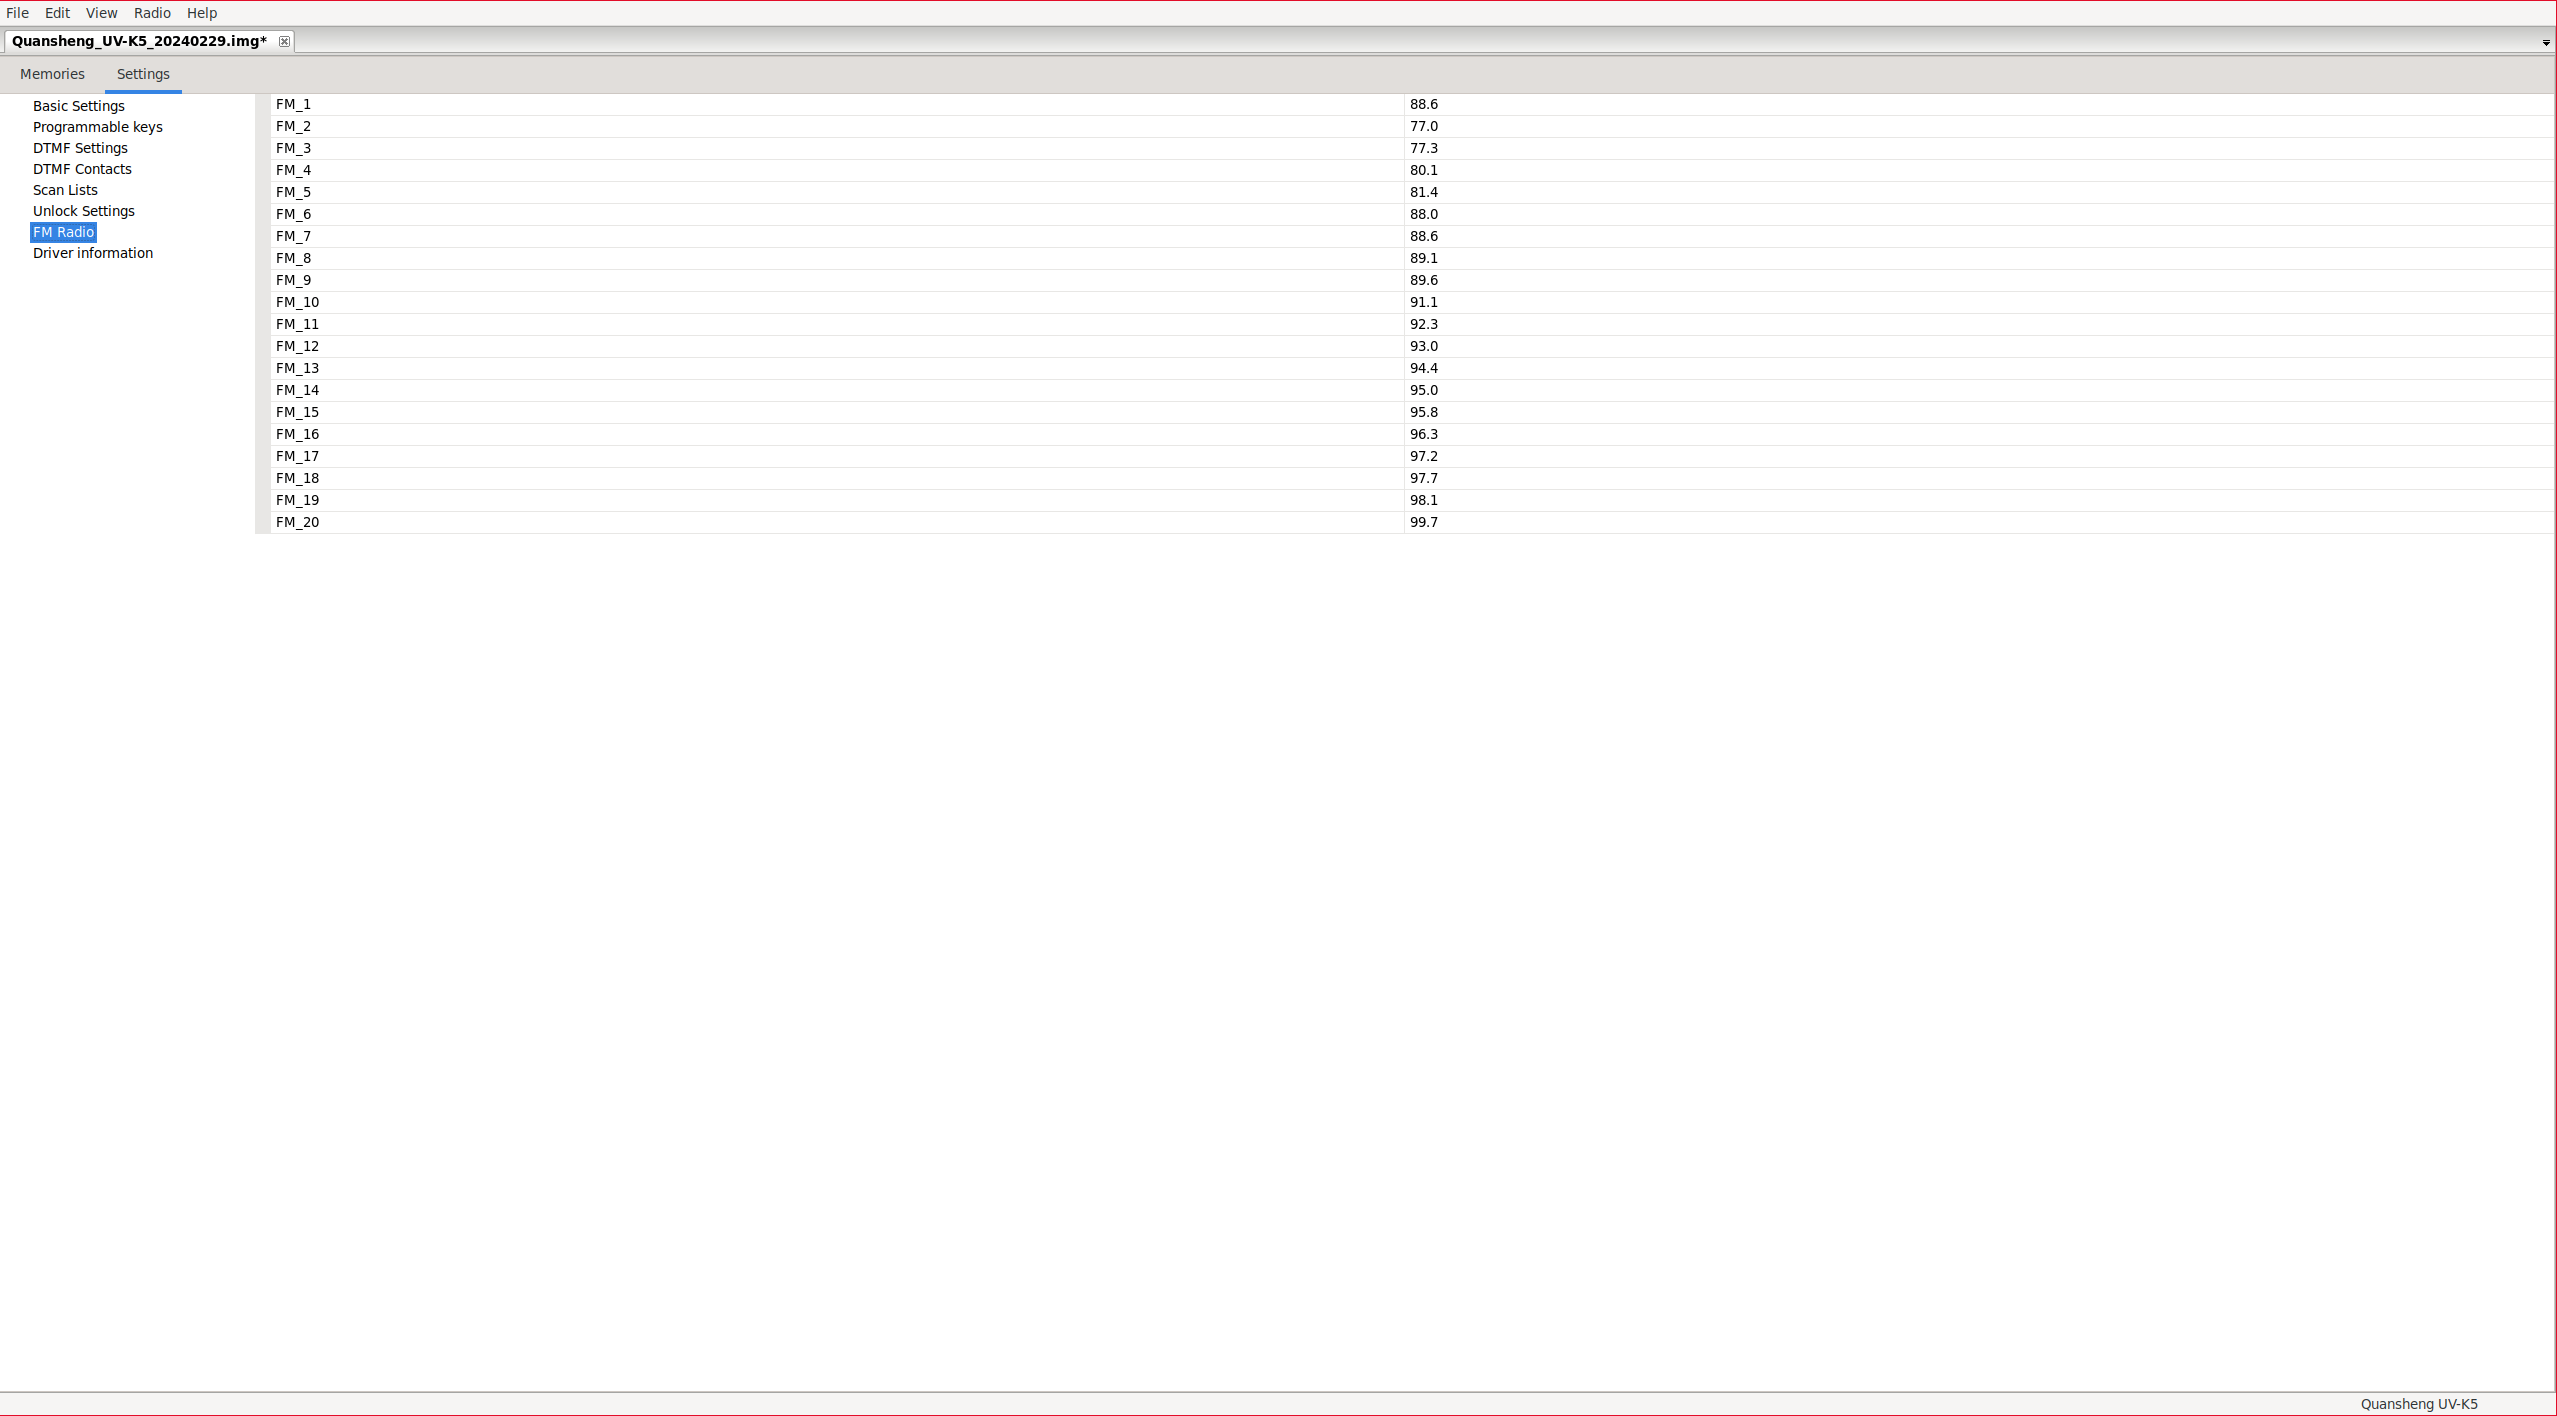
Frequency:
In the Frequency section, we can view and edit the saved radio stations. To edit a station, simply double-click on the current frequency.
|
|
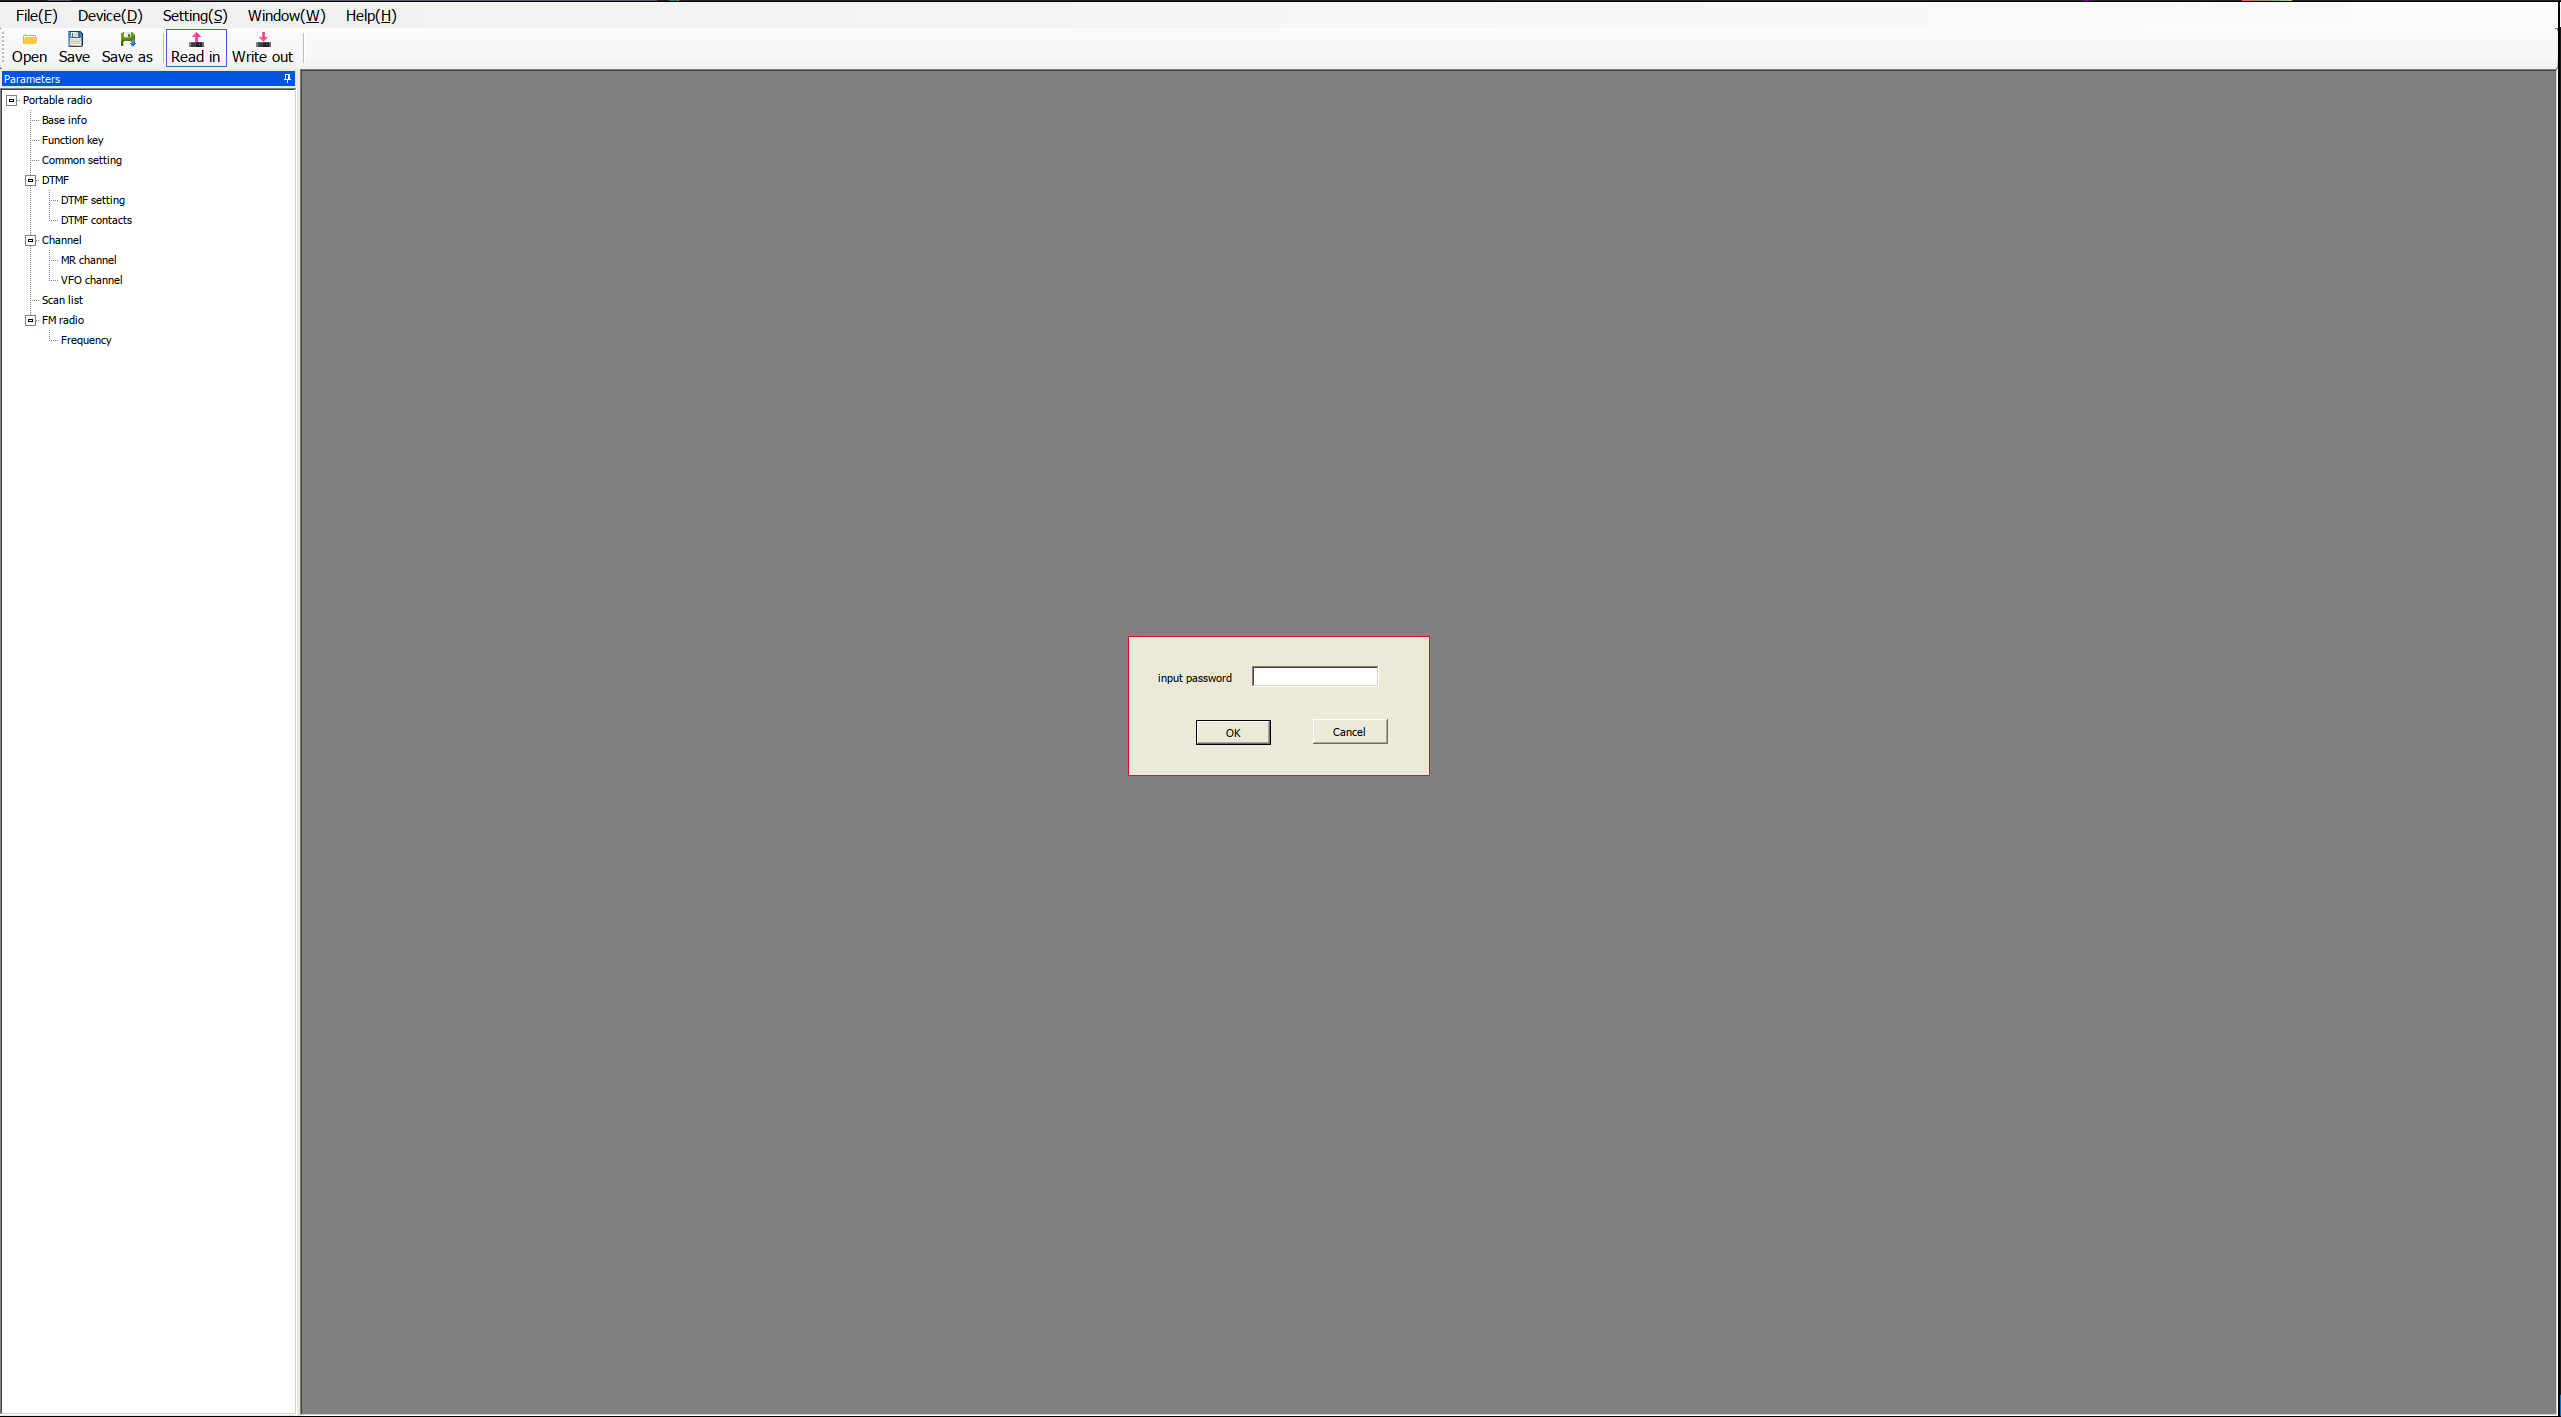
CPS password:
You can configure a password in CPS so that it prompts for it every time you try to read or load the configuration into the walkie.
Setting -> Password set...

|

|
Now, every time you want to read or write the configuration to the radio, it will ask for the password.
For greater convenience, I have set up an alias to run the software more easily.
alias quanshengCPS='WINEARCH=win32 WINEPREFIX=~/.local/share/wineprefixes/wineprefix32 wine ~/UV-K5\(8\)\ Programming\ Software-Neutral/cps_V1.0.40_免安装版/PSCPS.exe'
CHIRP:
Chirp is another widely used configuration software that supports a large number of devices. We’ll install it on the Linux system we’ve used in the previous steps.
The version of Chirp included in Ubuntu 22.04 as of today, February 24, 2024, does not support Quansheng devices, so we will install it manually.
ii chirp 1:20200227+py3+20200213-3 all Configuration tool for amateur radios
Install CHIRP from regular user:
cd chirp
pip install wxPython
pip install https://trac.chirp.danplanet.com/chirp_next/next-20240224/chirp-20240224-py3-none-any.whl
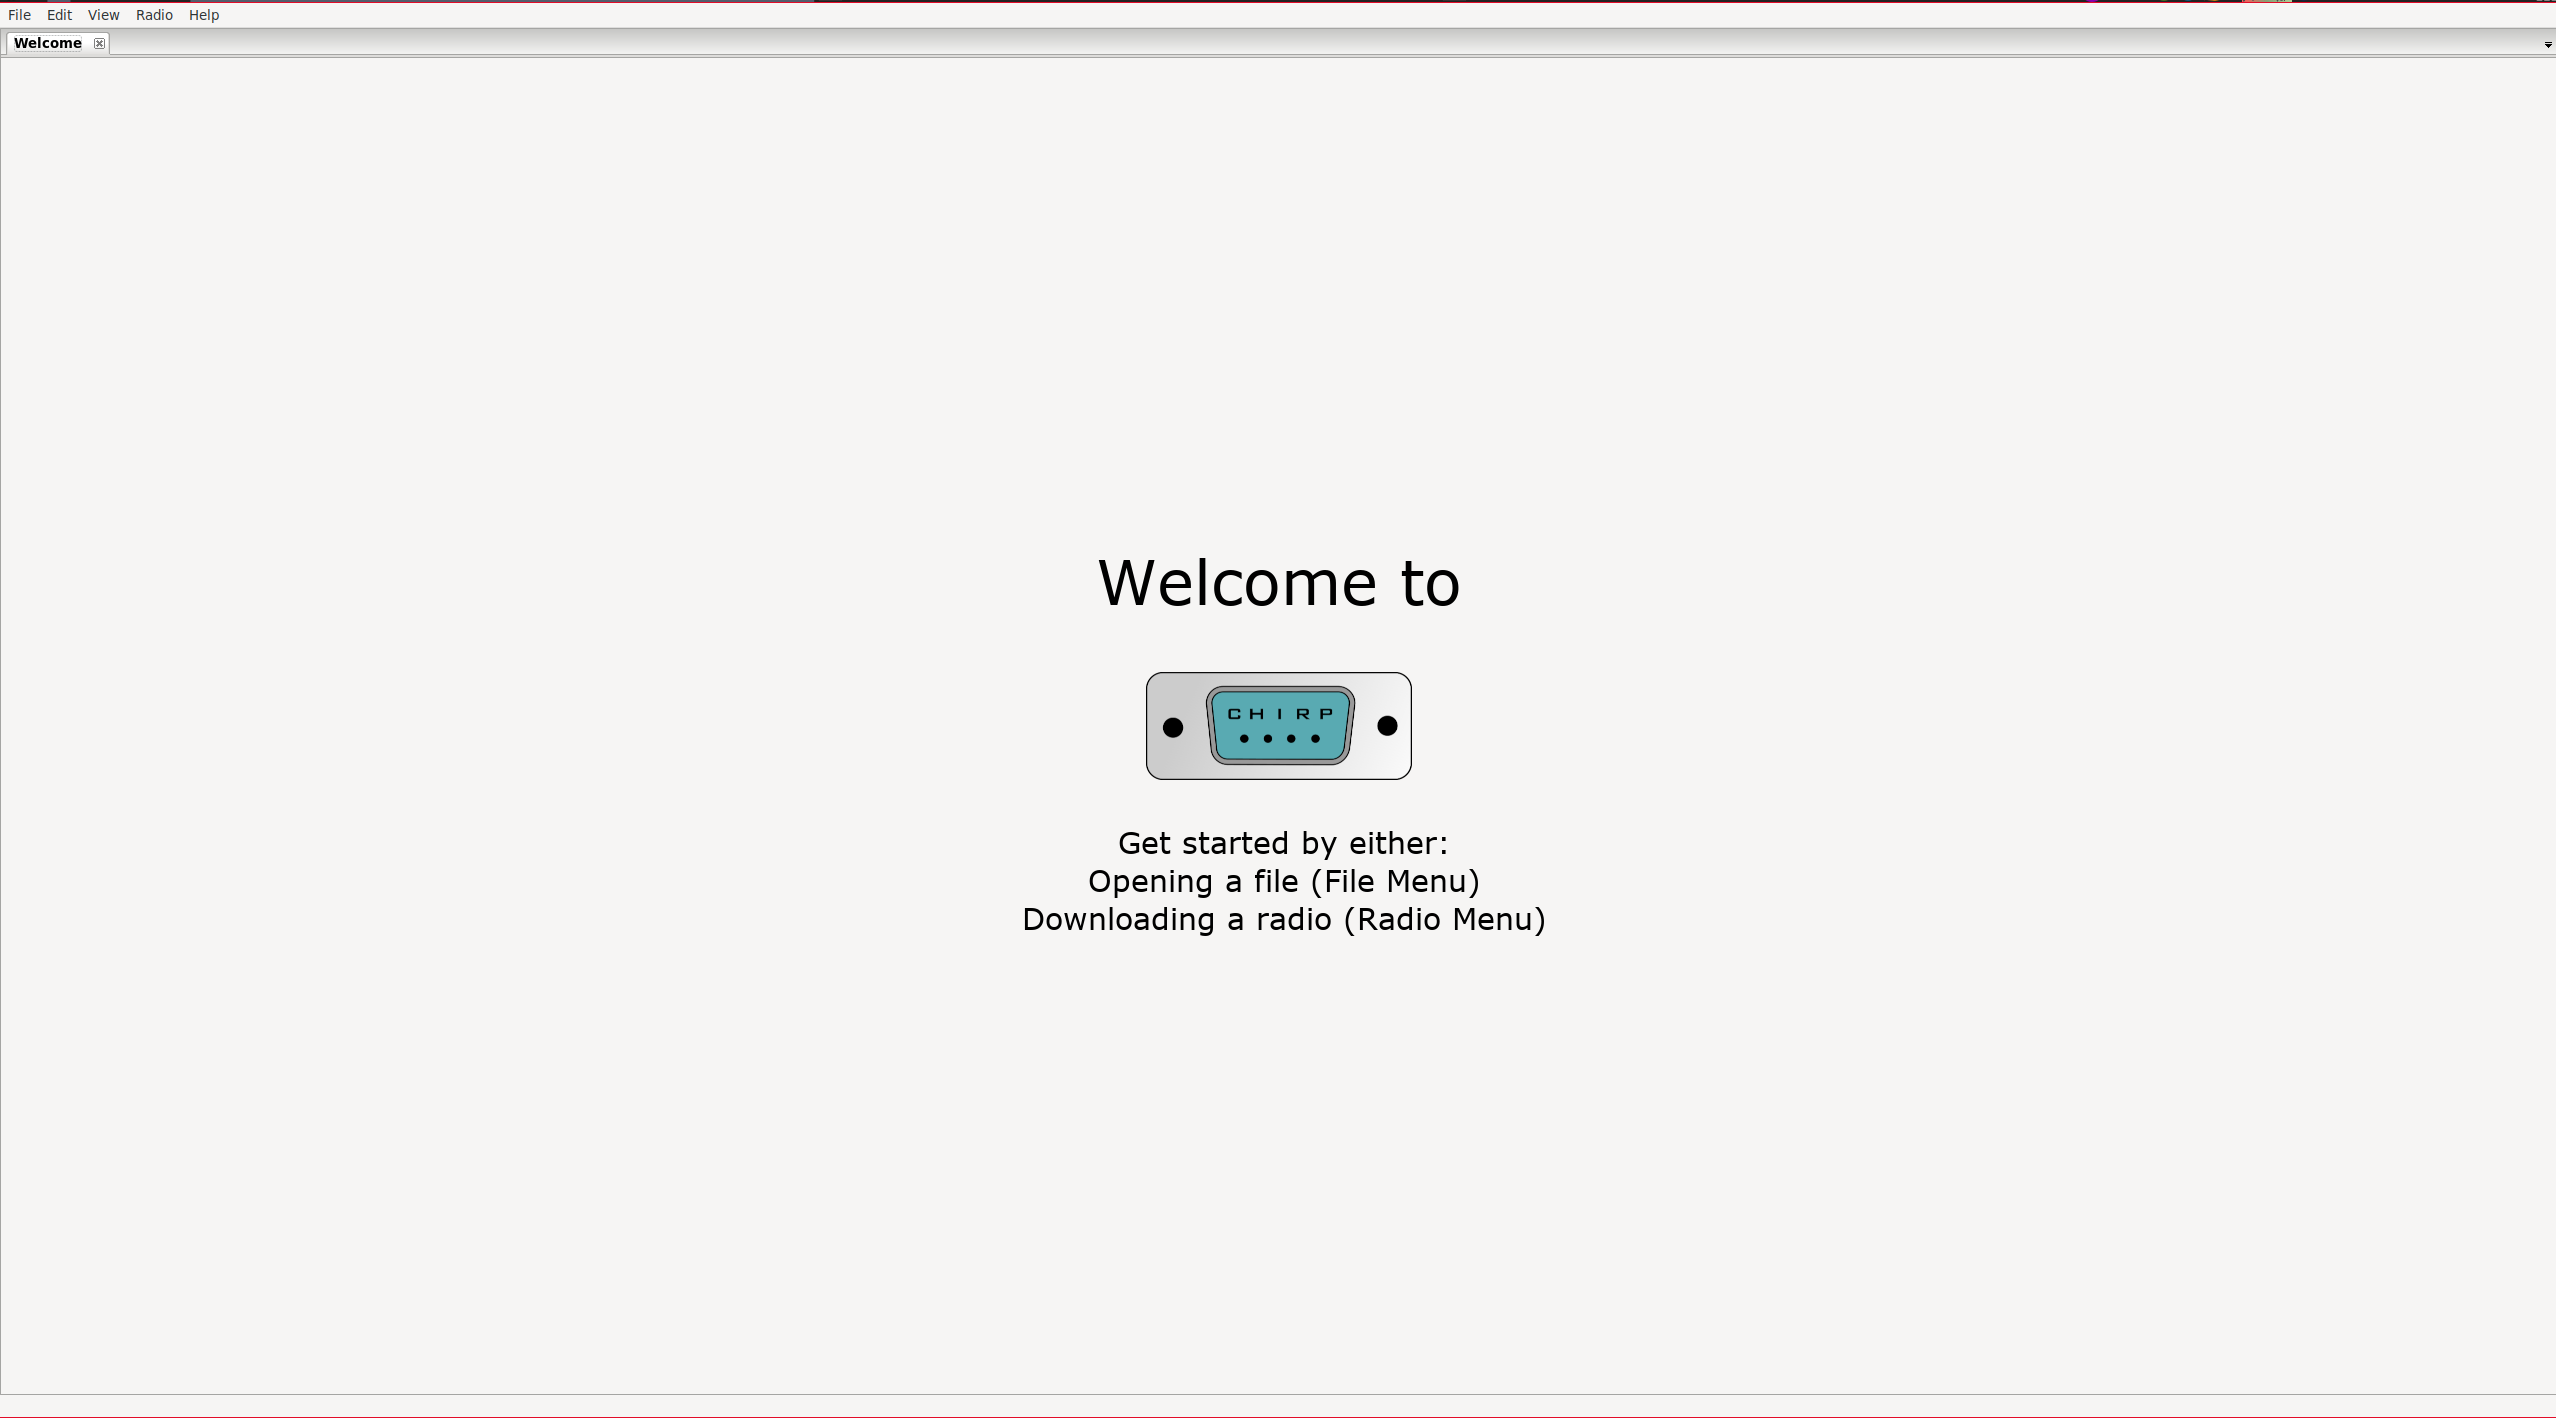
Start the software:
NOTE: CHIRP is a rather cumbersome software. For example, if we select a value from a dropdown but do not move the focus away from the parameter, the value will NOT be applied. This means that if we upload the configuration to the radio, the change will not have been applied.
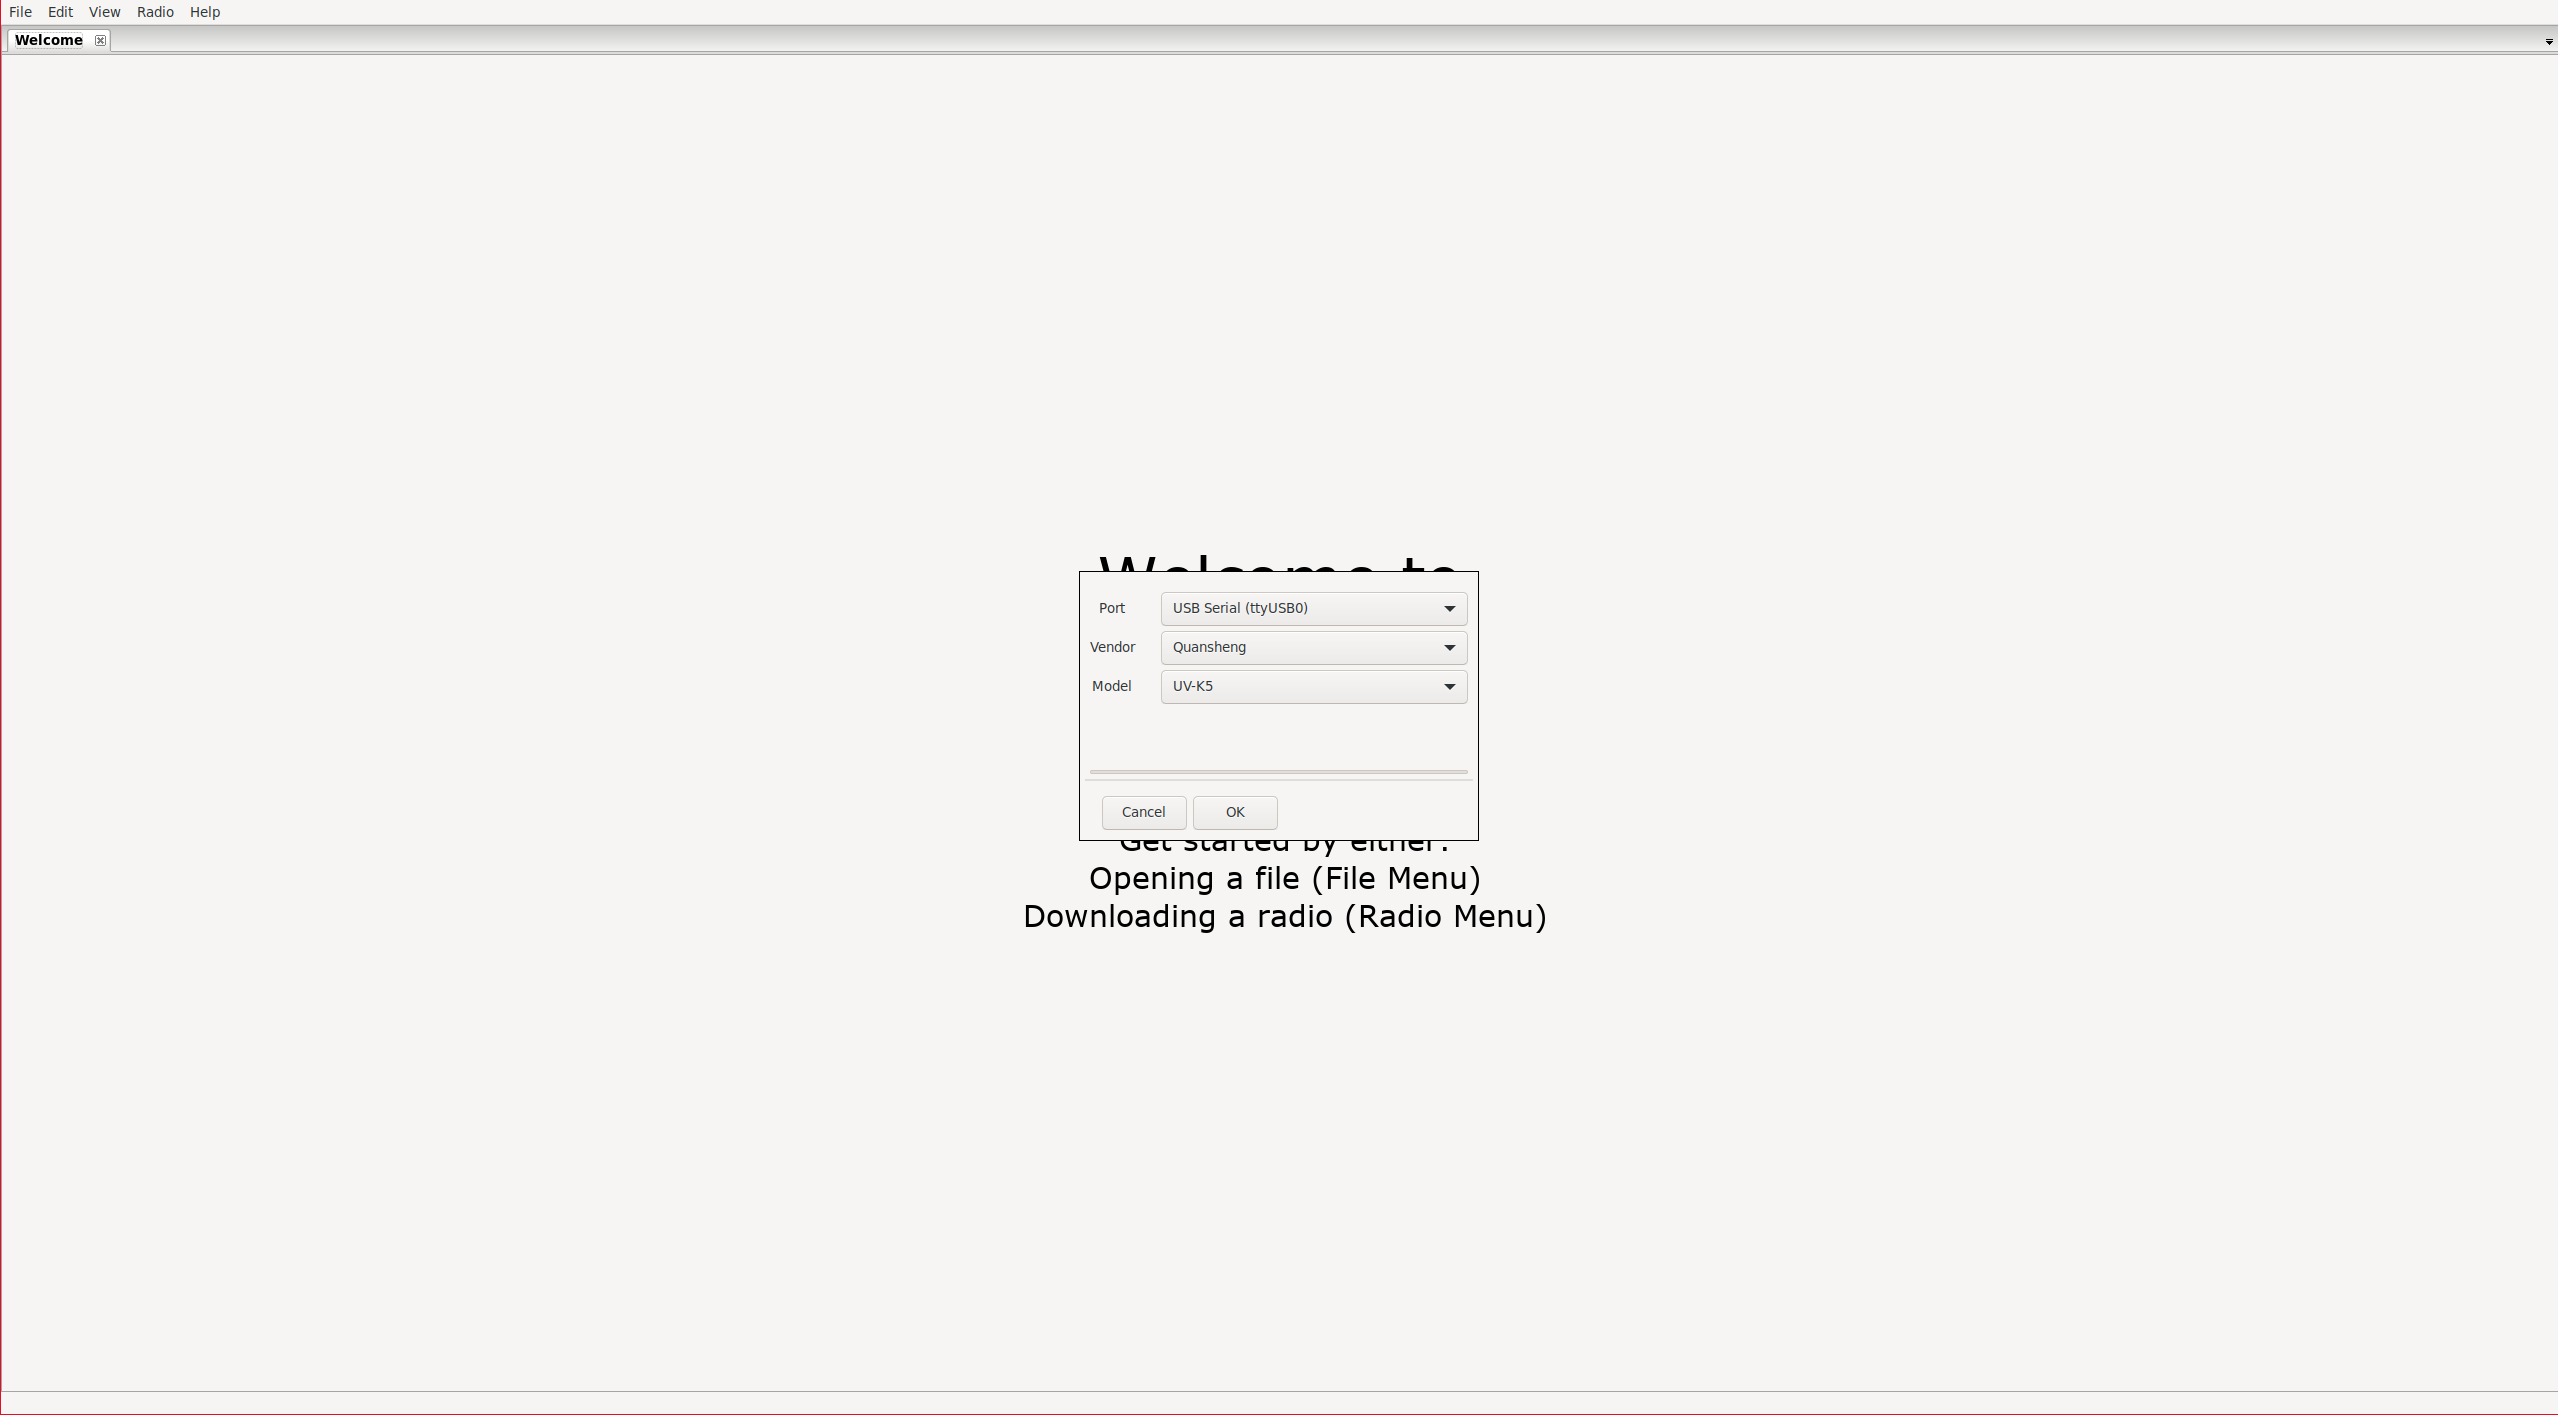
Connect with the radio:
Connect with the radio: Radio -> Download from radio

|
|
Channel list:
It will display the channels. In my opinion, the interface leaves much to be desired as it is very complicated to understand what each field is. It would have been much simpler to map a column for each option in the walkie’s menu as
CPS
does. Despite its lack of intuitiveness, I will try to explain what
each parameter
does:
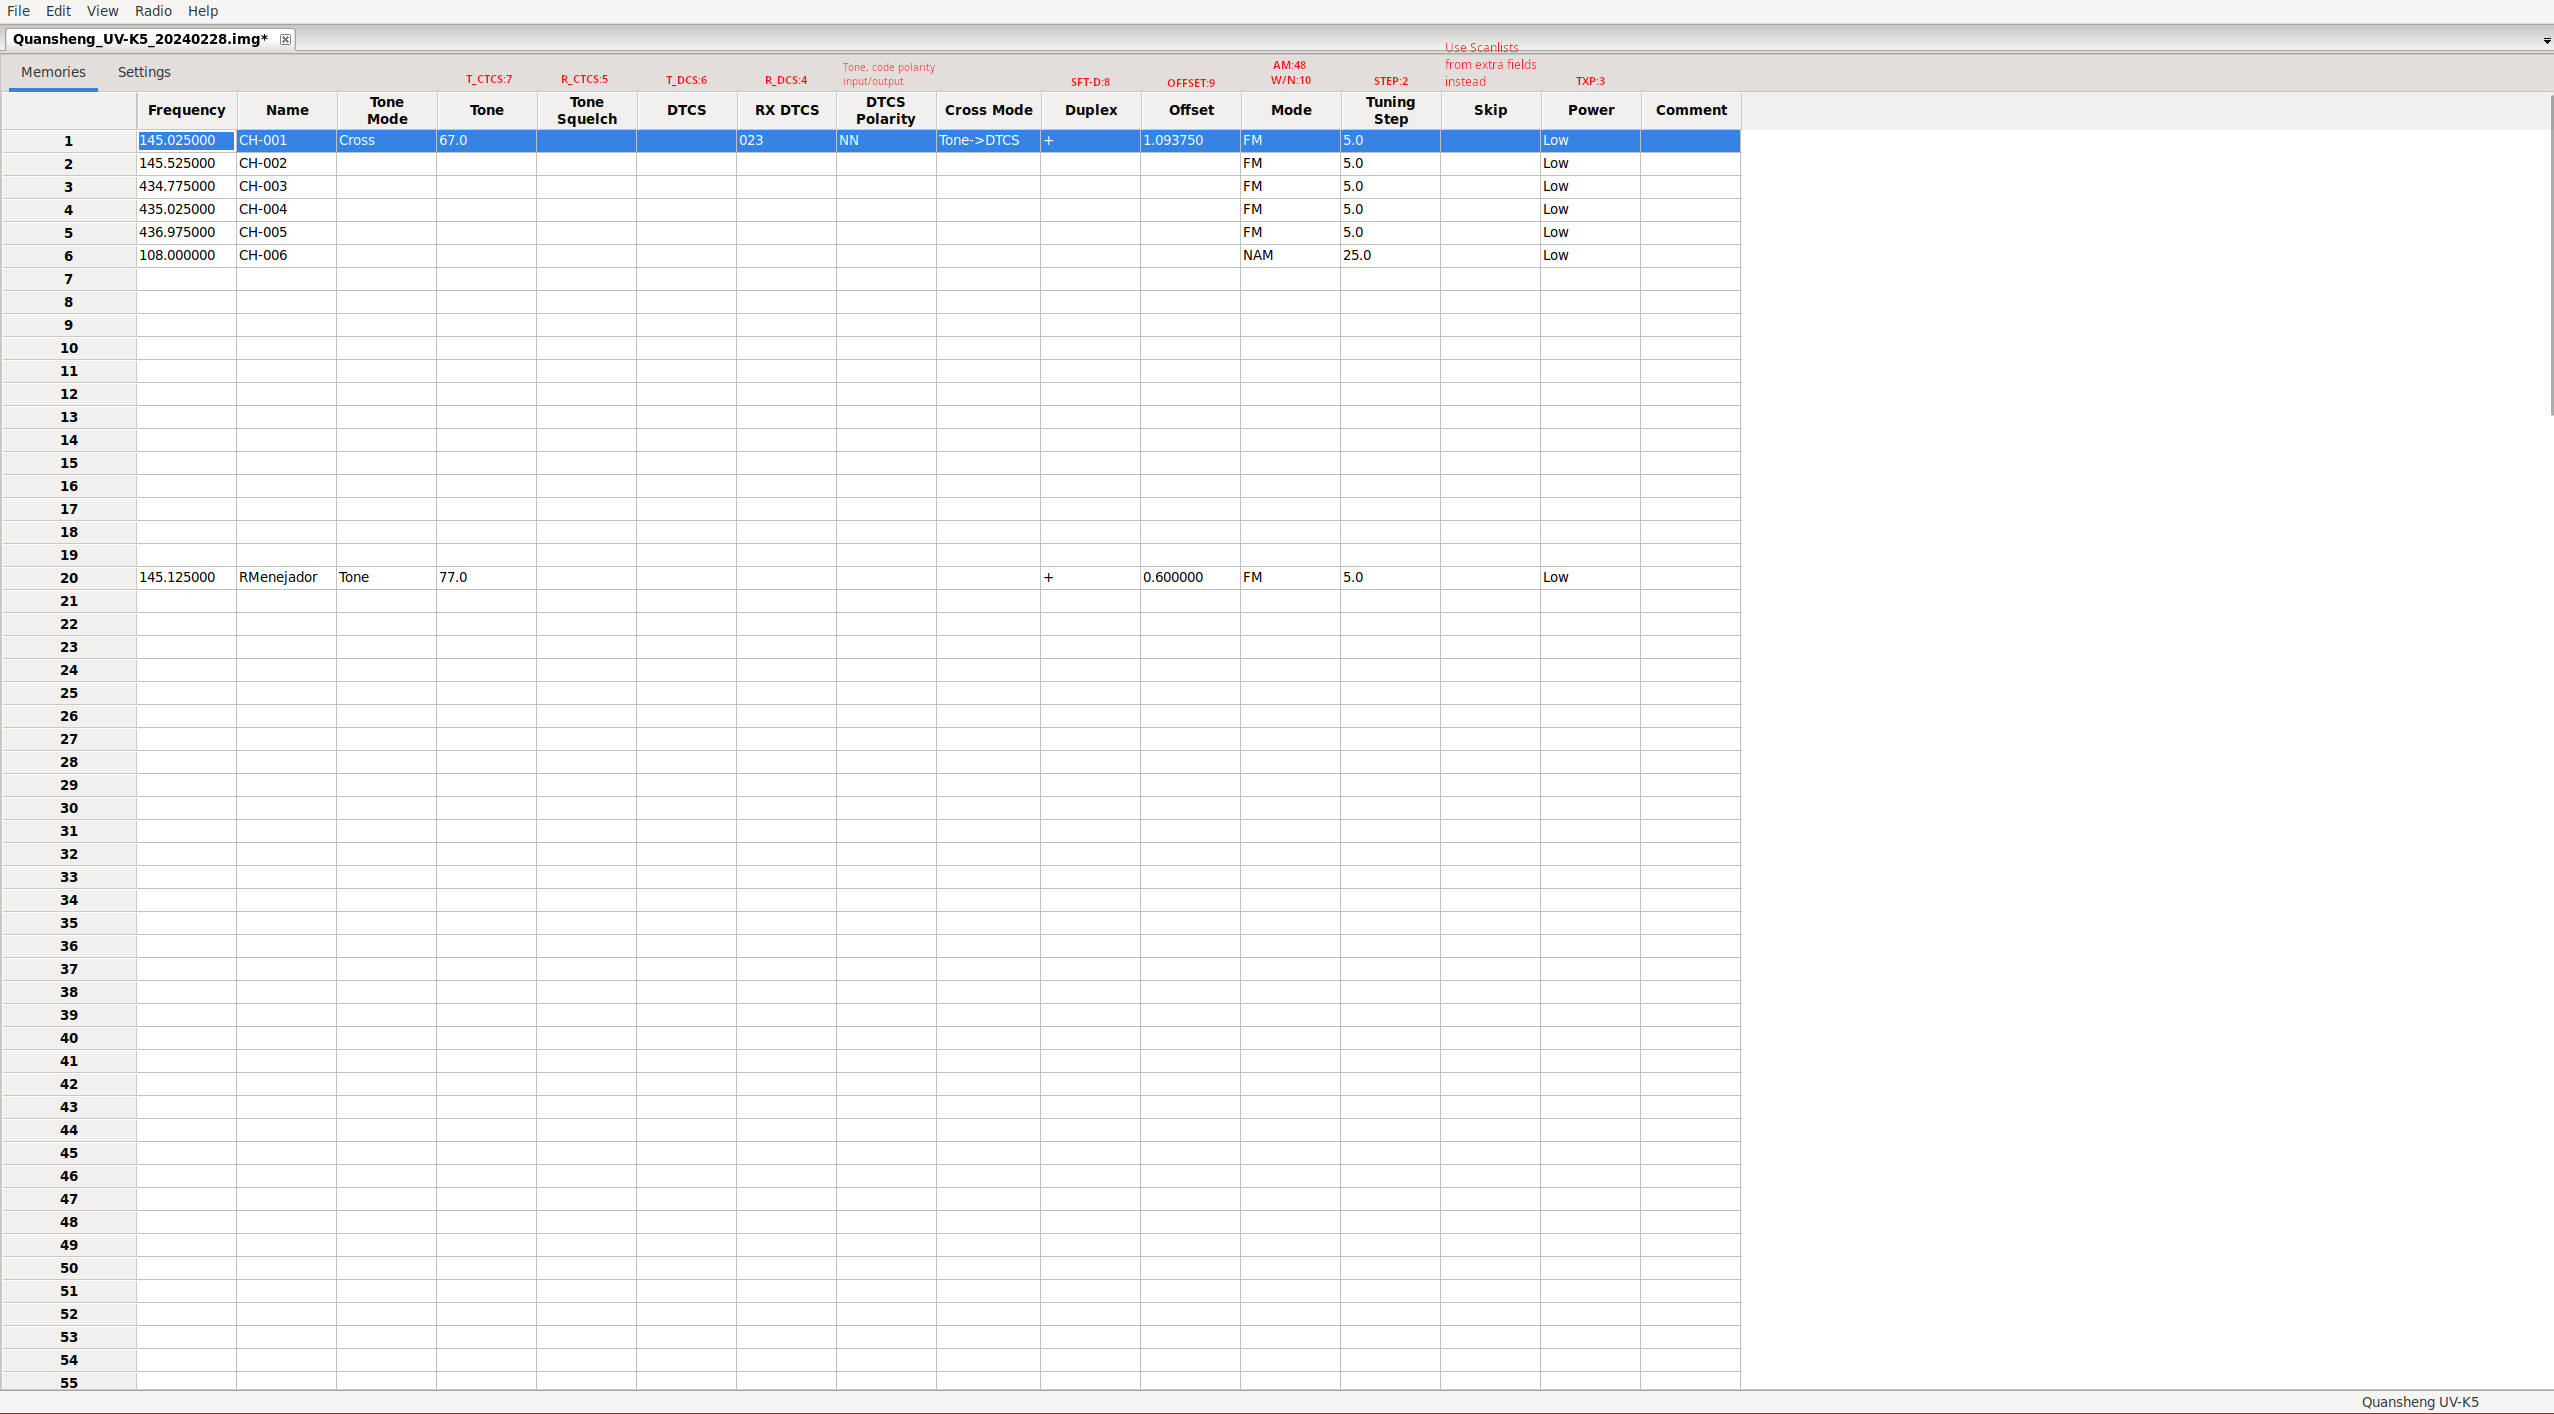
NOTE: Skip column seems to be a bug, as for skipping a channel from scanning we only have to not assign it as scanlist member. To configure the scanlists we must enable extrafields(explained below).
The DTCS Polarity option specifies the polarity of the input/output tone/code . Tones only allow positive polarity (N), while digital codes allow both positive (N) and negative (R) polarity.
| Value. | Output polarity. | Input polarity. |
|---|---|---|
| NN | Positive | Positive |
| NR | Positive | Negative |
| RN | Negative | Positive |
| RR | Negative | Negative |
Tone Mode option can take one of the following values:
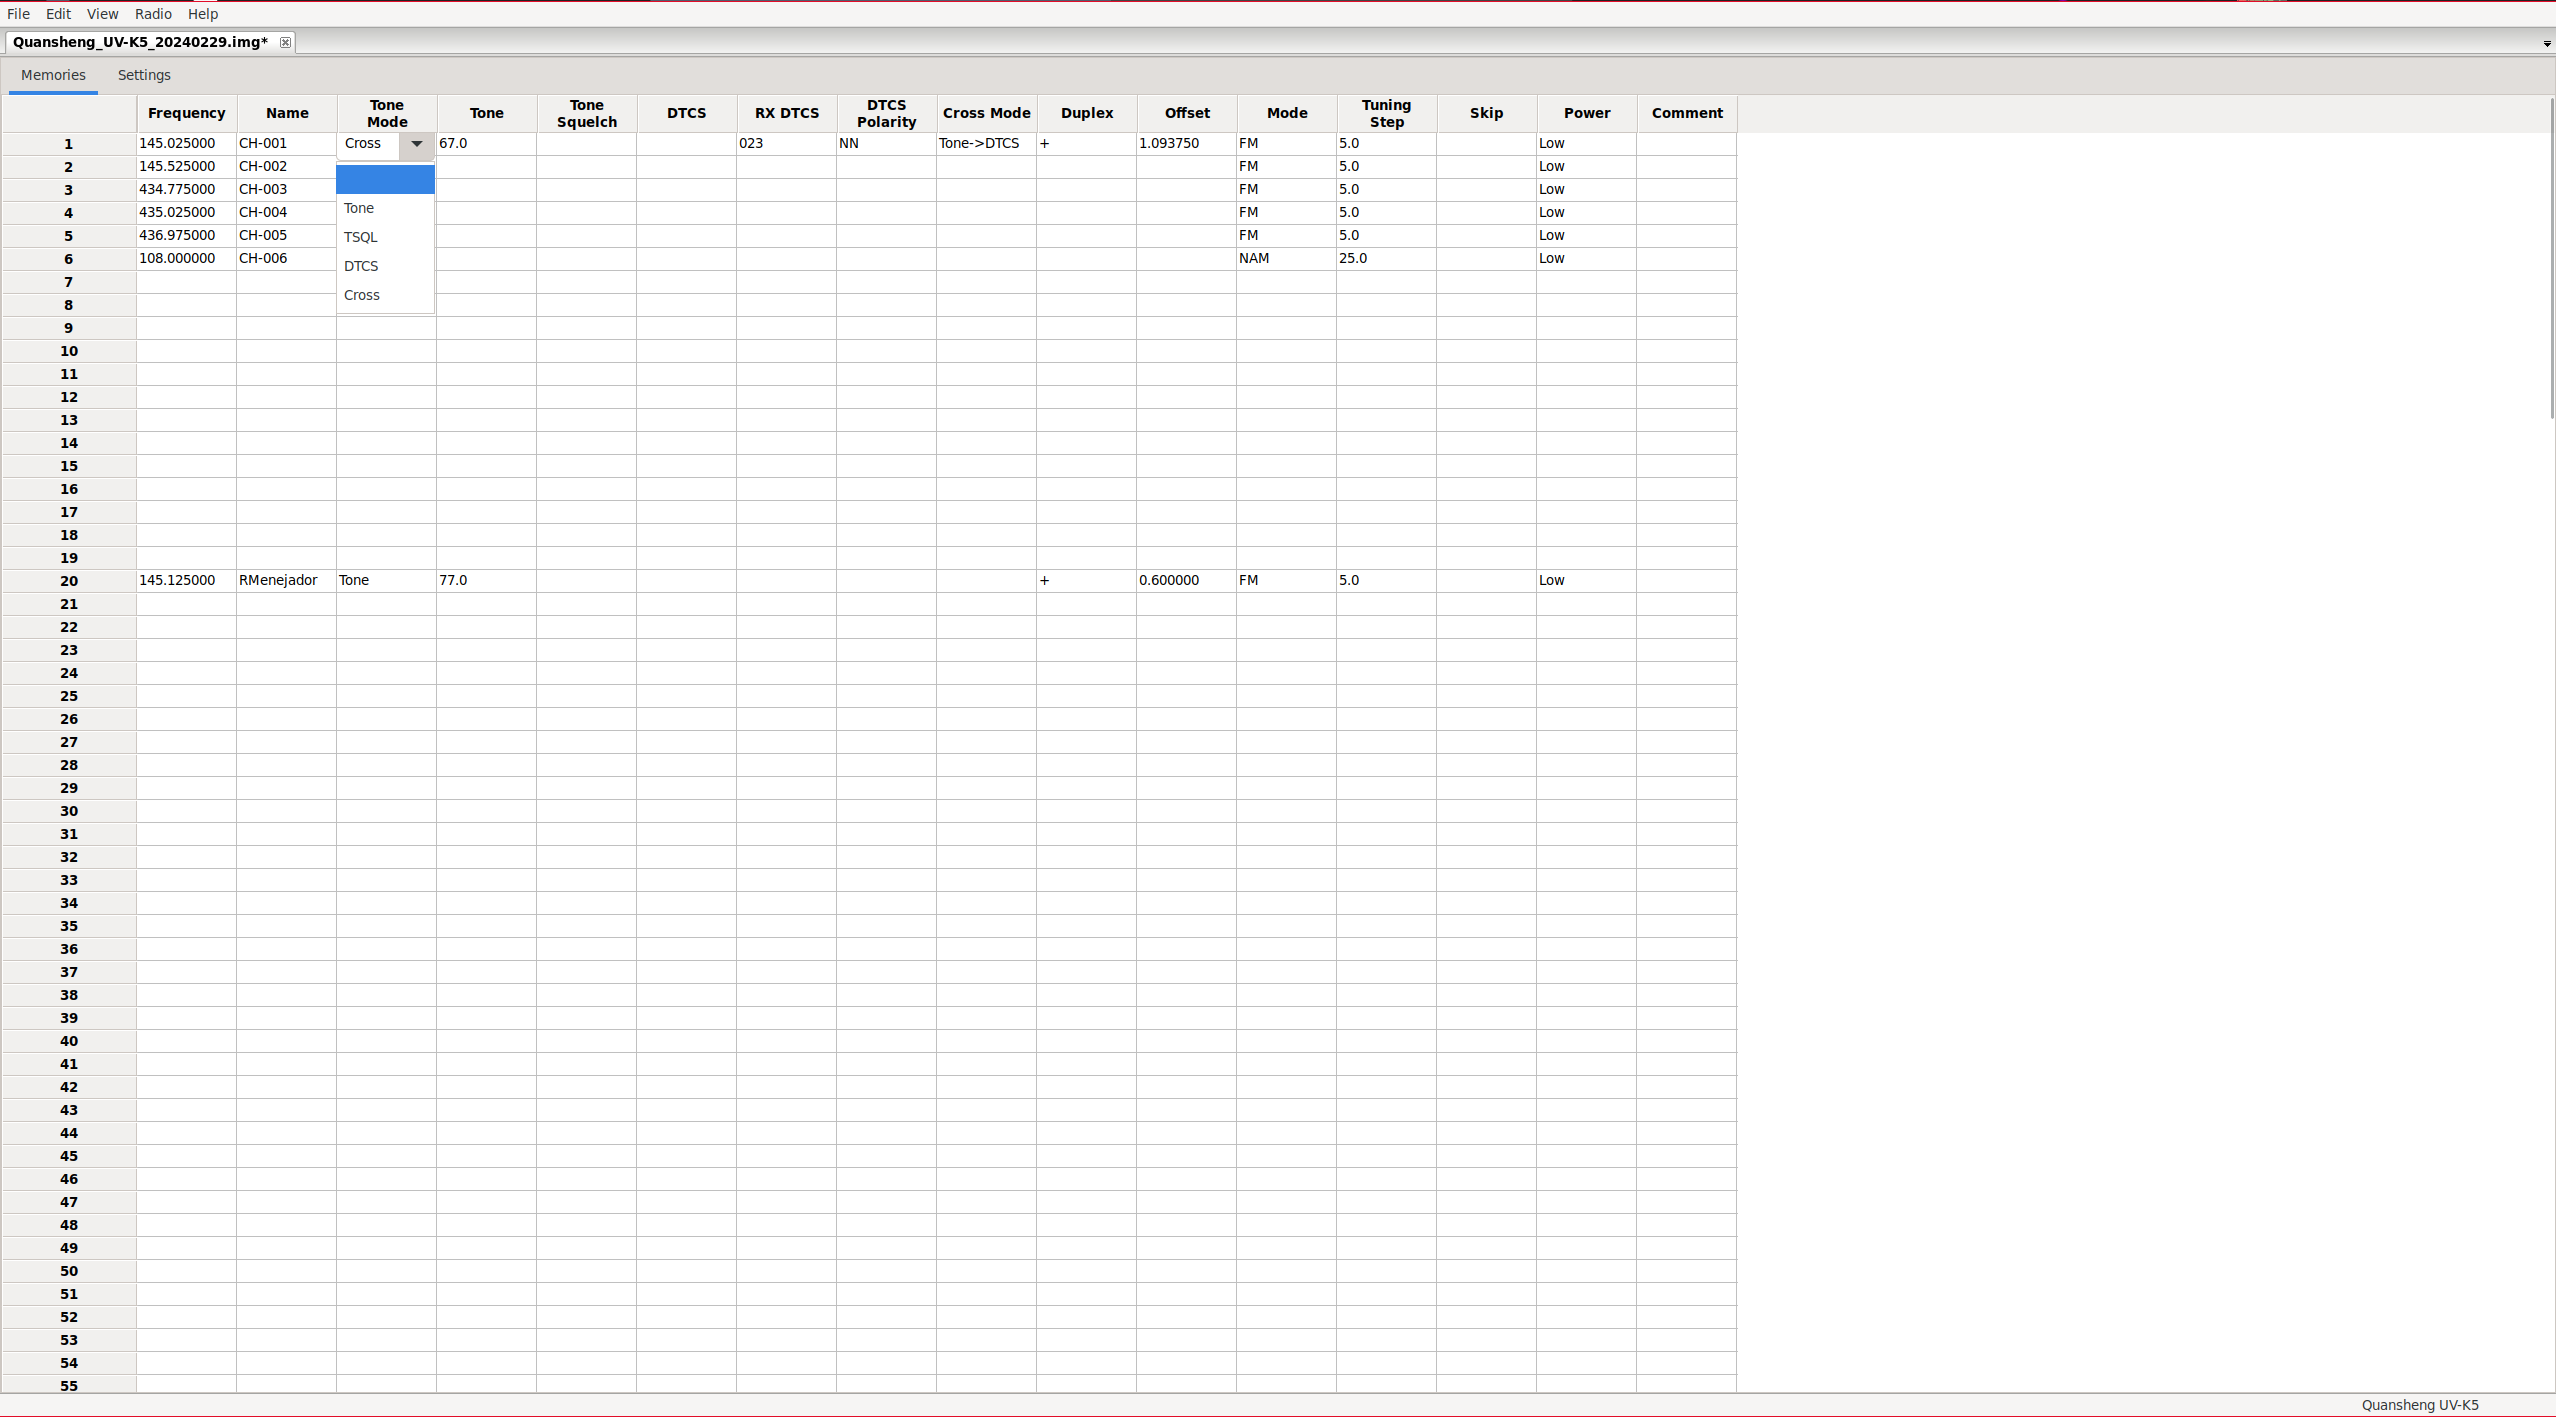
| Value. | Output Code/Tone. | Input Code/Tone. |
|---|---|---|
| None | No tone/code assigned | No tone/code assigned |
| Tone | Tone: Tone column | No tone/code assigned |
| TSQL | Tone: ToneSquelch column | Tone: ToneSquelch column |
| DTCS | Códe: DTCS column | Code: DTCS column |
| Cross | Mixed configuration. | Mixed configuration. |
NOTE: Cross: This mode should be assigned when we want to make mixed configurations, meaning not having only codes or only tones, but being able to choose for the input whether we will use codes or tones, and similarly for the output. This field depends on another column: Cross Mode.
The Cross Mode column determines whether codes or tones will be used, with the first field indicating transmission and the second field reception:
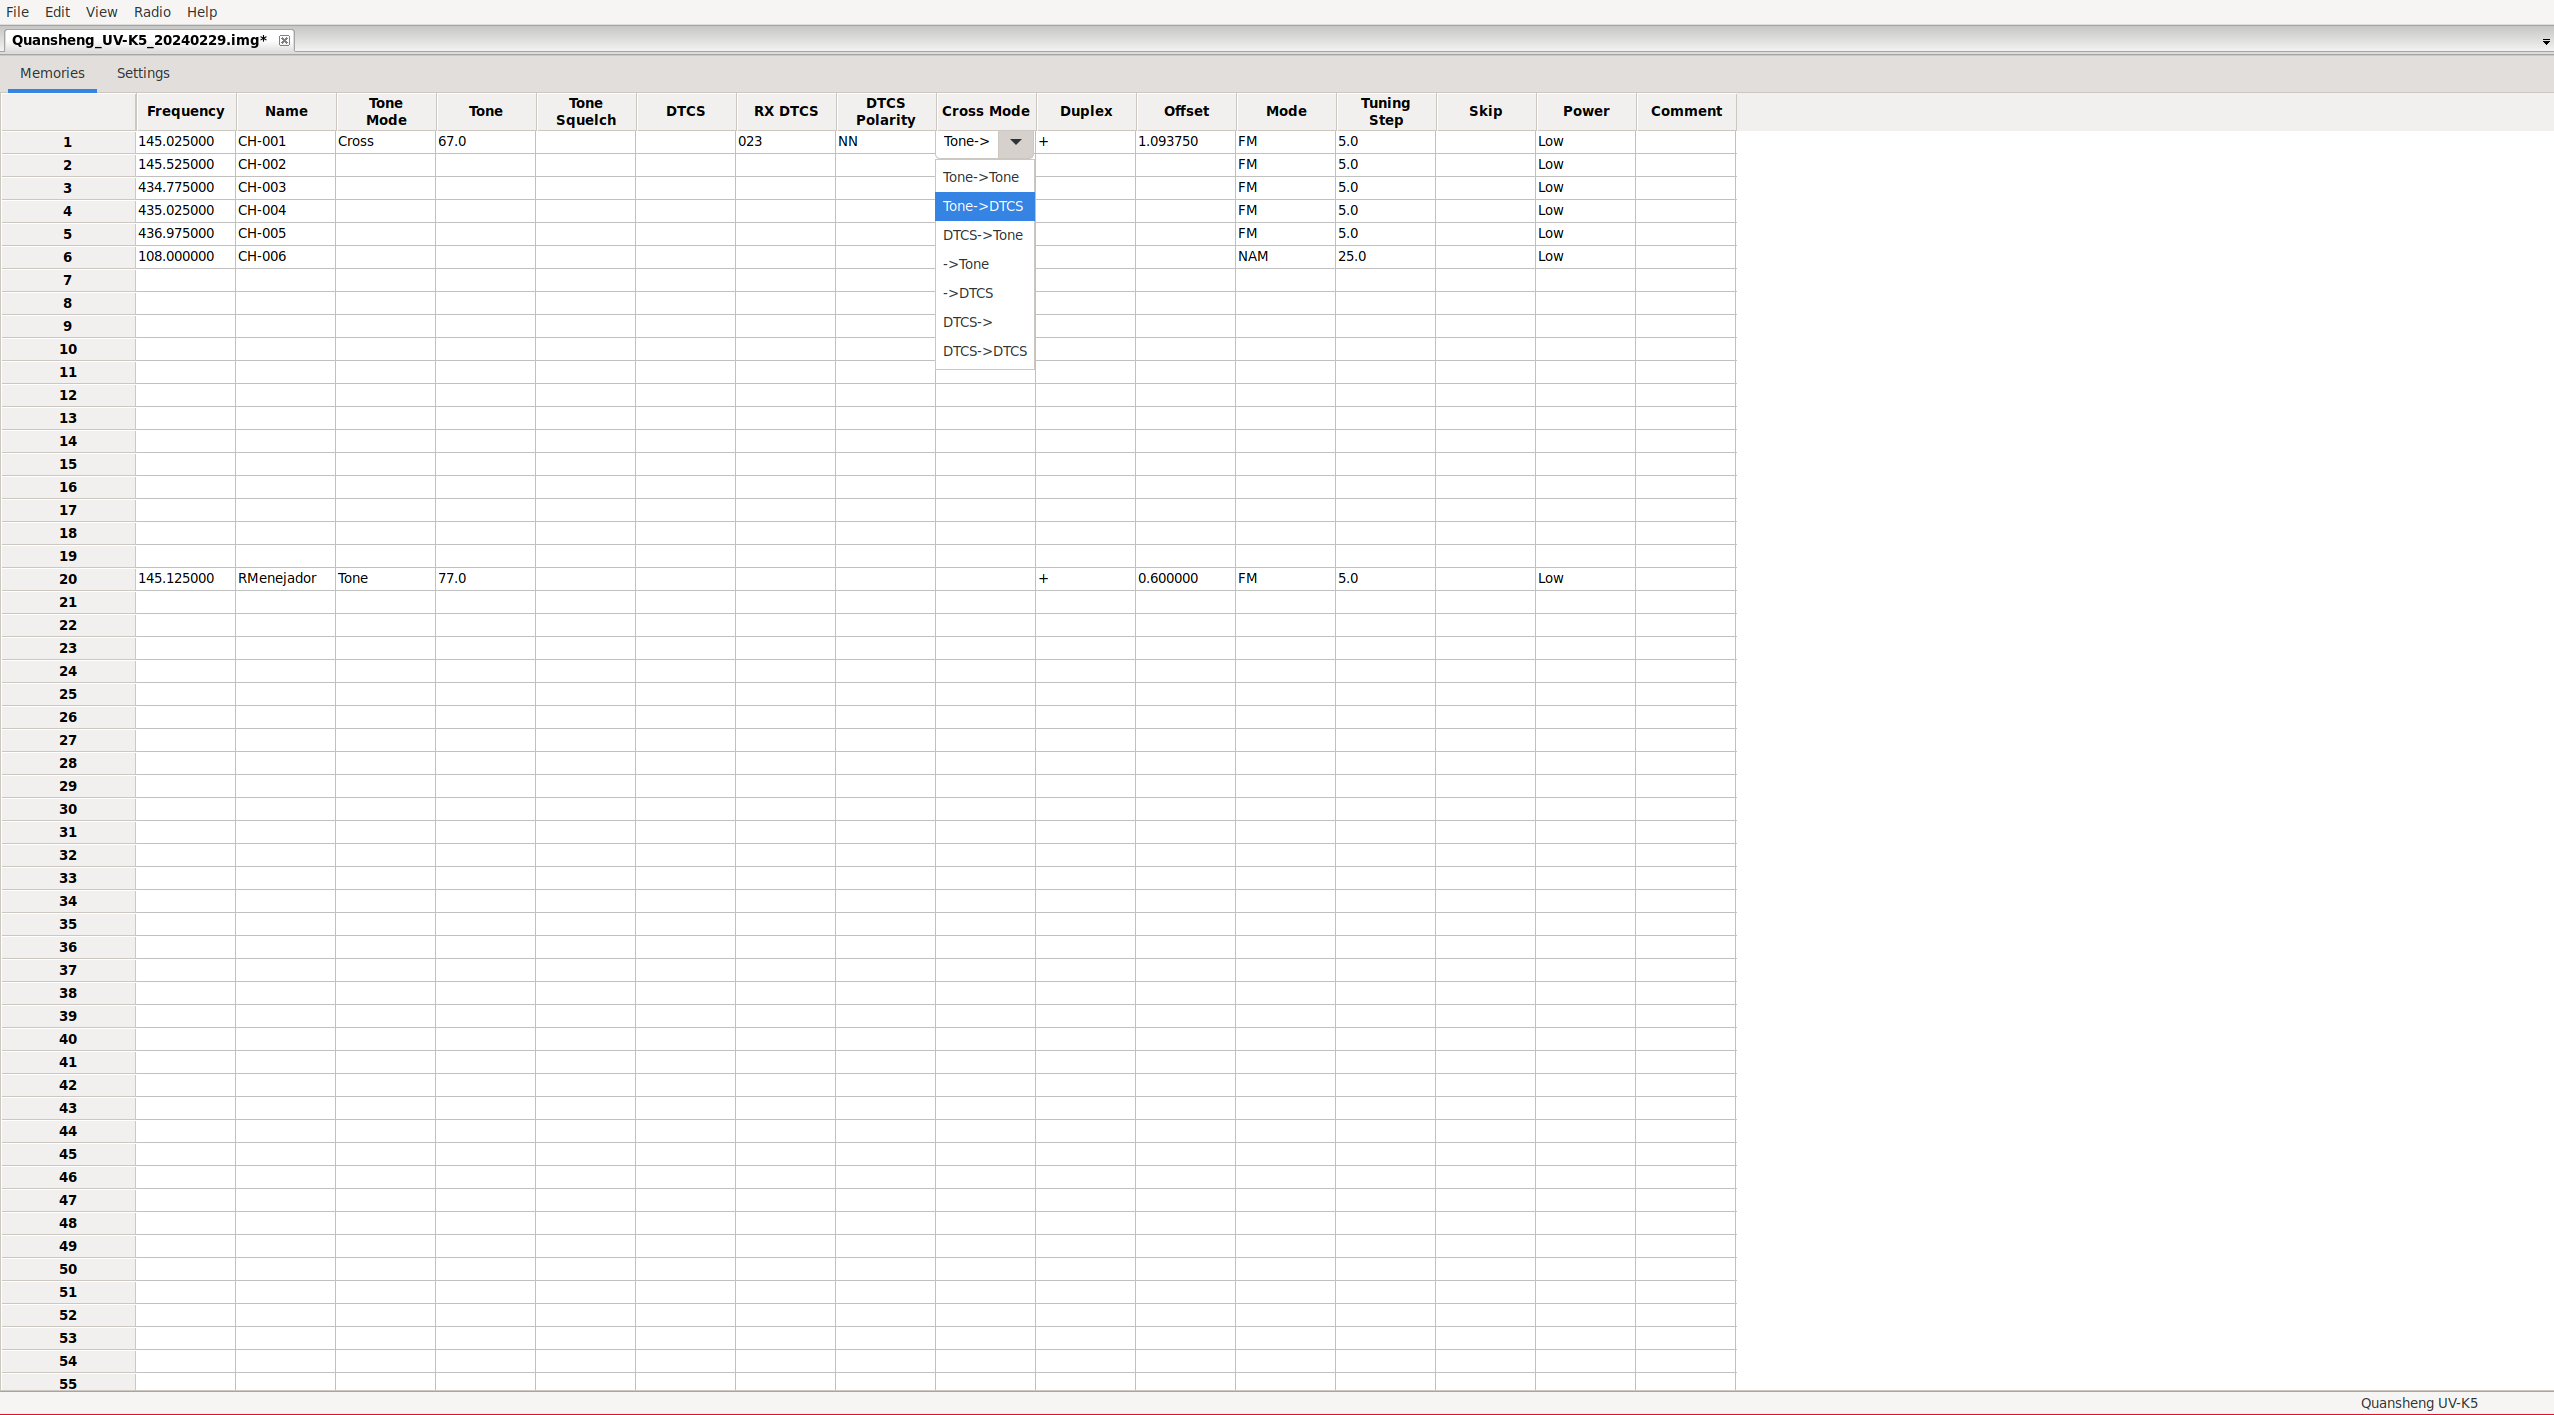
| Value. | Output Code/Tone. | Input Code/Tone. |
|---|---|---|
| Tone -> Tone | Tone: Tone column | Tone: ToneSquelch column |
| Tone -> DTCS | Tone: Tone column | Code: RX_DTCS column |
| DTCS -> Tone | Code: DTCS column | Tone: ToneSquelch column |
| -> Tone | No tone/code assigned | Tone: ToneSquelch column |
| -> DTCS | No tone/code assigned | Code: RX_DTCS column |
| DTCS -> | Code: DTCS column | No tone/code assigned |
| DTCS -> DTCS | Code: DTCS column | Code: RX_DTCS column |
NOTE: It seems like the option Tone -> is missing, probably due to a glitch in Chirp. I assume that over time they will fix these kind of issues, considering that the support for Quansheng radios is still experimental.
Some modes are more restrictive than others. For example, if we configure only digital code as output, it doesn’t make sense to have a tone set for input. The software detects these restrictions, but not very accurately. Sometimes you have to click on more fields, even if you’re not changing anything, to apply these restrictions.
Band list:
Similarly to how we did with
CPS
, from CHIRP it’s also possible to define the start and end of each band.:
FM:            F1 50∽76 MHz
FM:            F2 108∽135.9975 MHz
FM:            F3 136∽173.9975 MHz
FM:            F4 174∽349.9975 MHz
FM:            F5 350∽399.9975 MHz
FM:            F6 400∽469.9975 MHz
FM:            F7 470∽599.9975 MHz
AM:            F2 108∽135.9975 MHz
To modify the parameters, we must scroll all the way down the channel list:
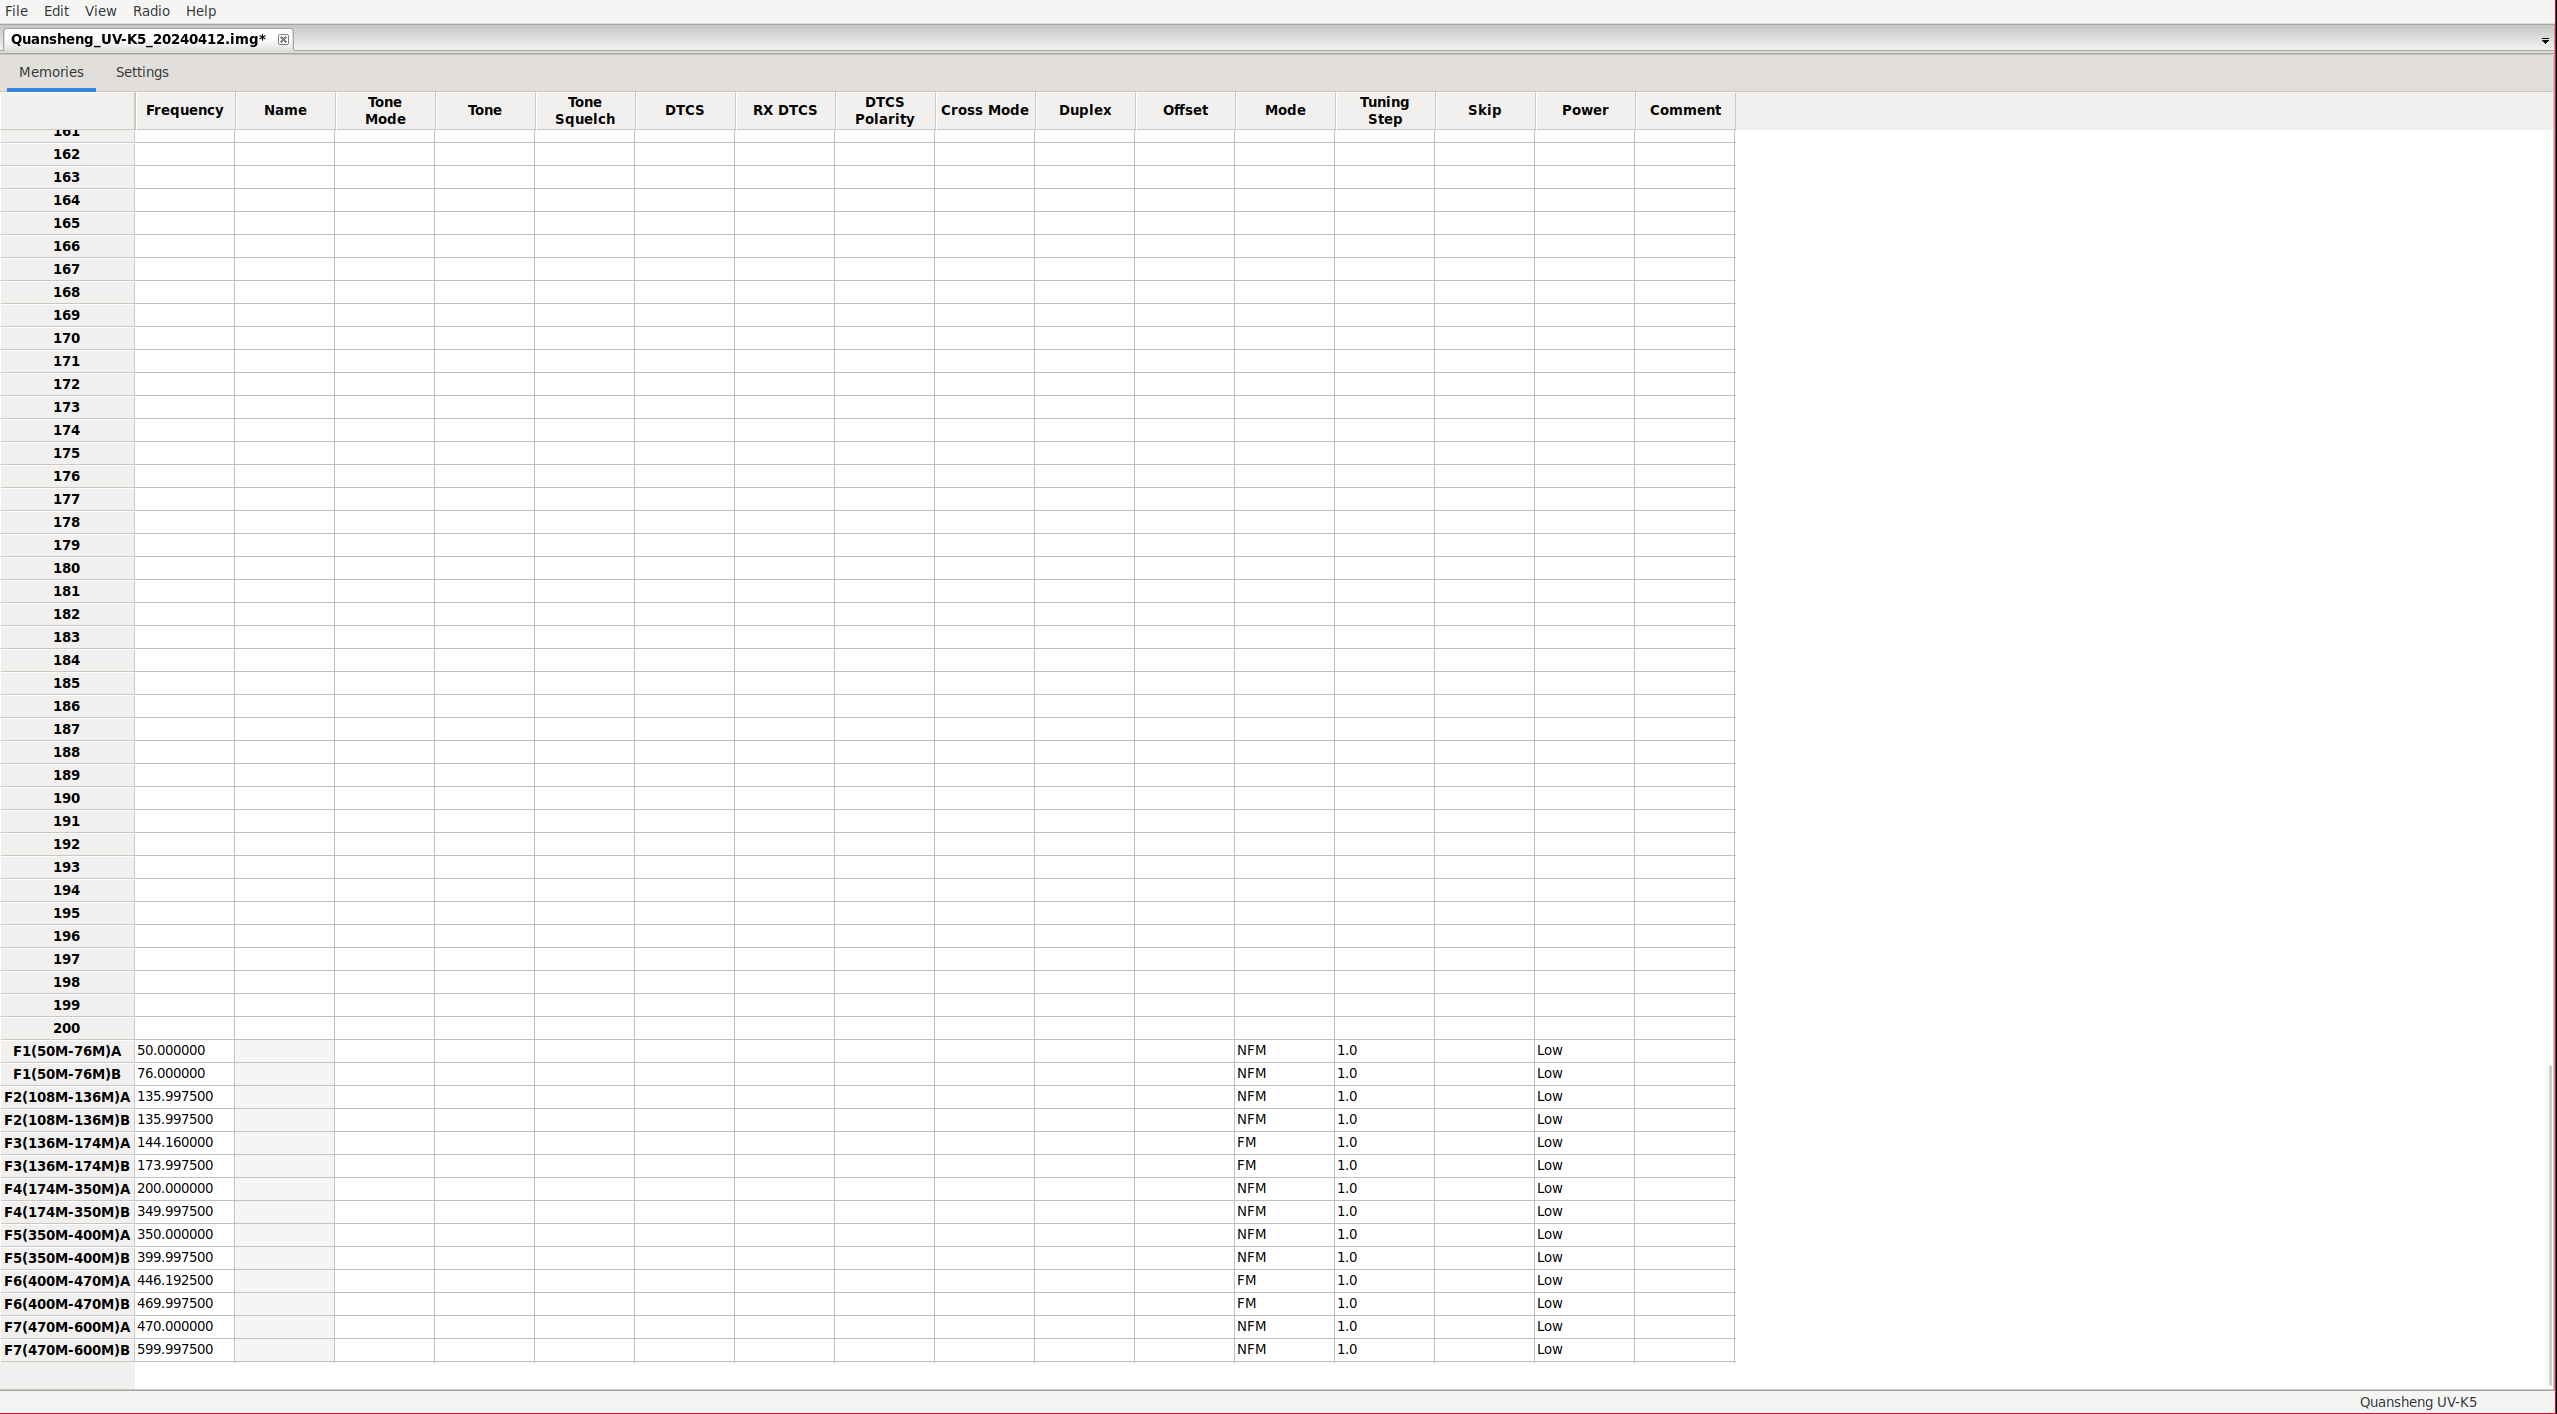
By modifying these parameters, we will alter the frequency limits when scanning in a band and the default parameters in the bands such as the tones/codes , bandwidth, transmission power, and other parameters. Of course, we can always modify these parameters on the fly from the walkie menu.
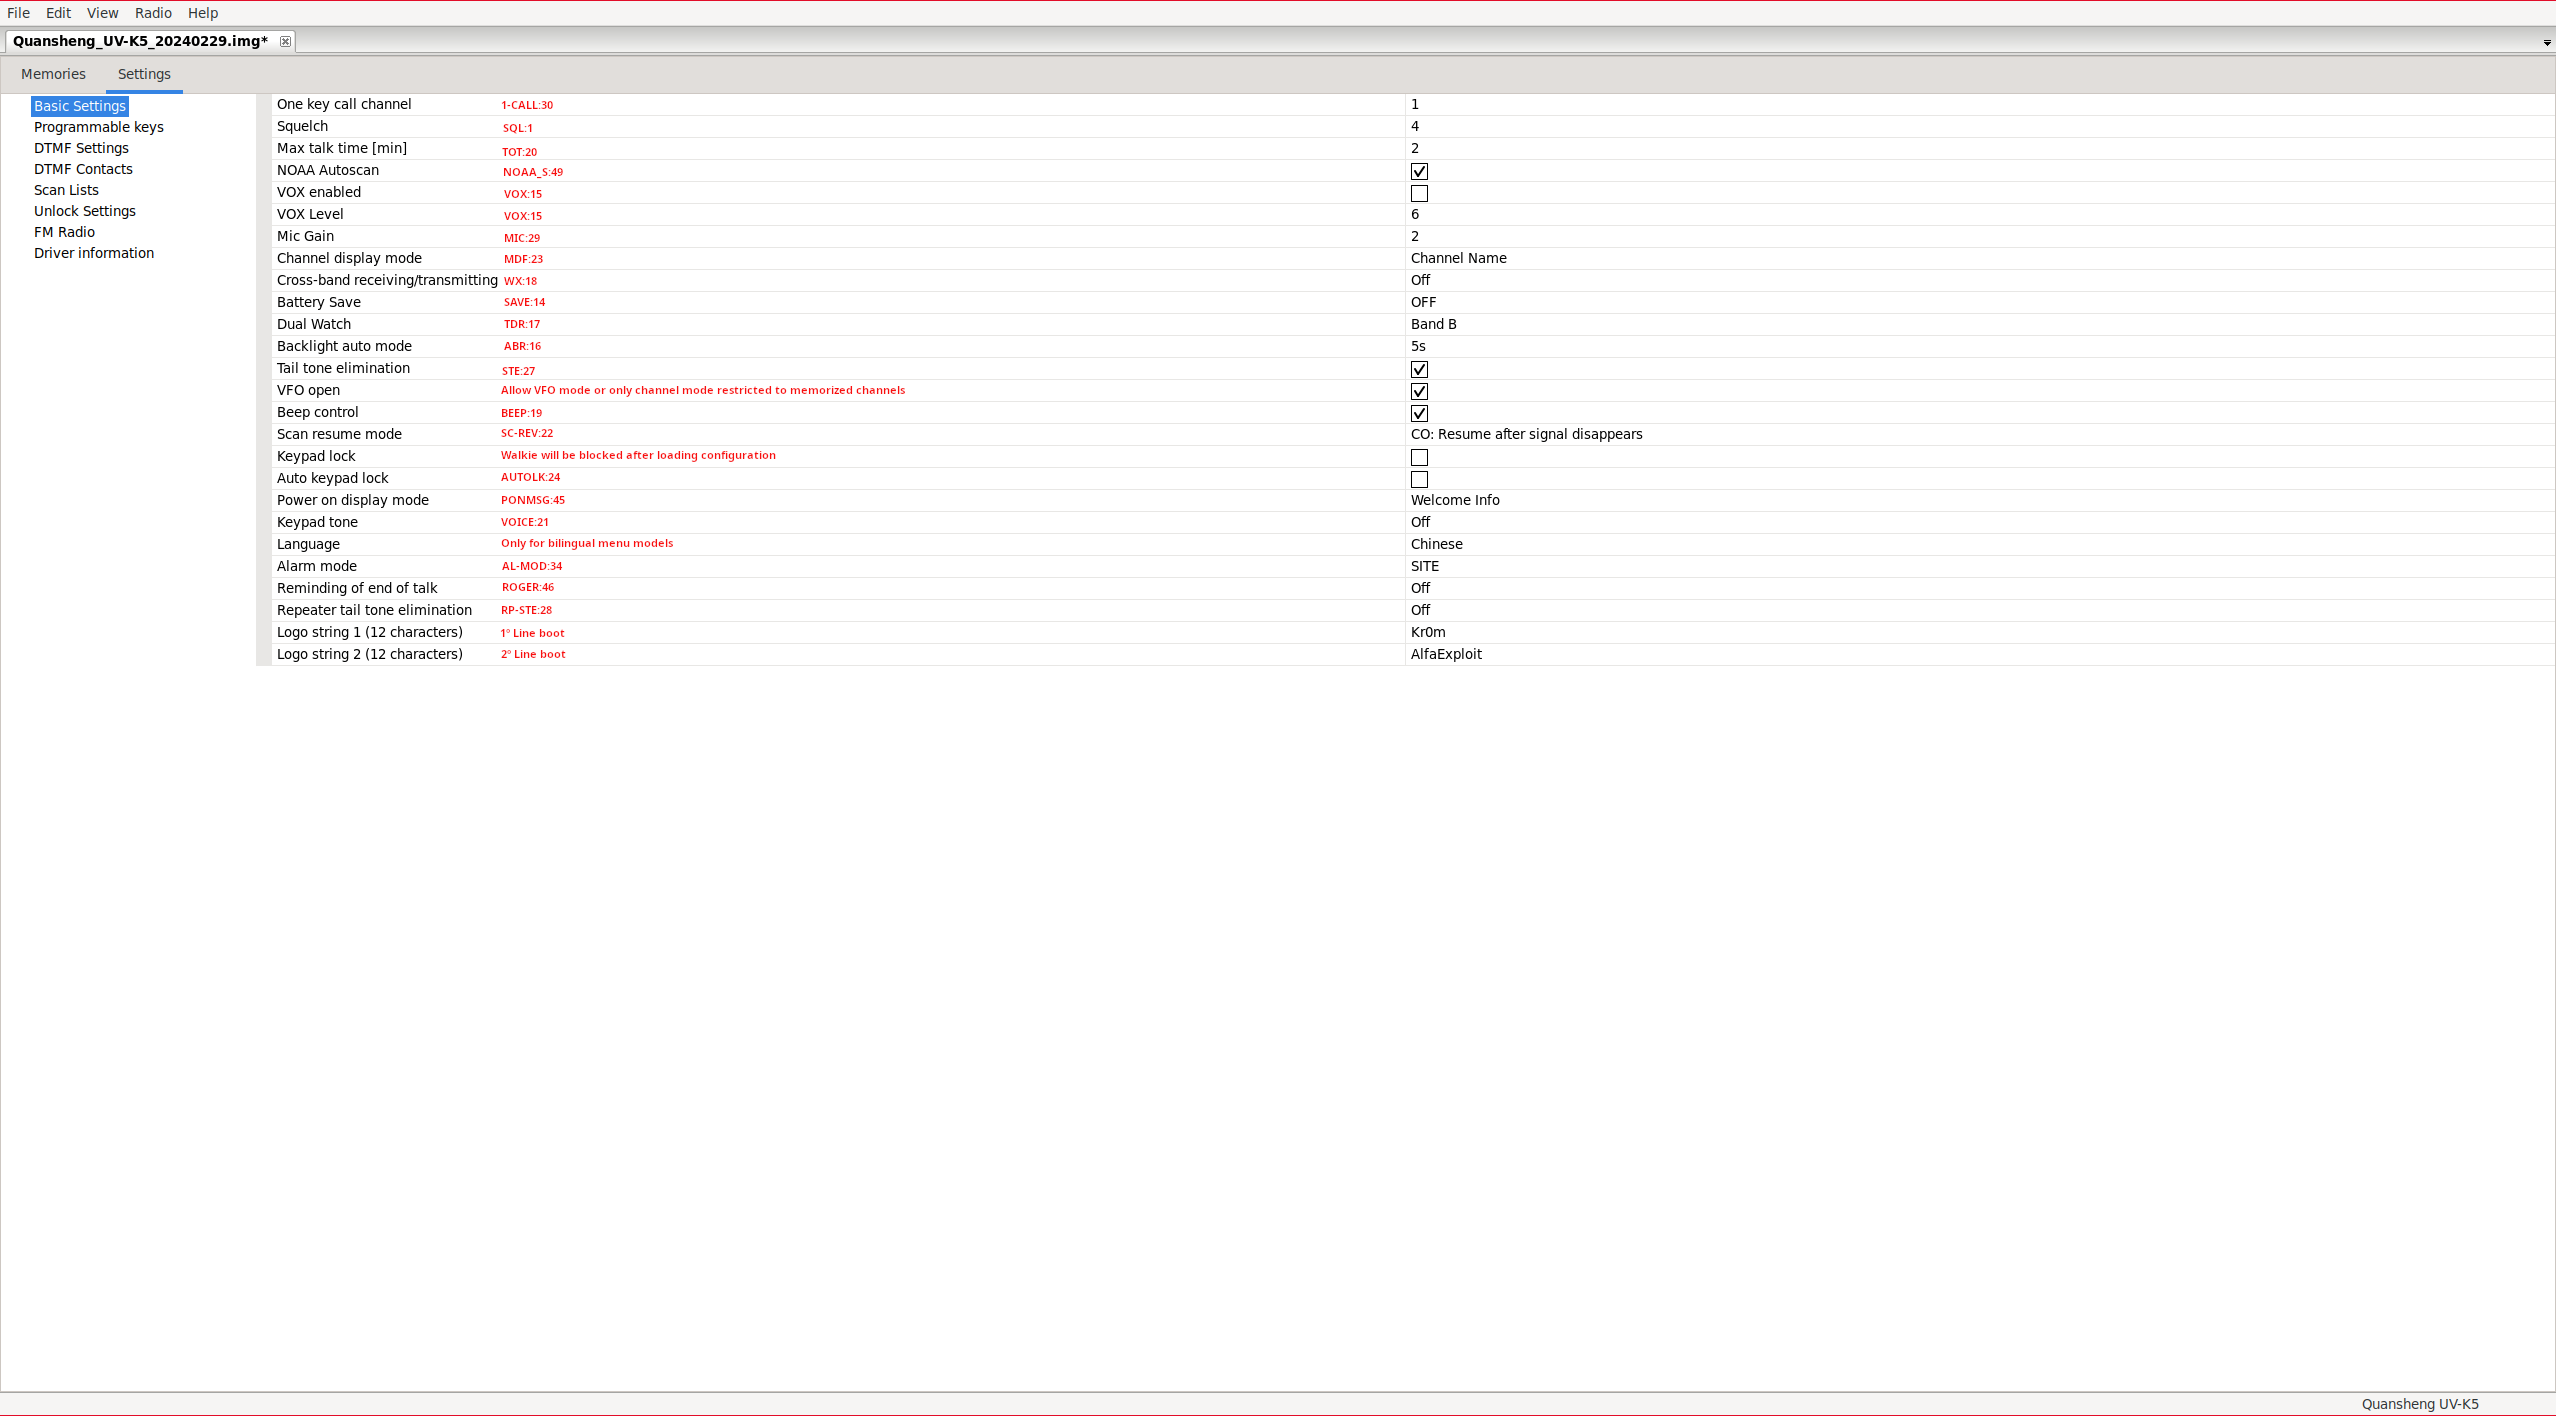
Settings:
In the Settings tab, we can find all other configuration settings.
Basic Settings:
Programmable keys: SideKeys configuration.
DTMF Settings:
DTMF Contacts: DTMF contact list.
Scan Lists: From this section we can only assign the default scan list, enable/disable scan priority, and configure the two priority channels for each list. These are channels that will be scanned more frequently than non-priority ones. This is useful when scanning a large number of channels without missing the reception of a priority channel while the walkie is busy scanning non-priority channels. To edit the lists, we must do so from the Memories tab, after previously enabling the extra fields: View → Show extra fields, as explained below.

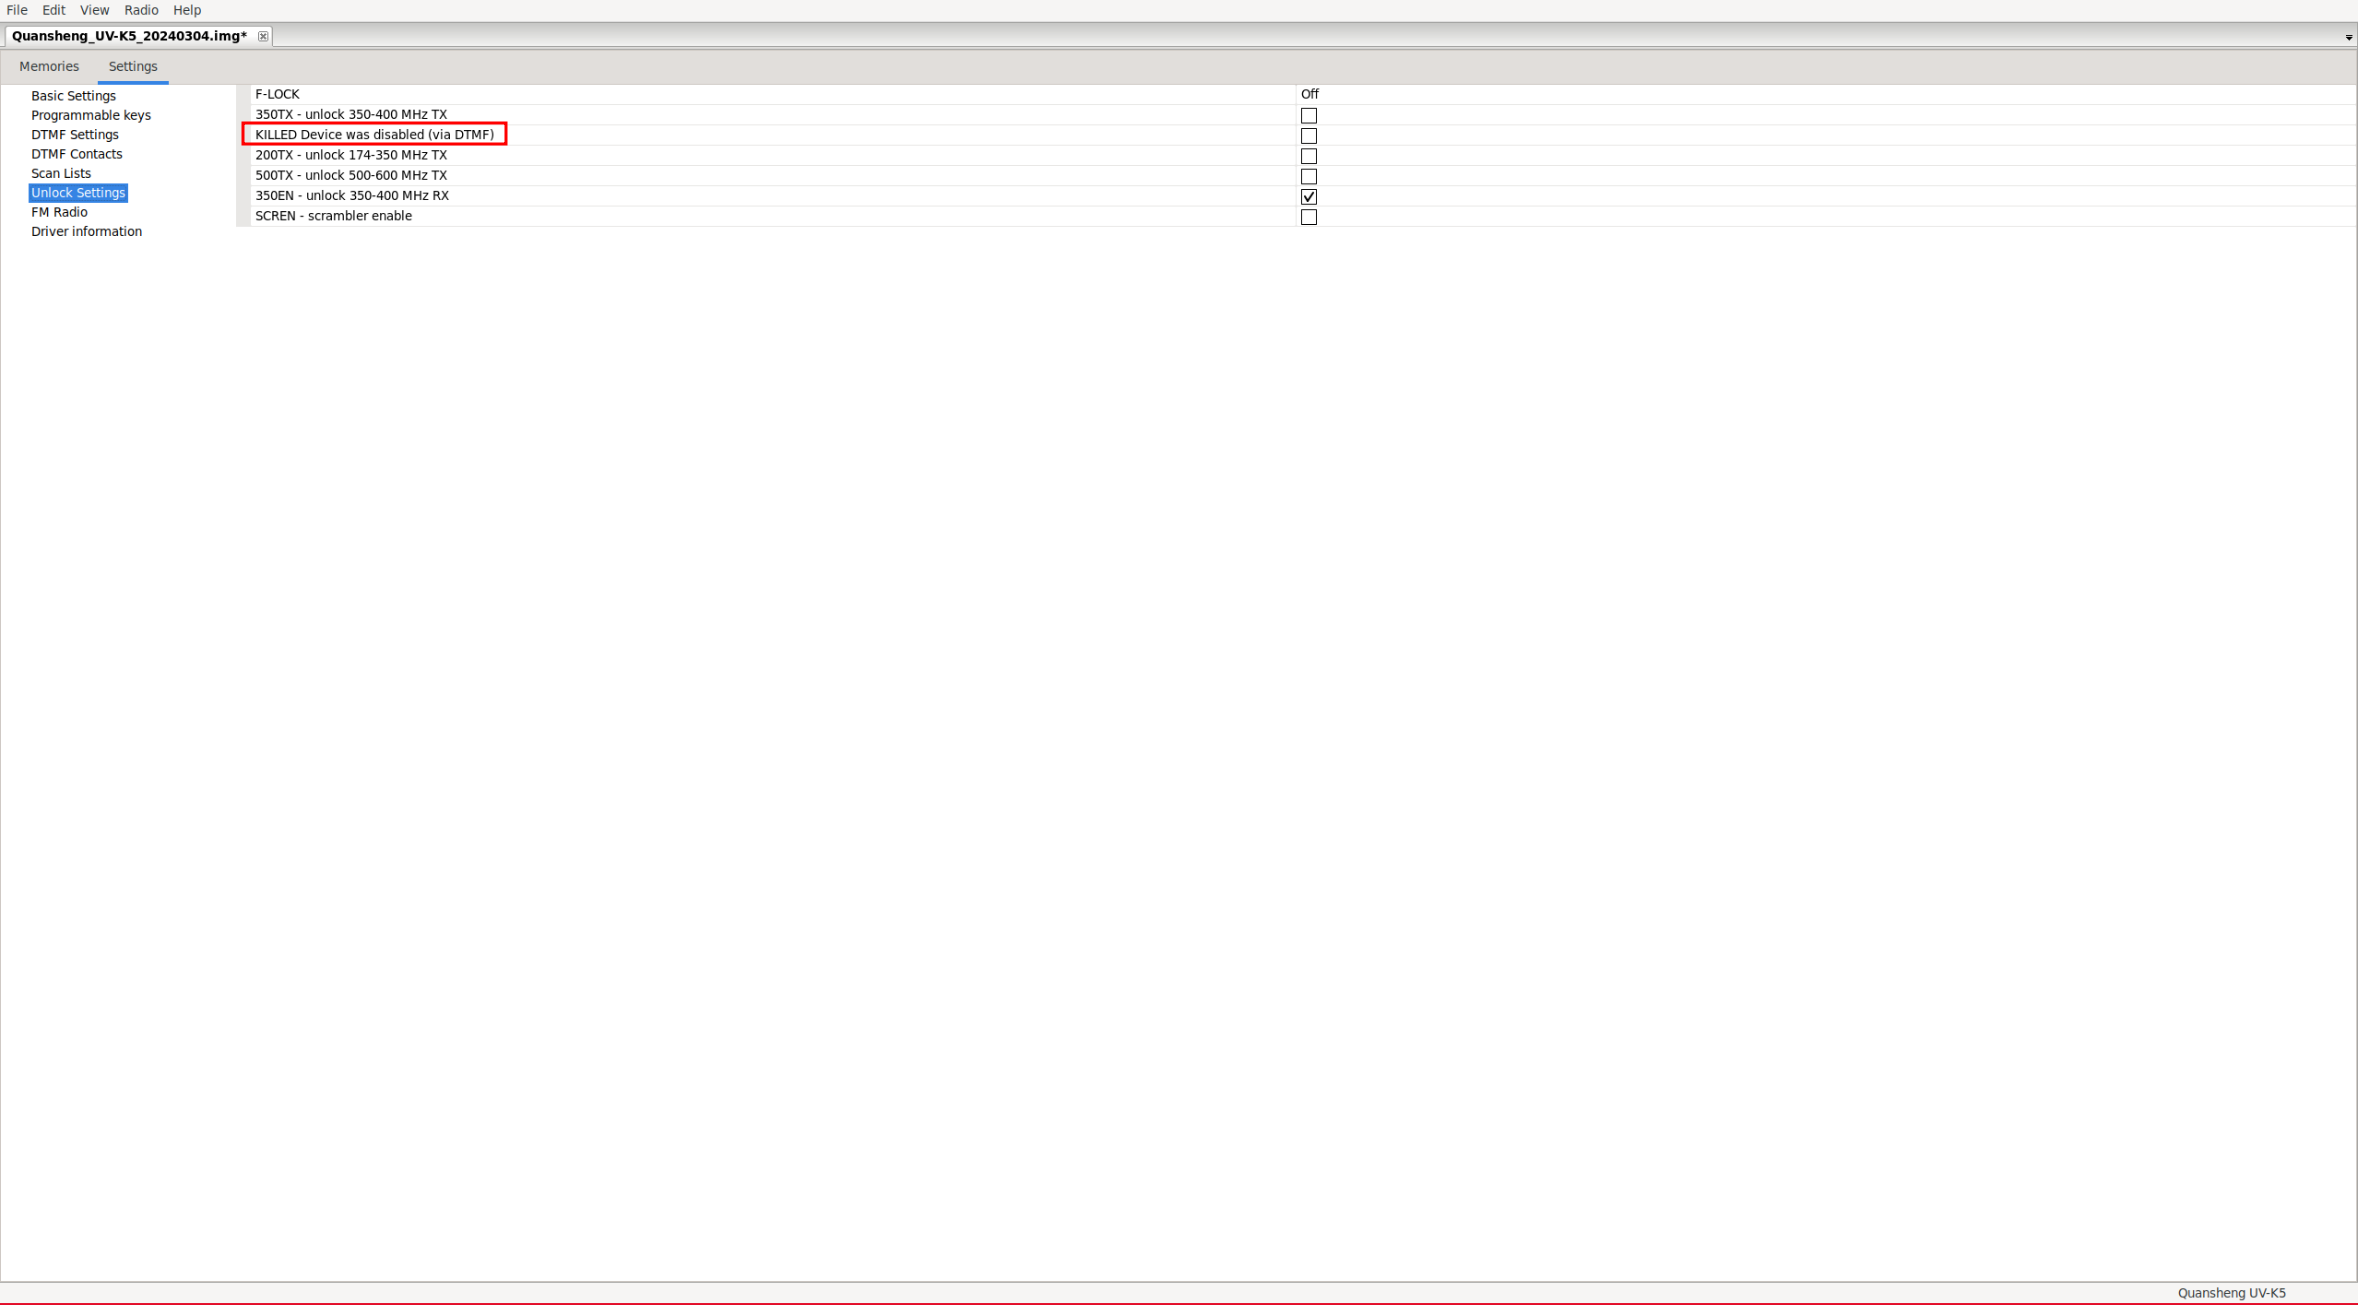
Unlock Settings: We can unlock transmission on frequencies outside the amateur radio range in the same way as we did from the
extended menu
. We can also see the option KILLED Device was disabled (via DTMF), this option only shows us if the walkie-talkie was disabled via
remote kill
, it does not allow to either lock or unlock the walkie-talkie.
FM Radio: It allows you to edit the stored radio channels.
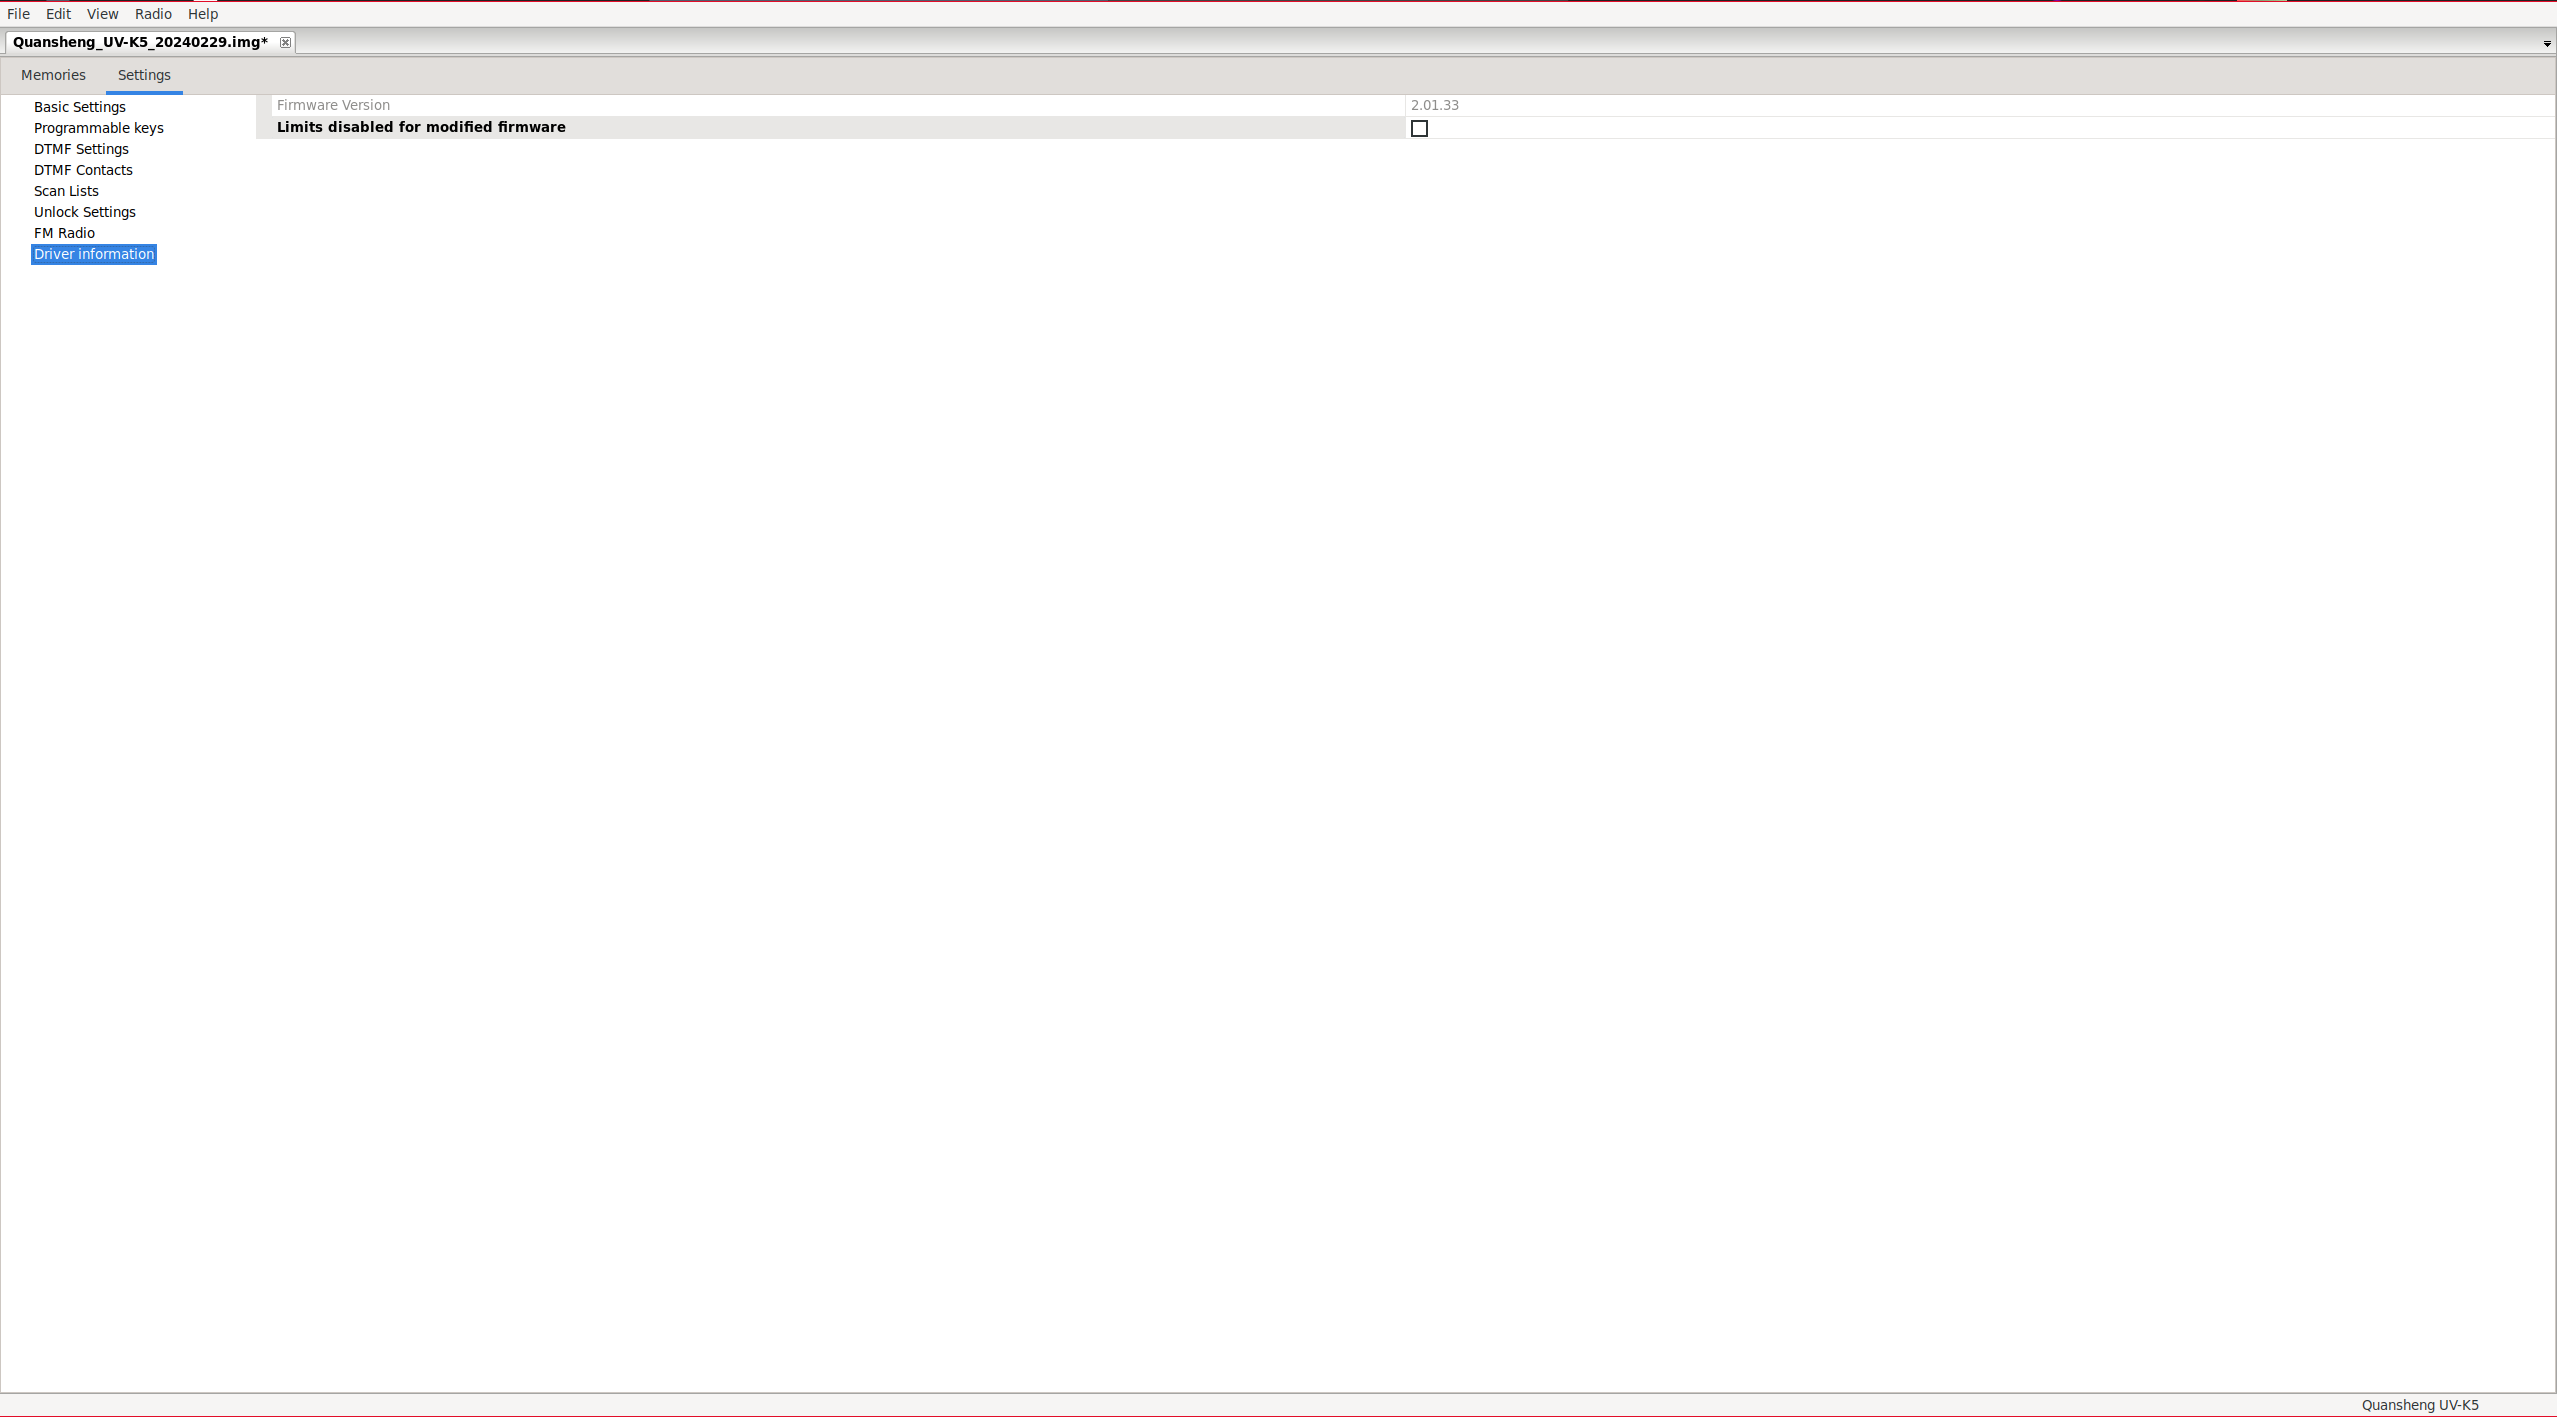
Driver information: Displays the firmware version. The second parameter allows you to configure channels on frequencies outside the ’normal’ range if you have loaded special firmware that allows a wider frequency range. Without this option, channel editing will be restricted to ’normal’ frequency ranges.
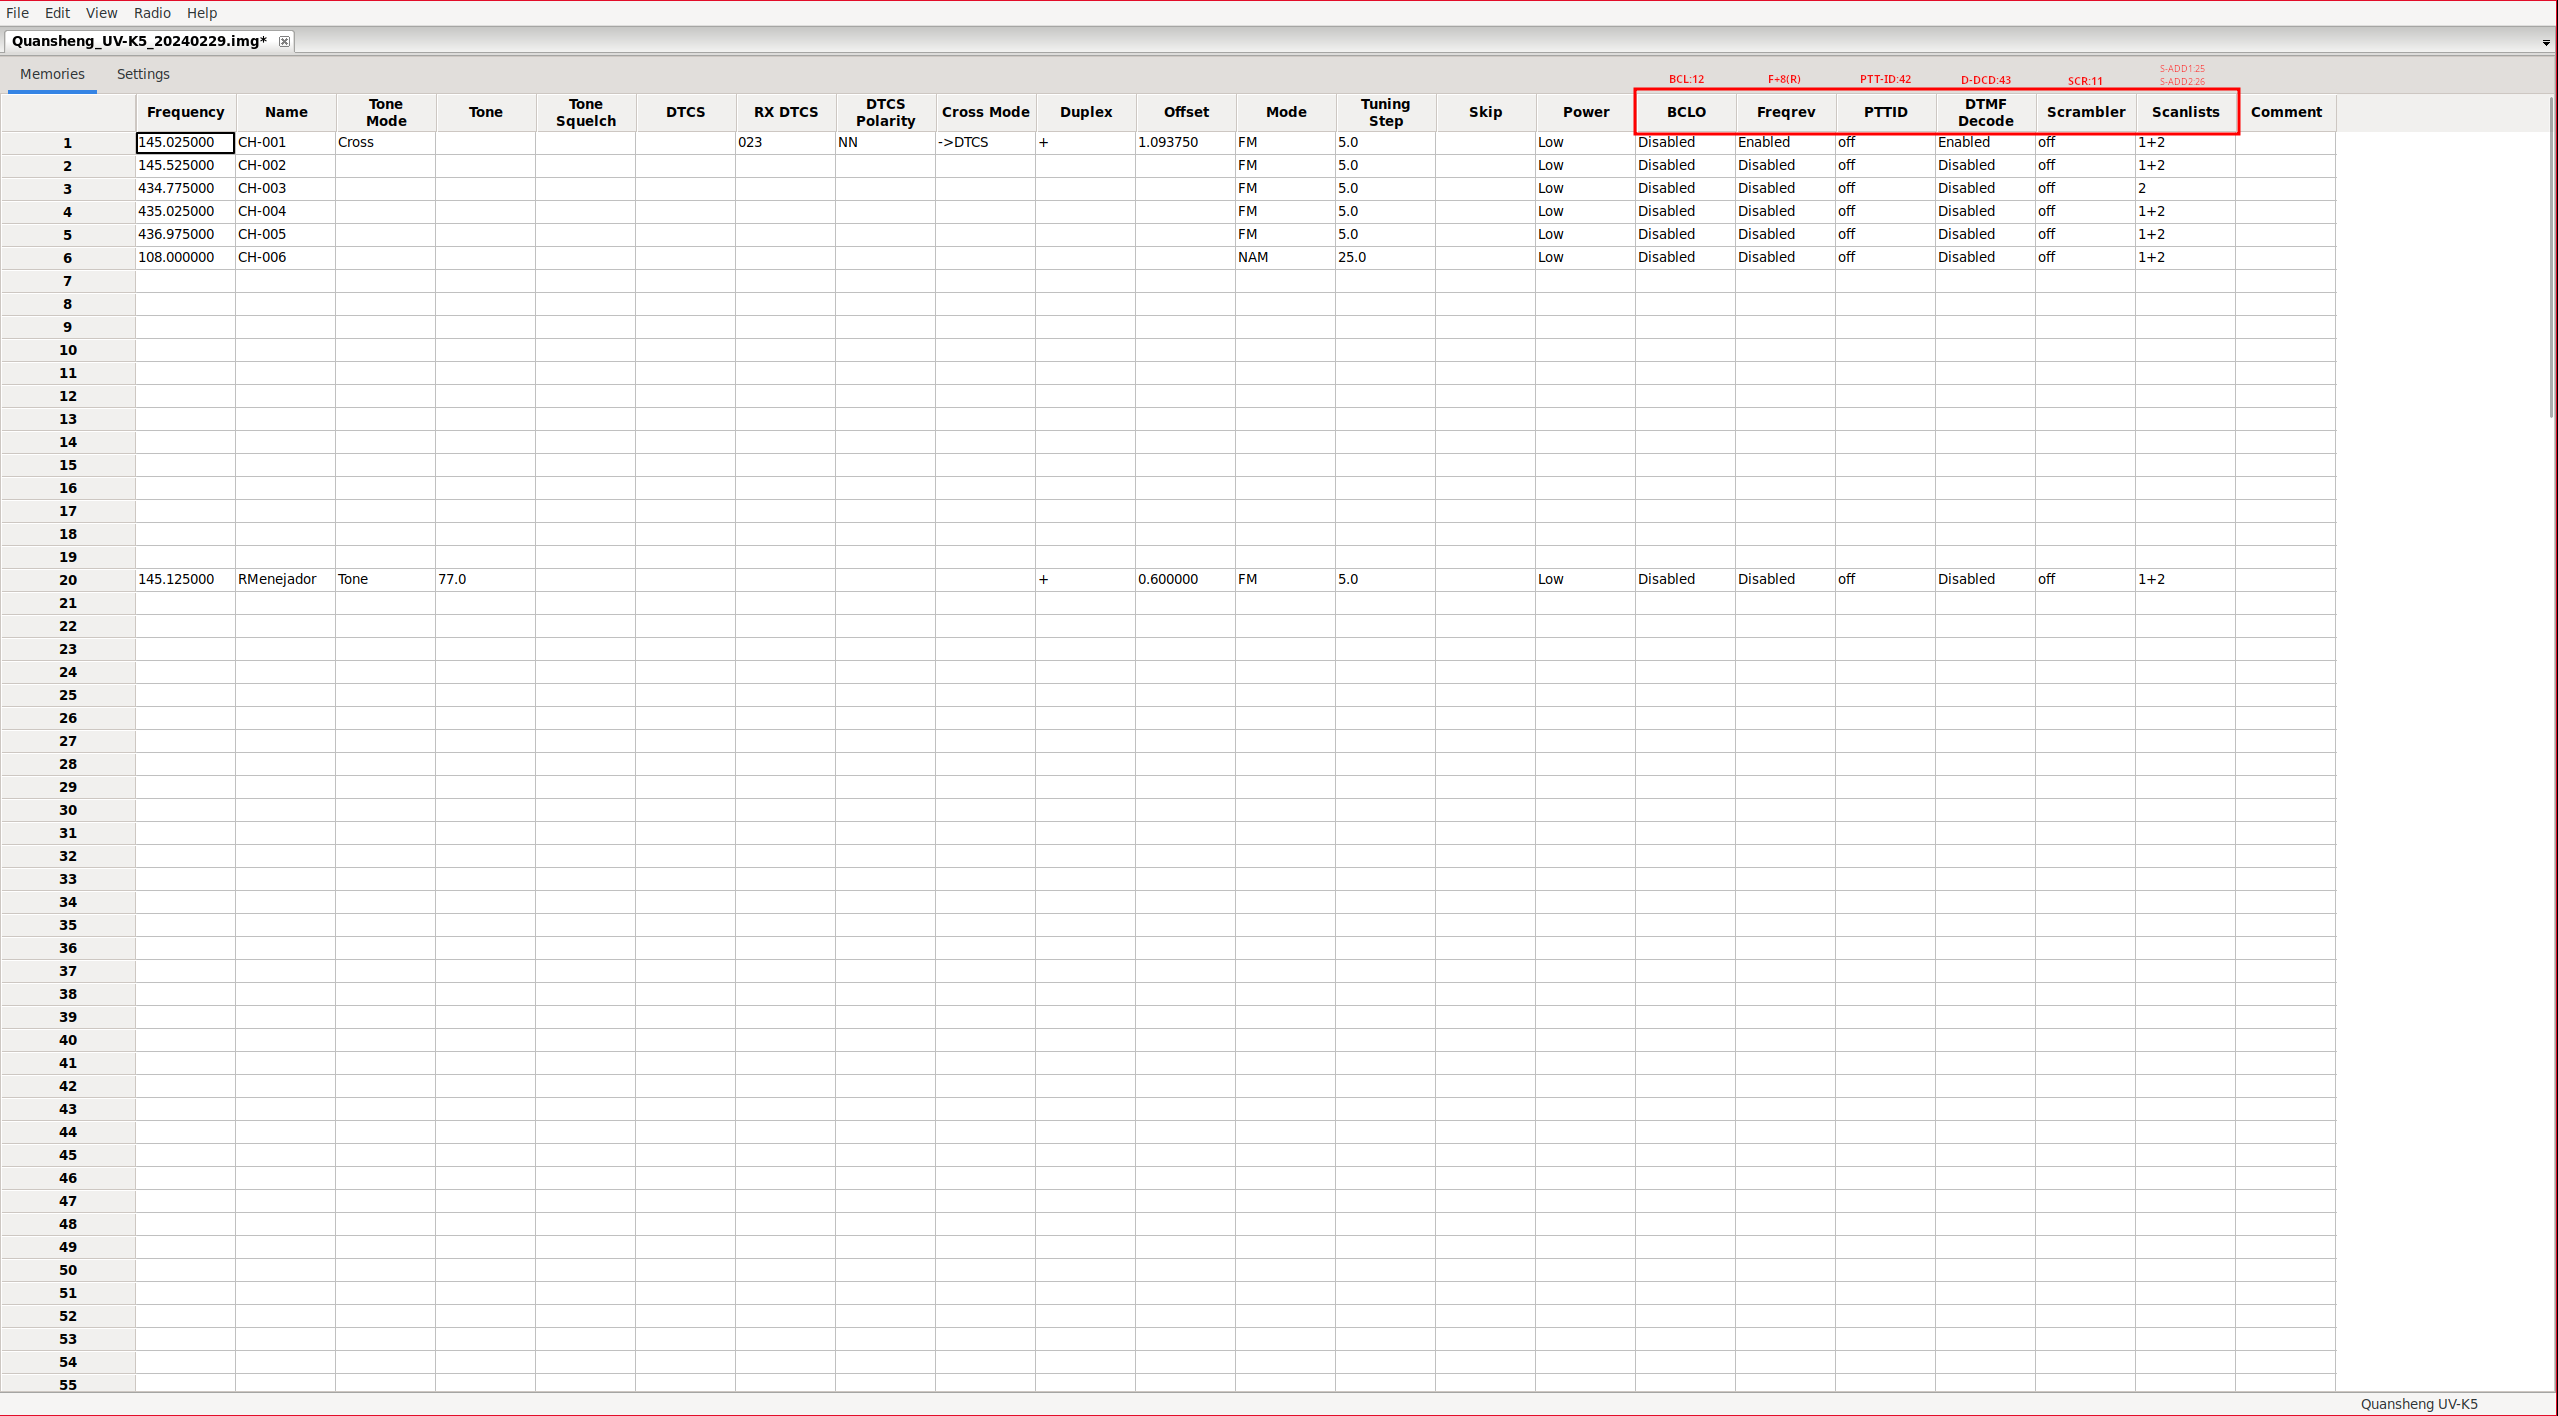
Extra fields:
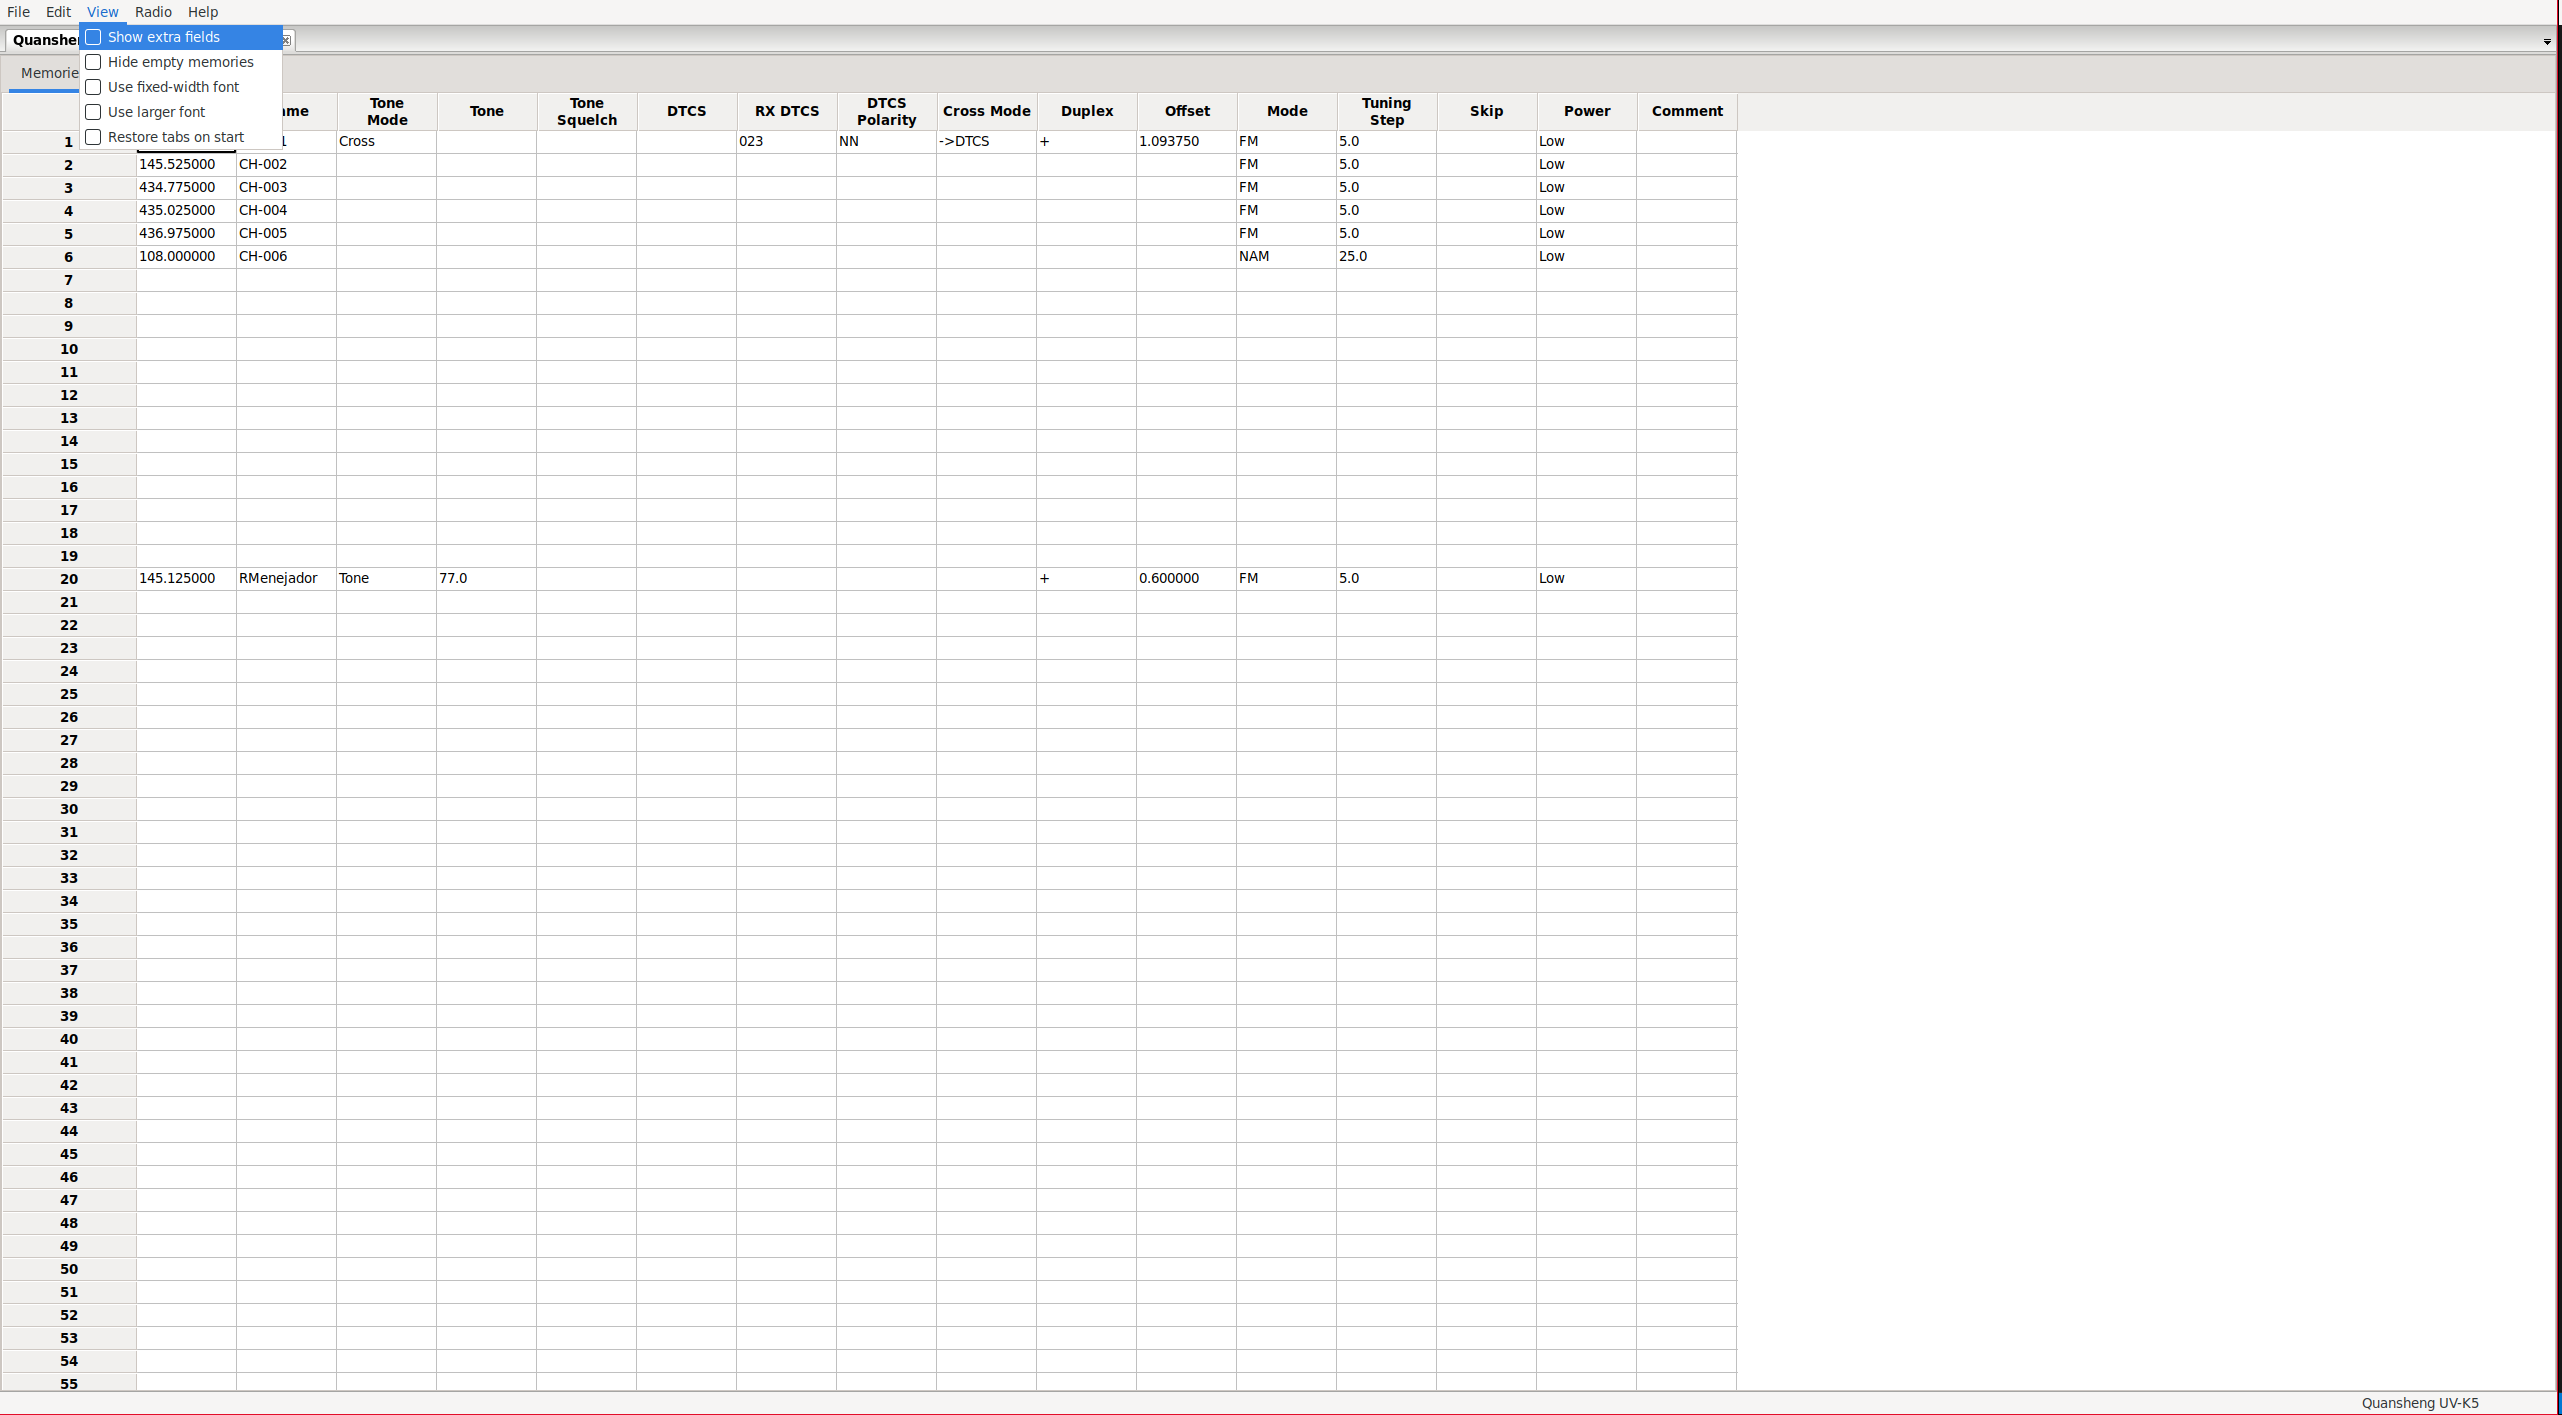
In the Memories section, additional parameters can be displayed if we enable them.
View -> Show extra fields
|
|
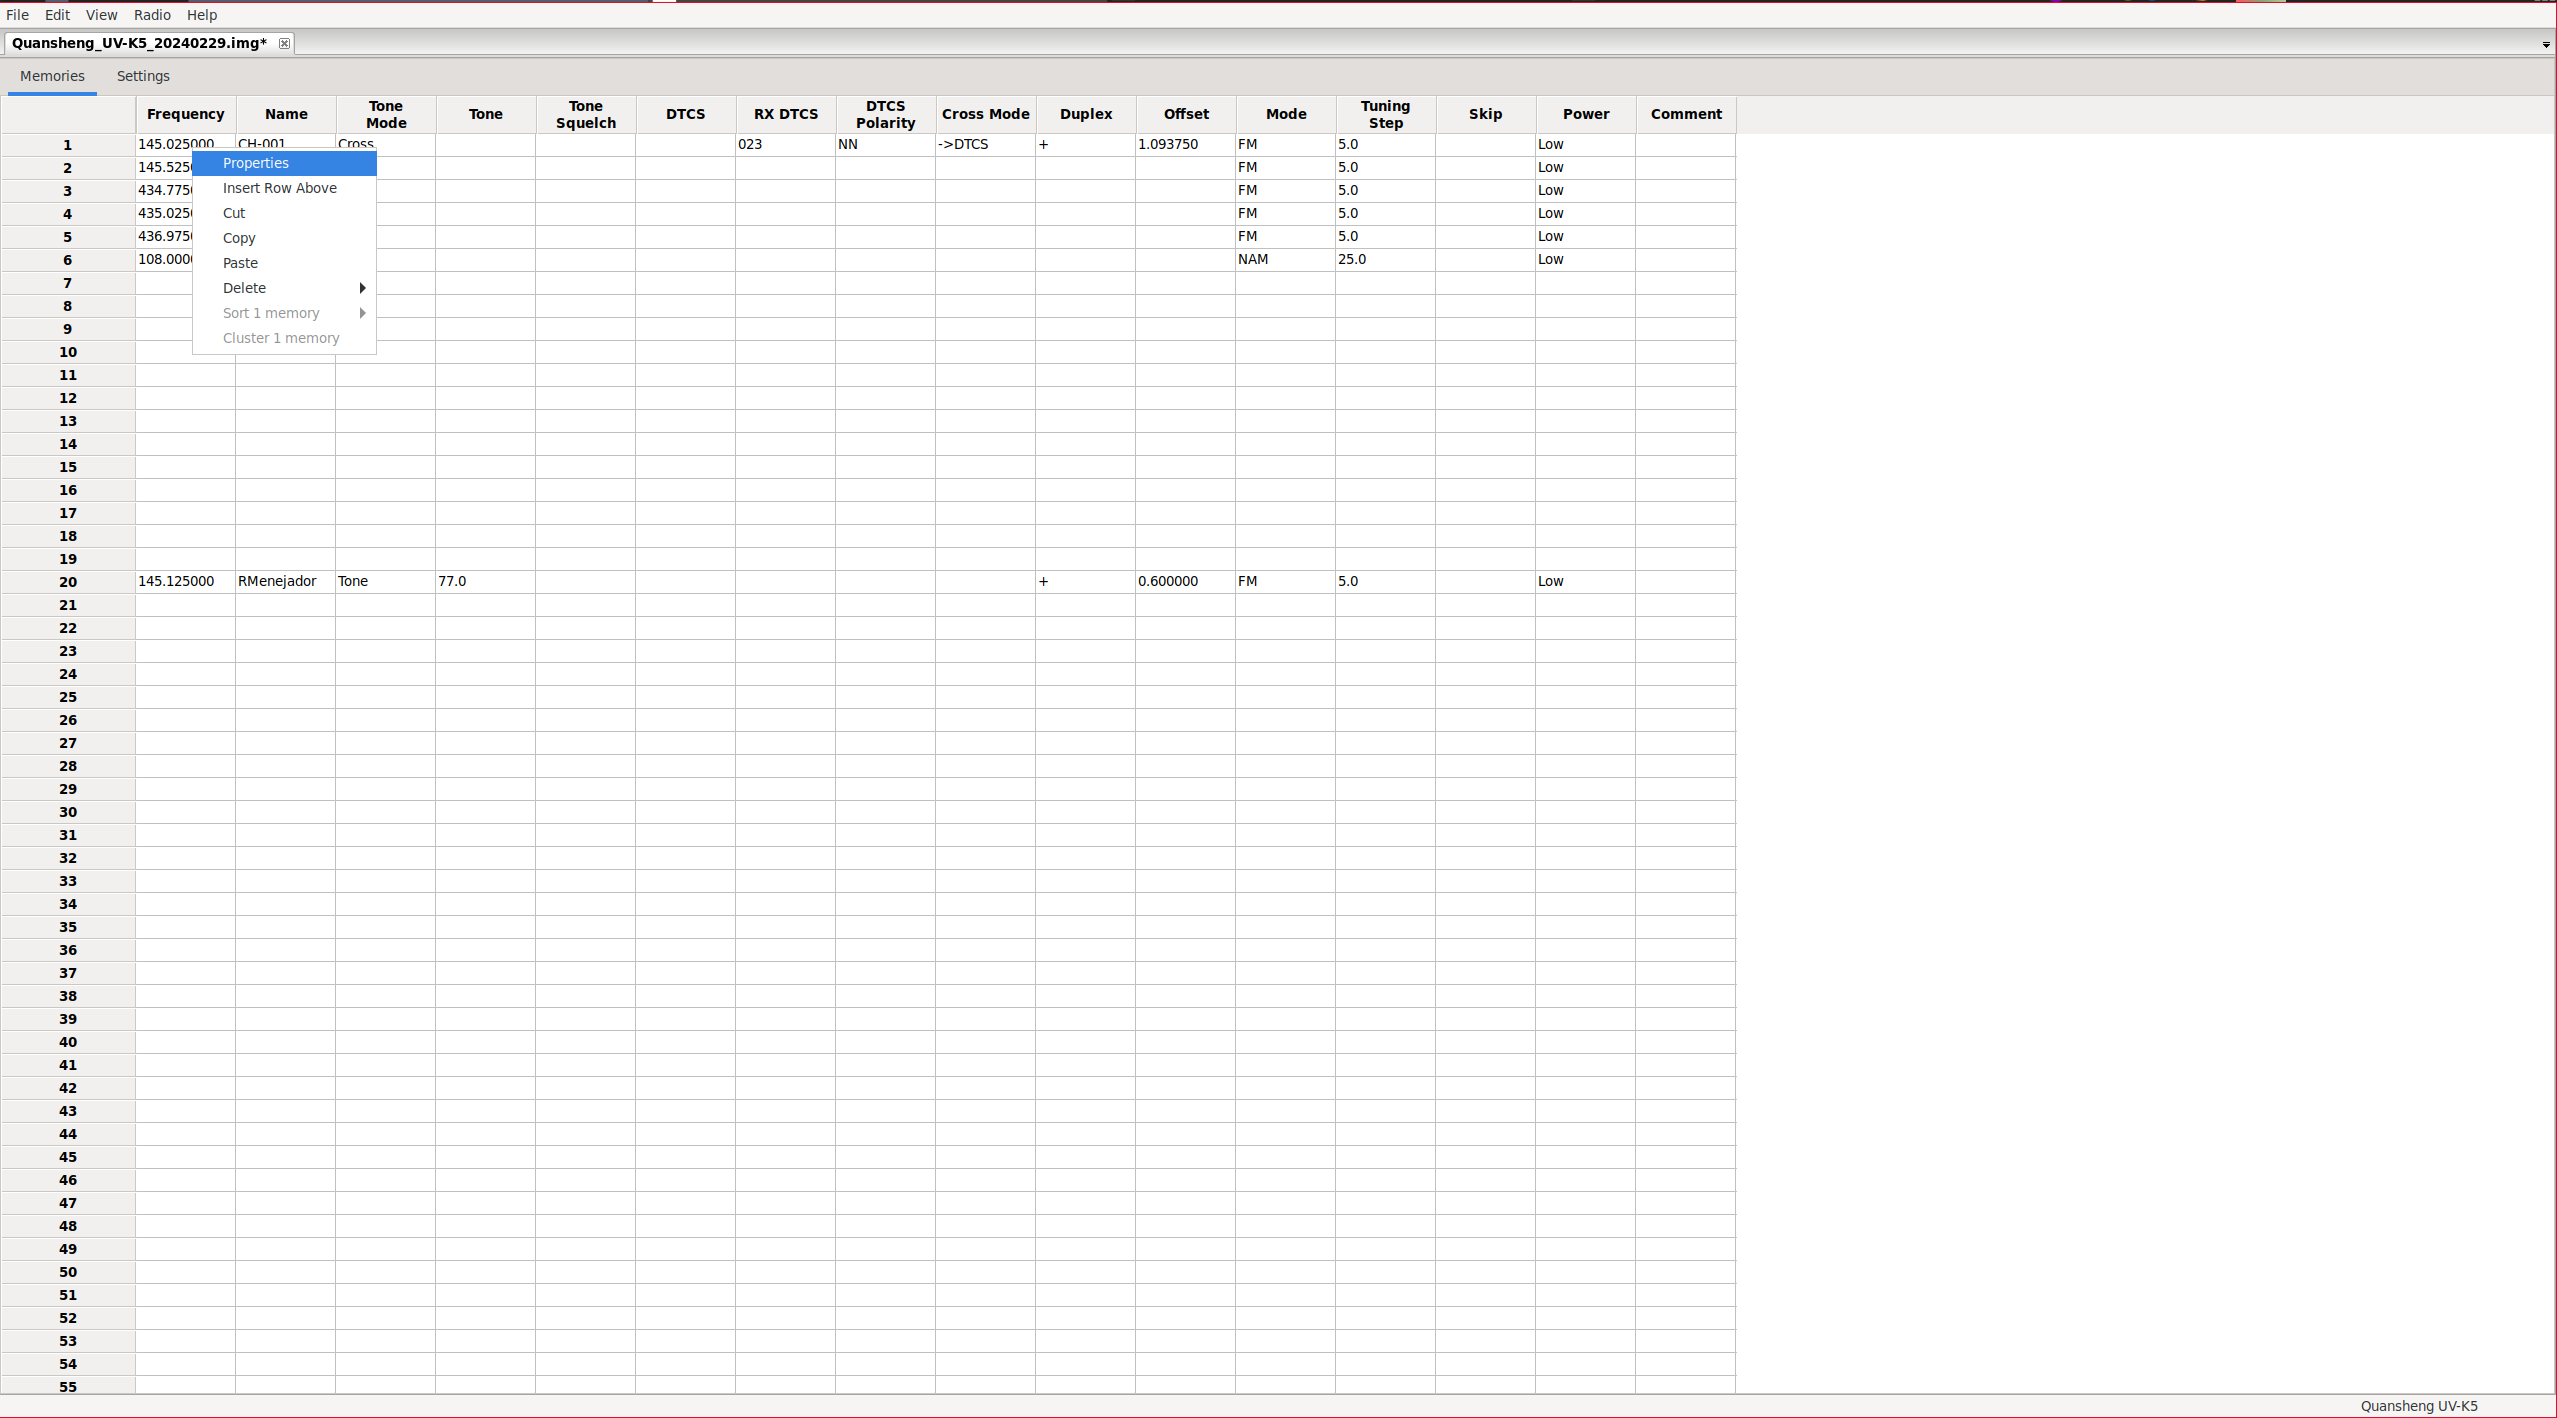
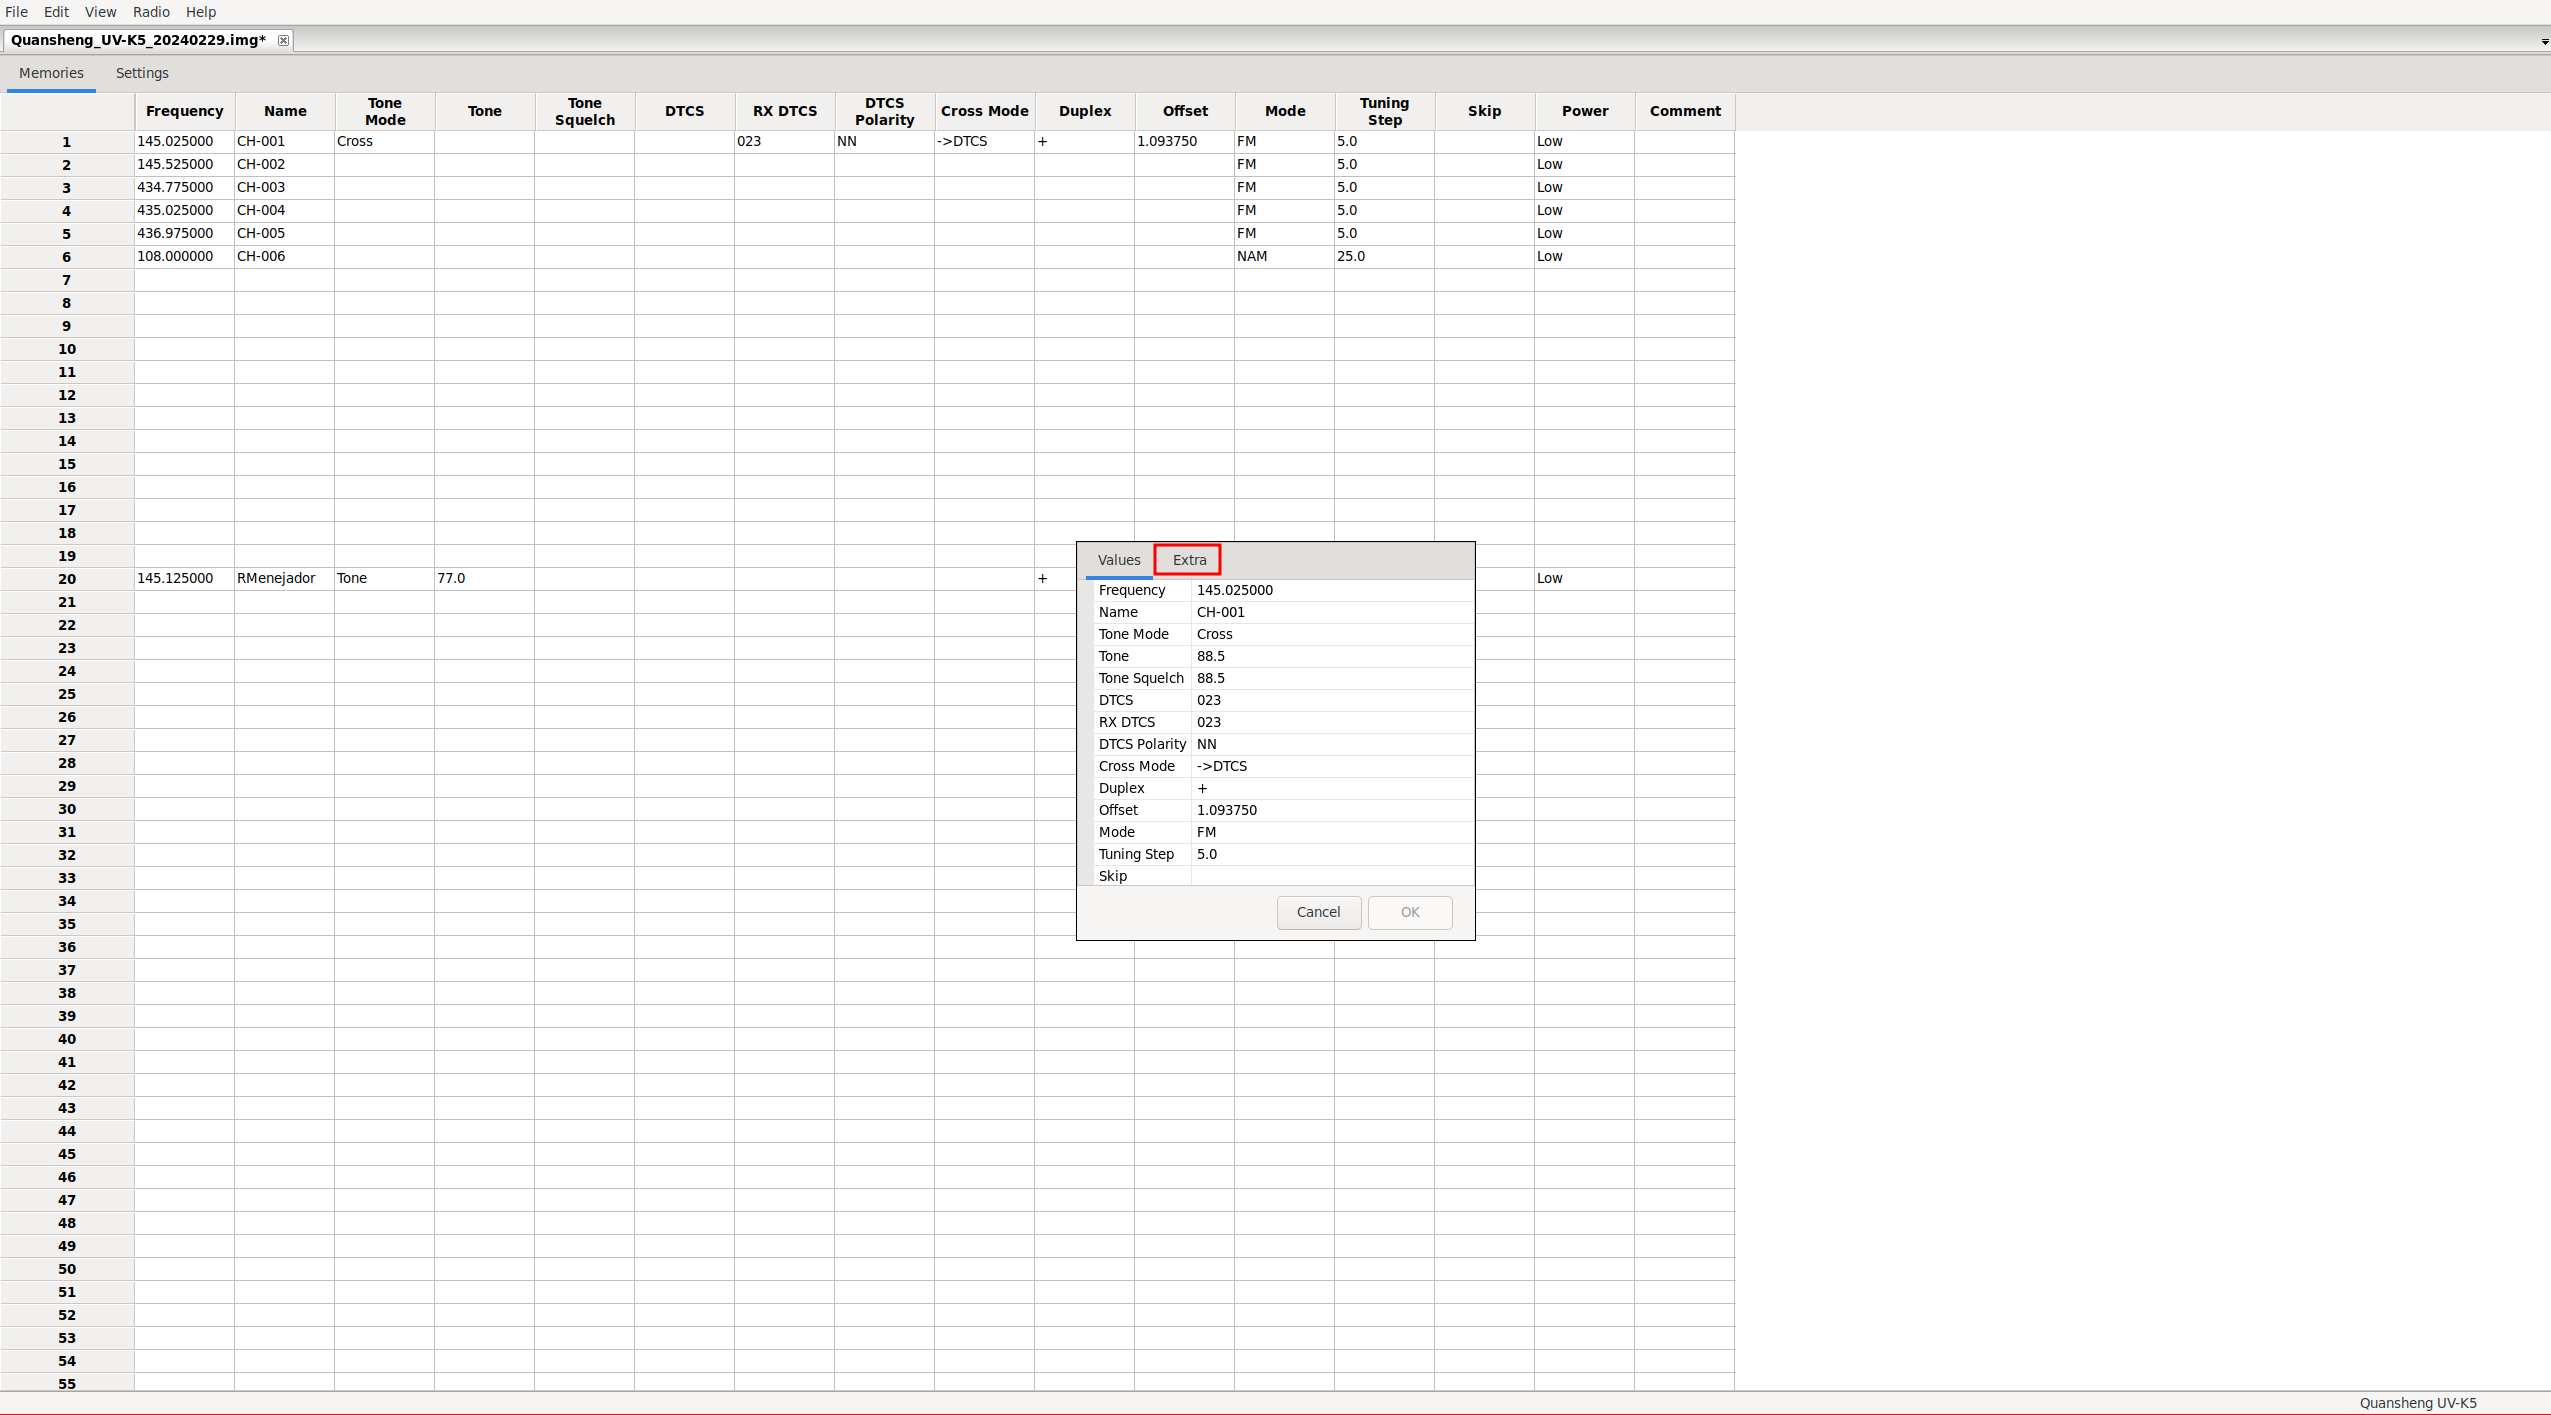
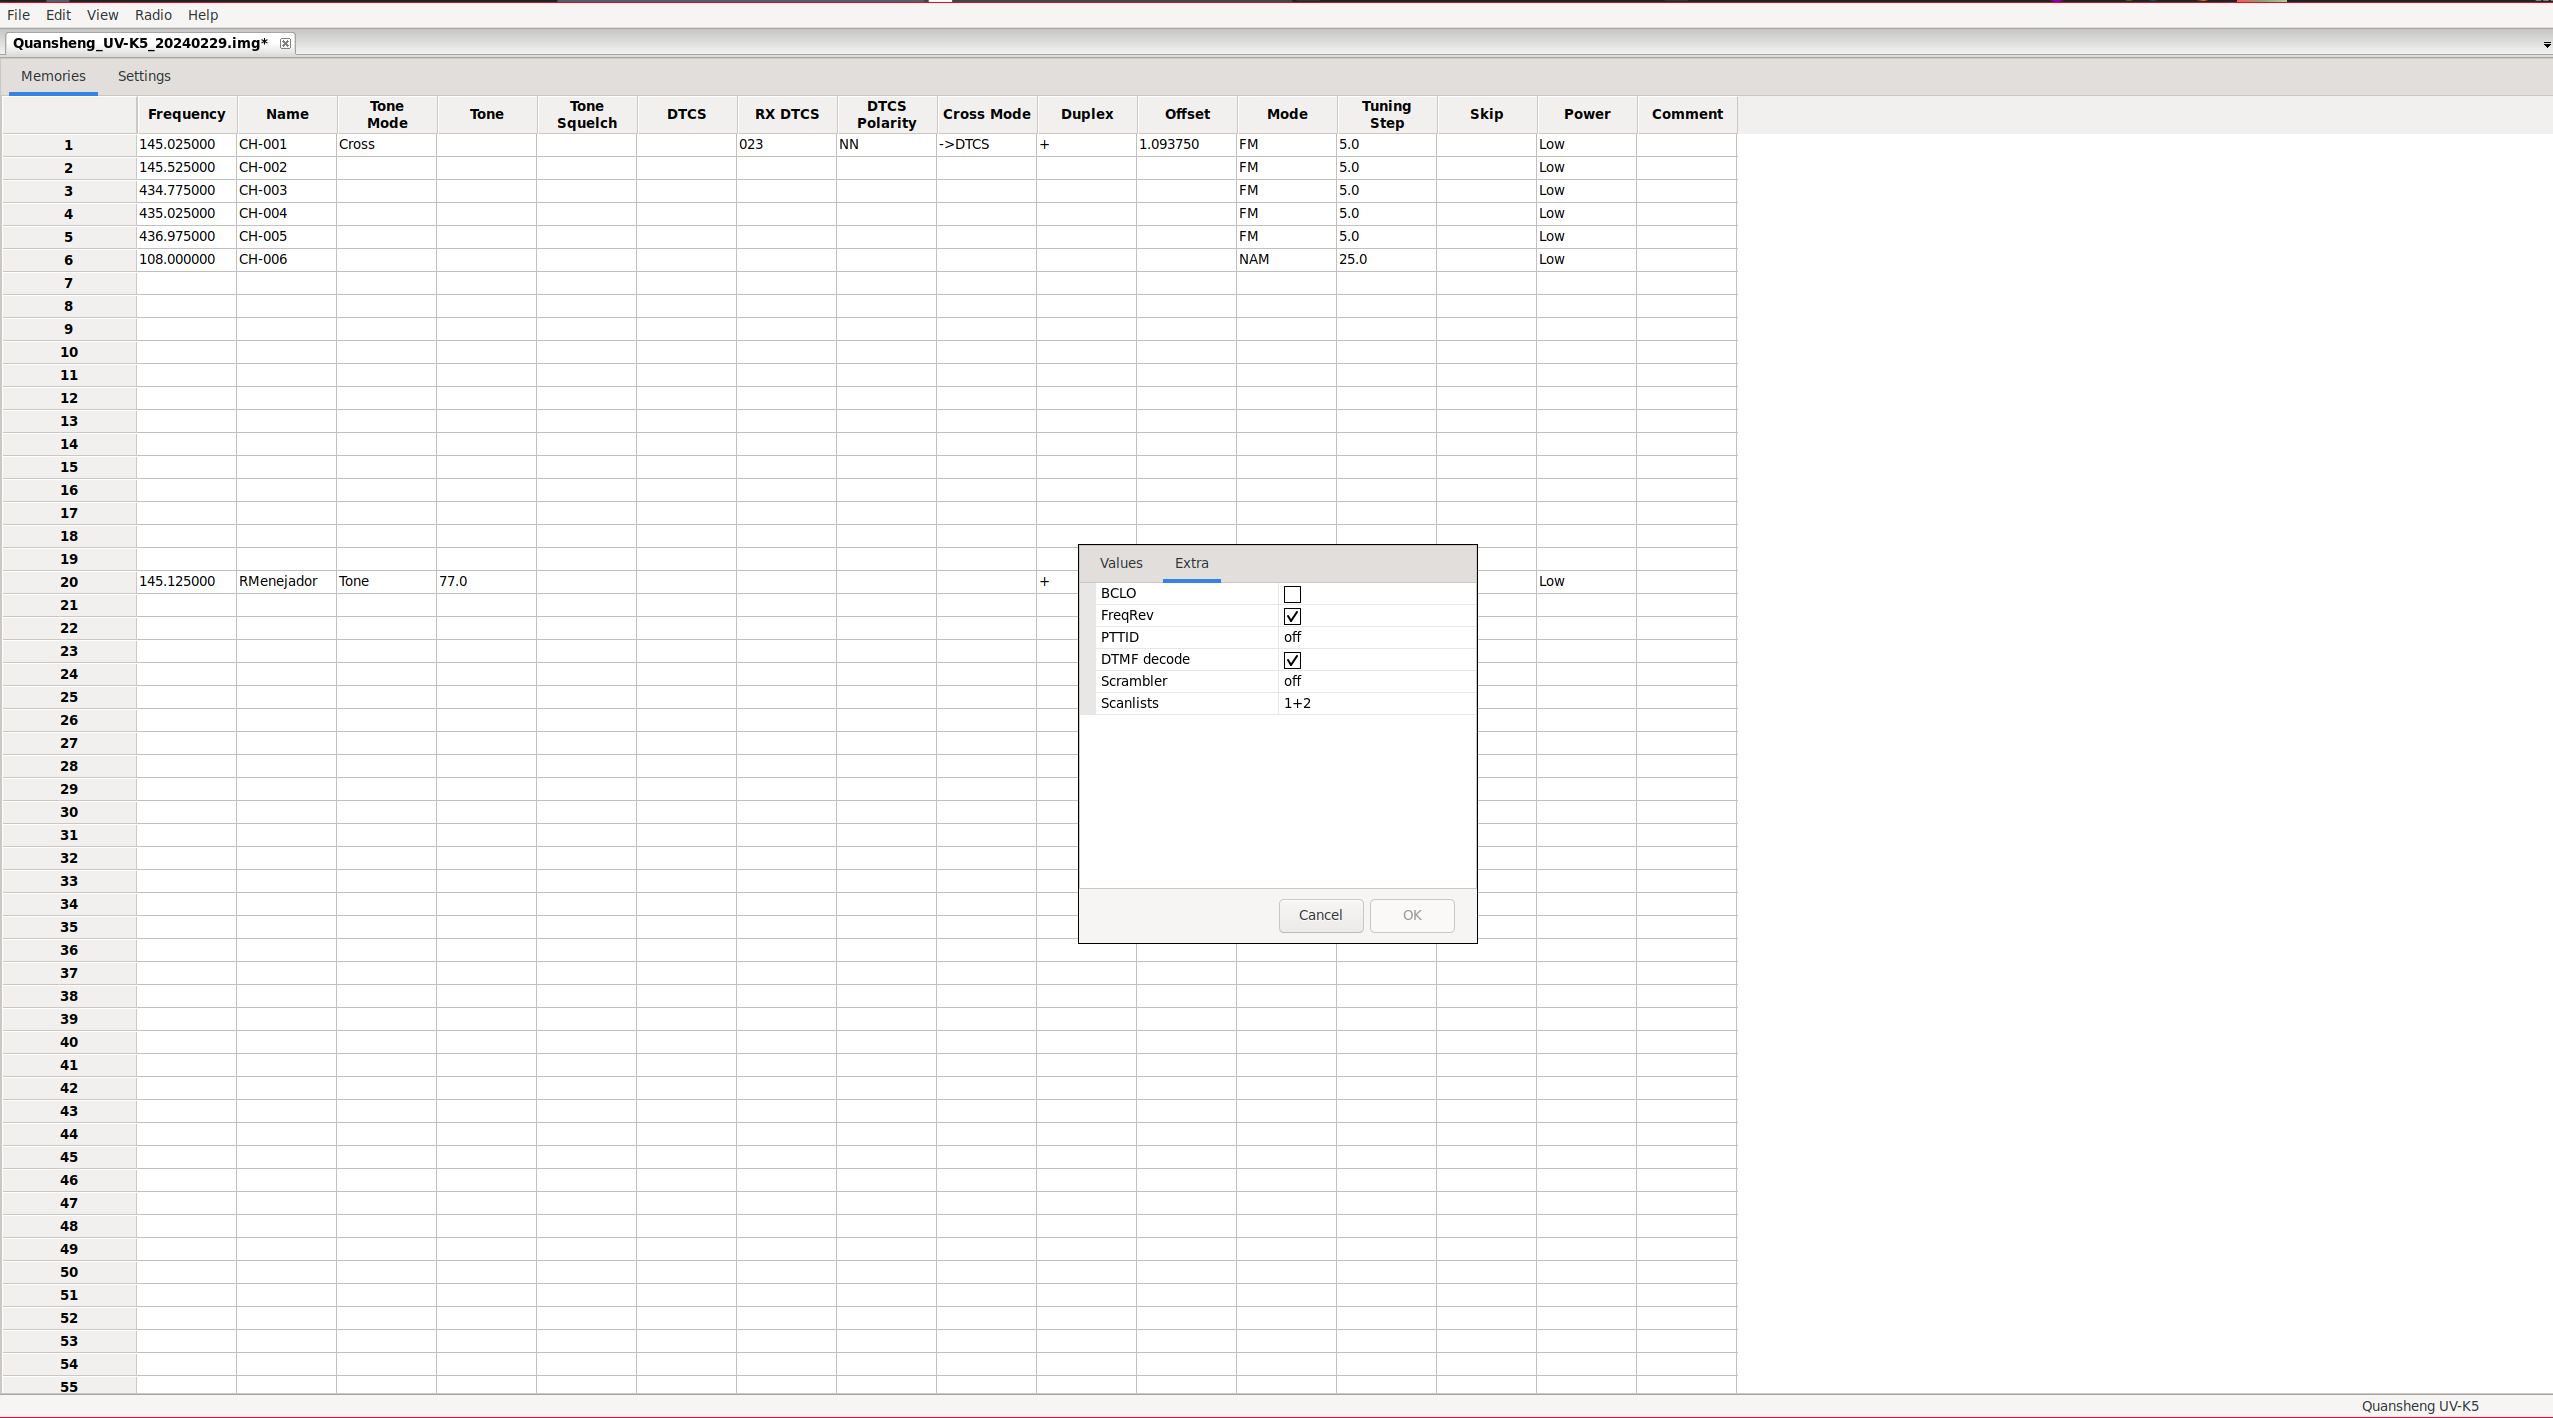
Actually, these parameters can also be accessed without enabling the mentioned menu. We should do:
Right click on the channel -> Properties -> Extra Tab
|
|
|
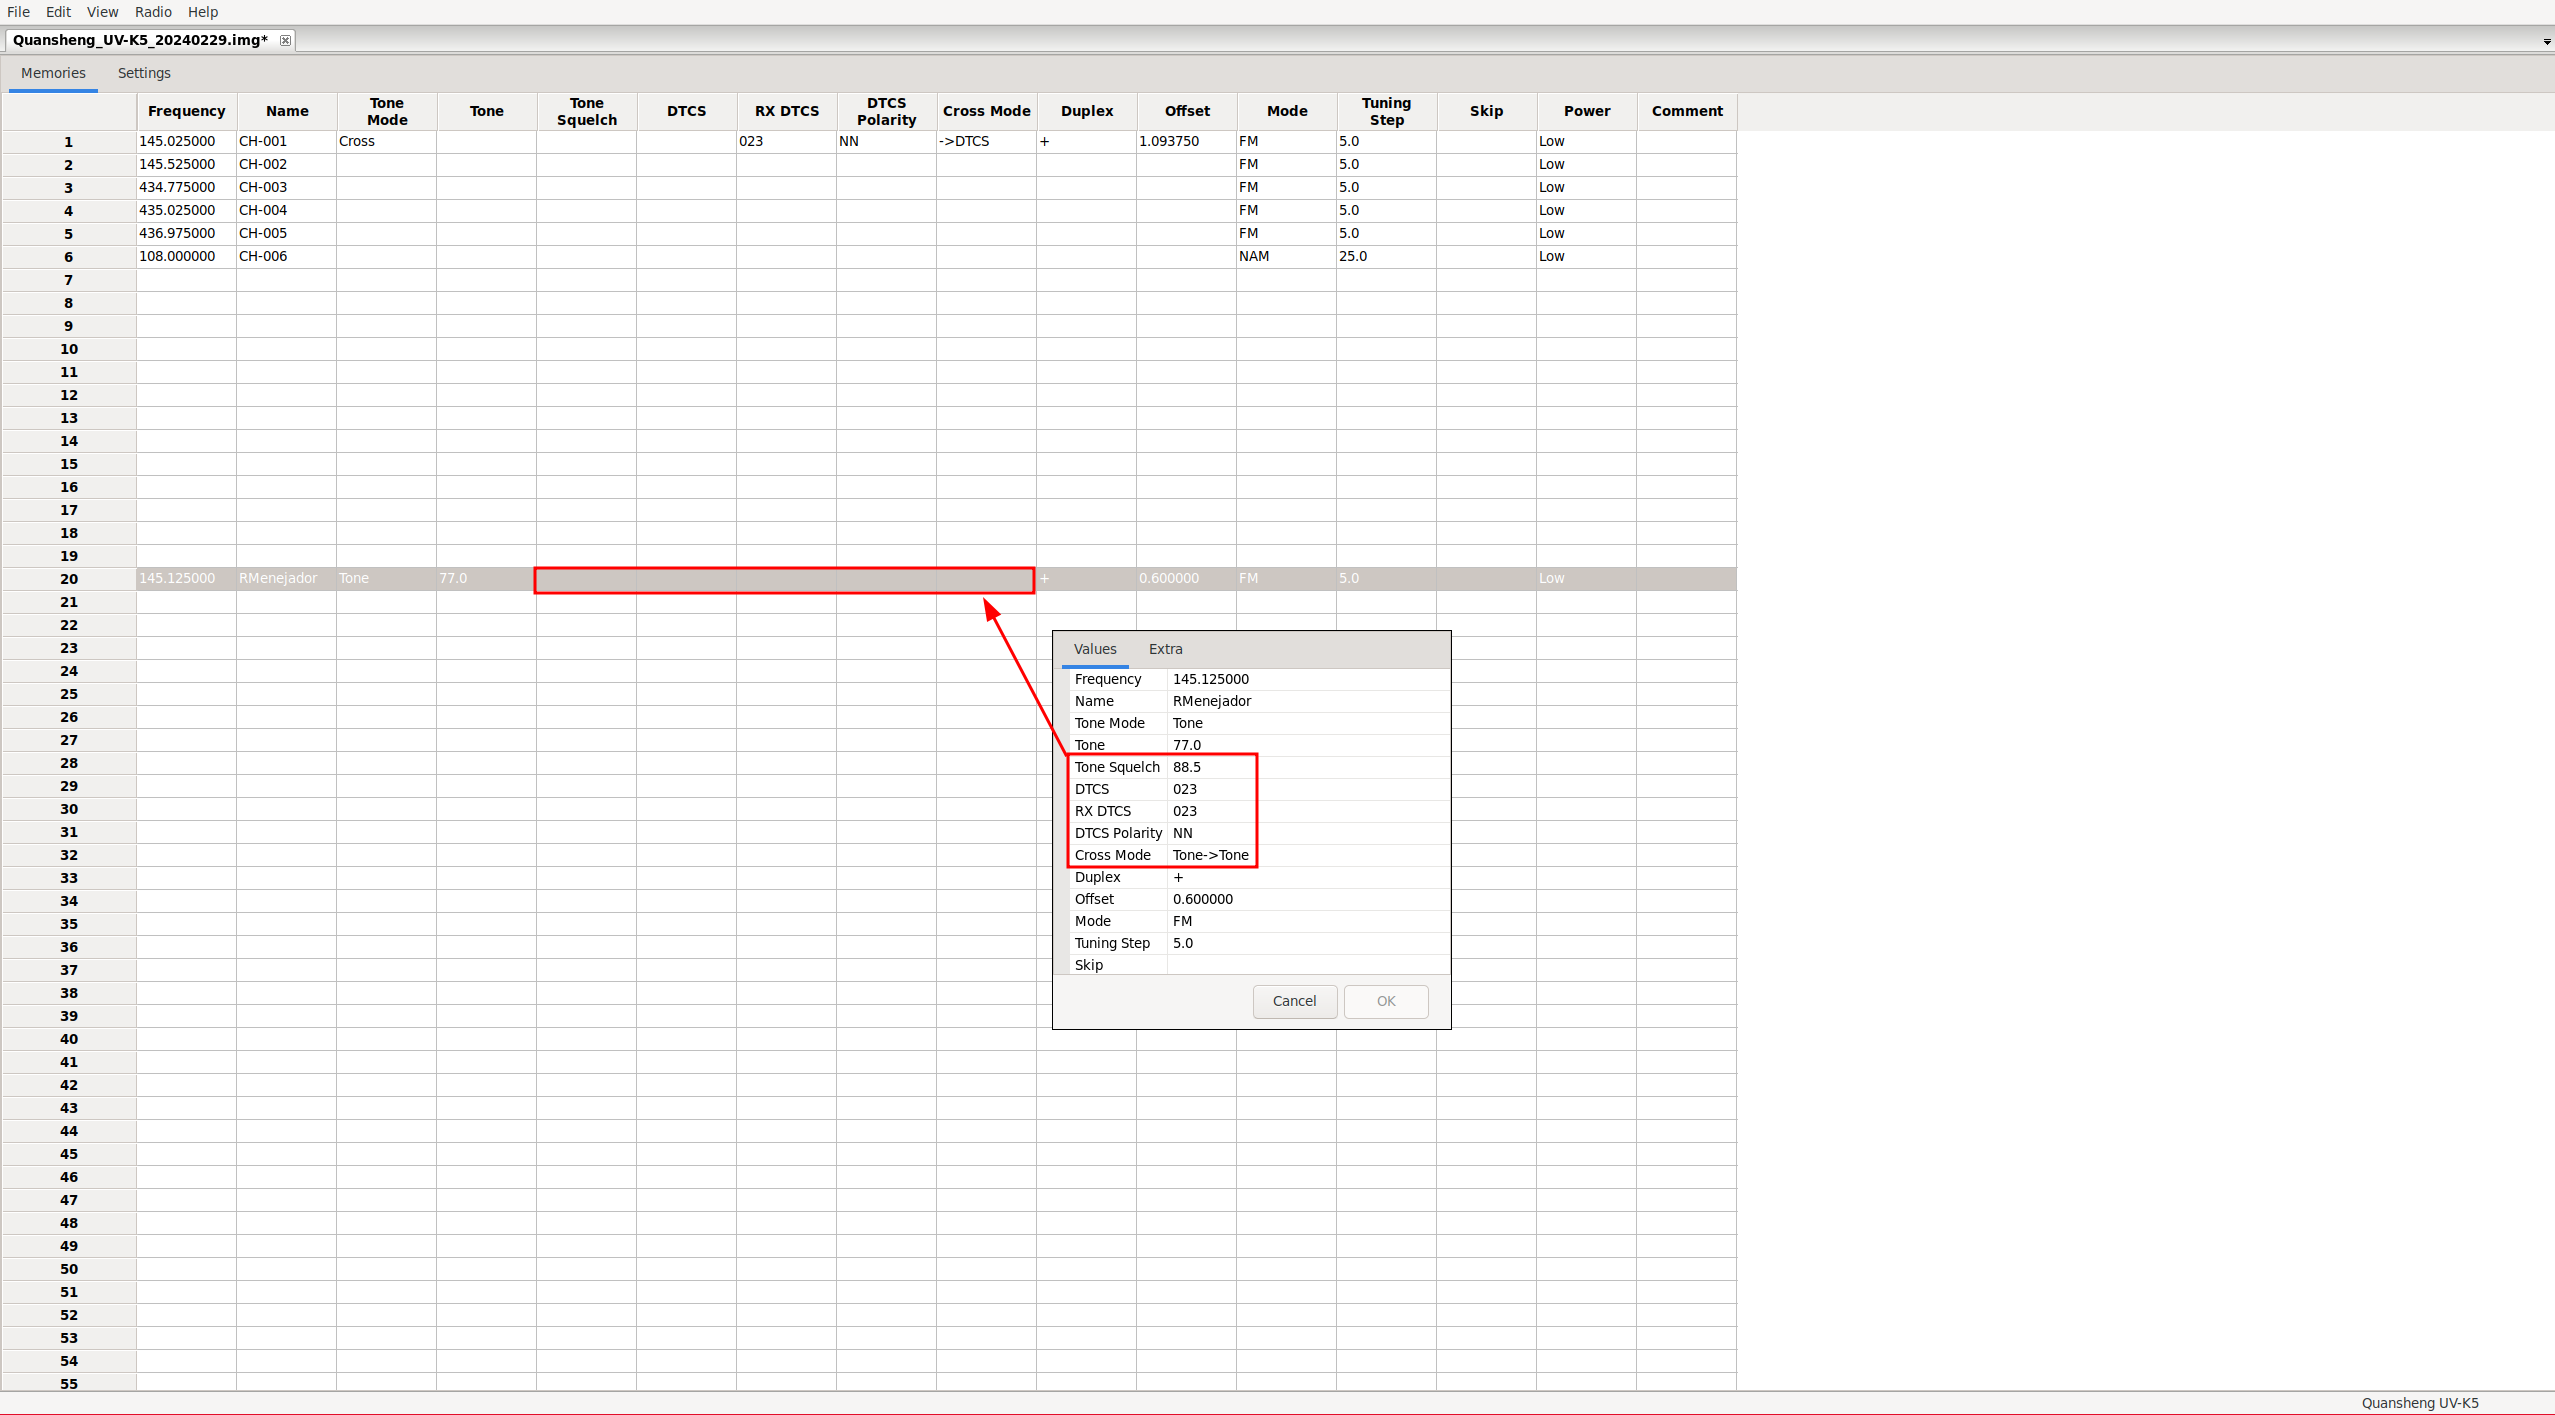
It seems that Chirp is quite buggy as of today, at least with this walkie model. For example, in channel 20, there’s only an analog tone configured for output, but in Properties, we see digital tones and more.
Tips:
Some basic recommendations are:
- Never transmit without the antenna, as the walkie-talkie may get damaged.
- The antenna must be appropriate for the frequency range in use; otherwise, it can also cause damage.
- Do not use the walkie-talkie while it’s charging.
- Only charge the battery when it’s fully discharged; otherwise, the battery memory may deteriorate.
- Use the USB-C charging port only for emergencies.
- Walkie-talkies cannot be used for commercial purposes or on PMR446 frequencies; a business license is required at least in Spain.
- Depending on the antenna length, optimal performance will vary across frequencies, as it corresponds to the wavelength of each frequency. The default antenna that comes with the Quansheng is designed for amateur radio frequencies, but using an antenna specifically tuned to the frequencies you plan to use will likely yield better results.
- We can see the frequencies of an antenna inside the thread of the antenna.
- If the CPS encounters any communication issues with the radio, we must ensure that the connector is inserted fully into the radio. We can try disconnecting and reconnecting the cable, unplugging the CPS from the COM port and reconnecting it. Sometimes, connecting the cable and then turning on the walkie seems to work better, all very random.
Resources:
- Wiki: https://github.com/ludwich66/Quansheng_UV-K5_Wiki/wiki
- Telegram EN: https://t.me/quansheng_uvk5_en
- Telegram ES: https://t.me/QuanShengES
- NewHamsInfo: https://newhams.info/
- HamRadioSchool: https://www.hamradioschool.com/all-articles
- URE forum: https://www.ure.es/foros/
- Online SDRs: https://www.receiverbook.de/map
- Signal Wiki: https://www.sigidwiki.com/wiki/Database
- Wave lengths: https://en.wikipedia.org/wiki/Amateur_radio_frequency_allocations
- HW MOD additional bands: http://www.hamskey.com/2024/02/introduction-to-uv-k5-hf-fullband.html
- MOD HW additional channels: https://www.universirius.com/en_gb/preppers/quansheng-uv-k5-manuale-del-firmware-ijv_v3/#IJV_V3-VX3
- MOD HW ESP32: https://github.com/kamilsss655/ESPRI
- Yes, DOOM can run on it: https://www.youtube.com/watch?v=5XH777ffqmk