Restic is a fast, efficient, and secure backup software that supports multiple operating systems such as Linux, macOS, Windows, FreeBSD, and OpenBSD.
It is also capable of using multiple systems as a backend:
- Local
- Sftp
- REST Server
- Amazon S3
- Minio
- Opentack Swift
- Backblaze B2
- Microsoft Azure Blob Storage
- Google Cloud Storage
- Rclone
- Windows
We start with the server, first we clone the project repository:
We compile the software and install it:
make
make install
We create the system user that will run the software:
In Restic, there are two concepts that we must understand to avoid confusion:
- Rest-server: It is the restic server, which will be protected by a password.
- Backup repository: It is a private repository of the client within the restic server, which is protected by a unique password that only the client knows.
To generate the restic server authentication file, we need the apache-tools, so we install them:
We generate the auth file:
mkdir backups
cd backups
htpasswd -B -c .htpasswd kr0m
NOTE: If we want to add a second user to the existing file, we just need to remove the -c parameter:
kr0m:$2y$05$yLbYcT96wddTqvsuwTp0UkSOK.xkvJhs9CwKXKwaAllNkWWT3mIRSO
kr0m2:$2y$05$YQrJ215y3tcIqJbjaEtq..gNBZhqviwERAL1HcGGnfZyCWQJsrwQ4
We generate a certificate so that the backups are transmitted securely over the network. If we are going to use the IP address in the SSL certificate, we will have to generate the certificate with a subjectAltName indicating the server’s IP address.
cd
mkdir ssl
cd ssl
We generate the private key:
We generate the certificate with the indicated configuration:
openssl req -x509 -sha256 -days 3650 -key private_key -out public_key -config <(
cat «-EOF
default_bits = 2048
distinguished_name = dn
x509_extensions = san
req_extensions = san
extensions = san
prompt = no
[ dn ]
countryName = ES
stateOrProvinceName = XXXX
localityName = XXXX
organizationName = Alfaexploit
[ san ]
subjectAltName = @alt_names
[ alt_names ]
IP.1 = RESTICSERVERIP
EOF
)
We create a server startup script:
su restic -s /bin/bash -c "nohup /usr/local/bin/rest-server --path /home/restic/backups --private-repos --prometheus --tls --tls-cert /home/restic/ssl/public_key --tls-key /home/restic/ssl/private_key &"
We assign the necessary permissions:
We start it manually:
We check that it is running:
restic 18354 0.0 0.0 112272 10668 ? Sl 08:03 0:00 /usr/local/bin/rest-server --path /home/restic/backups --private-repos --prometheus --tls --tls-cert /home/restic/ssl/public_key --tls-key /home/restic/ssl/private_key
NOTE: The parameter --private-repos is interesting so that clients cannot see other clients’ backups. Another notable parameter is --append-only, with this parameter enabled, clients can only perform backups but not delete them. If the client server is hacked, it will not be able to delete backups. Another very interesting option is --prometheus, which will present us with metrics that we can read through Prometheus.
We can debug it by starting it with the debug parameter:
/usr/local/bin/rest-server --path /home/restic/backups --private-repos --prometheus --tls --tls-cert /home/restic/ssl/public_key --tls-key /home/restic/ssl/private_key --debug
For the client, we will need to download the binary:
https://github.com/restic/restic/releases
tar xvzf restic-VERSION.tar.gz
cd restic-VERSION
We compile it:
We install it:
cp restic /usr/local/bin/
useradd -m restic
chown restic:restic /usr/local/bin/restic
chmod 500 /usr/local/bin/restic
If we are going to back up files outside of our user’s home directory, such as database backups, we will need access to these data. To do this, we modify the capabilities of the restic binary:
The restic binary can now read any file and directory regardless of who runs it, but if we want to make backups via streaming, such as with xtrabackup, it will also need the same capabilities since it will be the one reading the files.
We copy the rest-server certificate to the client:
scp root@RESTICSERVERIP:/home/restic/ssl/public_key /usr/local/share/ca-certificates/resticKey.crt
We update the CA database:
We check the CA data:
        Issuer: C = ES, ST = XXXX, L = XXXX, O = Alfaexploit
        Validity
            Not Before: Feb 25 08:03:25 2020 GMT
            Not After : Feb 22 08:03:25 2030 GMT
        Subject: C = ES, ST = XXXX, L = XXXX, O = Alfaexploit

        X509v3 extensions:
            X509v3 Subject Alternative Name:
                IP Address:RESTICSERVERIP
And from the server:
depth=0 C = ES, ST = XXXX, L = XXXX, O = Alfaexploit
We define the access data to the restic server and the password of our repo:
export RESTIC_REPOSITORY=rest:https://kr0m:PASSWORD@RESTICSERVERIP:8000/kr0m
export RESTIC_PASSWORD=REPOSITORY-PASSWORD
source .bashrc
We initialize the repo:
The repo password is important, without it we won’t be able to access the backups made.
We can see the keys of a repo with:
repository 17def041 opened successfully, password is correct
 ID        User    Host  Created
--------------------------------------------
*65c102fa  restic  RX4   2020-02-25 09:07:21
--------------------------------------------
NOTE: More keys can be added, in case we want to use different passwords for the same repo.
We backup the work directory:
touch work/AA
restic -v backup ~/work
We check that all the repo info has been stored without errors, this is important to ensure that the backups are consistent even if the rest-server is compromised:
no errors were found
Restic allows comparing snapshots:
restic -v backup ~/work
restic -v snapshots
ID        Time                 Host        Tags        Paths
------------------------------------------------------------------------
df975885  2020-02-25 09:08:33  RX4                     /home/restic/work
0dd2c06a  2020-02-25 09:24:31  RX4                     /home/restic/work
5cf720c5  2020-02-25 09:25:08  RX4                     /home/restic/work
------------------------------------------------------------------------
comparing snapshot 0dd2c06a to 5cf720c5:
+    /home/restic/work/BB

Files:           1 new,     0 removed,     0 changed
Dirs:            0 new,     0 removed
Others:          0 new,     0 removed
Data Blobs:      0 new,     0 removed
Tree Blobs:      3 new,     3 removed
  Added:   1.312 KiB
  Removed: 1.031 KiB
It is possible to read data from stdin, it can be useful for backing up mysqls for example, the following commands will read the dump output and save it with the name indicated in the --stdin-filename parameter:
mysqldump --all-databases -uUSER -p’PASSWORD’ | restic backup -v --stdin --stdin-filename dump.sql
xtrabackup --user=USER --password=PASSWORD --backup --stream=tar | restic -v backup --stdin --stdin-filename xtrabackup.tar
Tags can be assigned to snapshots:
restic -v snapshots
ID        Time                 Host        Tags        Paths
------------------------------------------------------------------------
df975885  2020-02-25 09:08:33  RX4                     /home/restic/work
0dd2c06a  2020-02-25 09:24:31  RX4                     /home/restic/work
5cf720c5  2020-02-25 09:25:08  RX4                     /home/restic/work
0424e81b  2020-02-25 09:39:47  RX4                     /dump.sql
41f32b15  2020-02-25 09:41:47  RX4         TAG00       /home/restic/work
------------------------------------------------------------------------
We can filter by path:
restic -v snapshots
ID        Time                 Host        Tags        Paths
------------------------------------------------------------------------
df975885  2020-02-25 09:08:33  RX4                     /home/restic/work
0dd2c06a  2020-02-25 09:24:31  RX4                     /home/restic/work
5cf720c5  2020-02-25 09:25:08  RX4                     /home/restic/work
0424e81b  2020-02-25 09:39:47  RX4                     /dump.sql
41f32b15  2020-02-25 09:41:47  RX4         TAG00       /home/restic/work
59e93273  2020-02-25 09:45:58  RX4         MYSQLDUMP   /dump.sql
------------------------------------------------------------------------
ID        Time                 Host        Tags        Paths
----------------------------------------------------------------
0424e81b  2020-02-25 09:39:47  RX4                     /dump.sql
59e93273  2020-02-25 09:45:58  RX4         MYSQLDUMP   /dump.sql
----------------------------------------------------------------
It is also possible to filter by the host that made the snapshot:
ID        Time                 Host        Tags        Paths
------------------------------------------------------------------------
df975885  2020-02-25 09:08:33  RX4                     /home/restic/work
0dd2c06a  2020-02-25 09:24:31  RX4                     /home/restic/work
5cf720c5  2020-02-25 09:25:08  RX4                     /home/restic/work
0424e81b  2020-02-25 09:39:47  RX4                     /dump.sql
41f32b15  2020-02-25 09:41:47  RX4         TAG00       /home/restic/work
59e93273  2020-02-25 09:45:58  RX4         MYSQLDUMP   /dump.sql
------------------------------------------------------------------------
To restore a snapshot, first we need to check the snapshots:
ID        Time                 Host        Tags        Paths
------------------------------------------------------------------------
df975885  2020-02-25 09:08:33  RX4                     /home/restic/work
0dd2c06a  2020-02-25 09:24:31  RX4                     /home/restic/work
5cf720c5  2020-02-25 09:25:08  RX4                     /home/restic/work
0424e81b  2020-02-25 09:39:47  RX4                     /dump.sql
41f32b15  2020-02-25 09:41:47  RX4         TAG00       /home/restic/work
59e93273  2020-02-25 09:45:58  RX4         MYSQLDUMP   /dump.sql
------------------------------------------------------------------------
Then we restore the one we are interested in:
restoring <Snapshot 41f32b15 of [/home/restic/work] at 2020-02-25 09:41:47.447912749 +0100 CET by restic@RX4> to /tmp/restore
We check that it has been restored with the correct content:
total 8
drwxr-xr-x 2 restic restic 4096 feb 25 09:25 .
drwxr-xr-x 3 restic restic 4096 feb 25 09:28 ..
-rw-r--r-- 1 restic restic    0 feb 25 09:08 AA
-rw-r--r-- 1 restic restic    0 feb 25 09:25 BB
If we only want a specific file:
restic -v restore 41f32b15 --target /tmp/restore --include /home/restic/work/BB
ls -la /tmp/restore/home/restic/work/
total 8
drwx------ 2 restic restic 4096 feb 25 09:51 .
drwx------ 3 restic restic 4096 feb 25 09:51 ..
-rw-r--r-- 1 restic restic    0 feb 25 09:25 BB
Restic allows us to mount the repositories using FUSE(RO):
restic -v mount mntRestic
In another terminal we can navigate through the repo:
total 4
dr-xr-xr-x 1 restic restic    0 feb 25 09:54 .
drwxr-xr-x 6 restic restic 4096 feb 25 09:54 ..
dr-xr-xr-x 1 restic restic    0 feb 25 09:54 hosts
dr-xr-xr-x 1 restic restic    0 feb 25 09:54 ids
dr-xr-xr-x 1 restic restic    0 feb 25 09:54 snapshots
dr-xr-xr-x 1 restic restic    0 feb 25 09:54 tags
We can output a file from a snapshot to stdout, for example we could pipe a mysql dump directly to a mysql, it is similar to a cat:
ID        Time                 Host        Tags        Paths
------------------------------------------------------------------------
df975885  2020-02-25 09:08:33  RX4                     /home/restic/work
0dd2c06a  2020-02-25 09:24:31  RX4                     /home/restic/work
5cf720c5  2020-02-25 09:25:08  RX4                     /home/restic/work
0424e81b  2020-02-25 09:39:47  RX4                     /dump.sql
41f32b15  2020-02-25 09:41:47  RX4         TAG00       /home/restic/work
59e93273  2020-02-25 09:45:58  RX4         MYSQLDUMP   /dump.sql
194533ab  2020-02-25 10:00:53  RX4         MYSQLDUMP2  /dump.sql
eb0045b8  2020-02-25 10:05:45  RX4         MYSQLDUMP   /dump.sql
------------------------------------------------------------------------
In this case we restore the database directly from the backup:
We must take into account certain aspects of Restic when deleting snapshots:
- The deletion process can take a long time, while the index is being deleted it is blocked and backups are stopped until it finishes.
- If we have a repo for each client, only the backups of that client are blocked, but we must take into account that deduplication works at the repo level, therefore if the other clients copy the same information, it will NOT be deduplicated.
- It is advisable to perform a check after each prune.
- We could also leave a day off from backups to perform maintenance.
The steps to delete a snapshot are forget and prune:
ID        Time                 Host        Tags        Paths
------------------------------------------------------------------------
df975885  2020-02-25 09:08:33  RX4                     /home/restic/work
0dd2c06a  2020-02-25 09:24:31  RX4                     /home/restic/work
5cf720c5  2020-02-25 09:25:08  RX4                     /home/restic/work
0424e81b  2020-02-25 09:39:47  RX4                     /dump.sql
41f32b15  2020-02-25 09:41:47  RX4         TAG00       /home/restic/work
59e93273  2020-02-25 09:45:58  RX4         MYSQLDUMP   /dump.sql
194533ab  2020-02-25 10:00:53  RX4         MYSQLDUMP2  /dump.sql
eb0045b8  2020-02-25 10:05:45  RX4         MYSQLDUMP   /dump.sql
------------------------------------------------------------------------
If we started the server with –append-only, when deleting snapshots, the following error will appear:
repository 17def041 opened successfully, password is correct
blob not removed, server response: 403 Forbidden (403)
Without –append-only it will work correctly:
repository 17def041 opened successfully, password is correct
removed snapshot 41f32b15
We perform the prune to release the space of the deleted snapshots:
repository 17def041 opened successfully, password is correct
counting files in repo
building new index for repo
[0:00] 100.00% 9 / 9 packs
repository contains 9 packs (17 blobs) with 3.153 MiB
processed 17 blobs: 0 duplicate blobs, 0 B duplicate
load all snapshots
find data that is still in use for 7 snapshots
[0:00] 100.00% 7 / 7 snapshots
found 15 of 17 data blobs still in use, removing 2 blobs
will remove 0 invalid files
will delete 1 packs and rewrite 0 packs, this frees 810 B
counting files in repo
[0:00] 100.00% 8 / 8 packs
finding old index files
saved new indexes as [4cbba758]
remove 7 old index files
[0:00] 100.00% 1 / 1 packs deleted
done
NOTE: If any snapshot contains files from the deleted snapshot, the space is not recovered because those files still need to be kept.
The forget command allows several very interesting options:
 --keep-last n, mantiene n snapshots.
 --keep-hourly n, mantiene n snapshots guardando el último de cada hora.
 --keep-daily n, mantiene n snapshots guardando el último de cada día.
 --keep-weekly n, mantiene n snapshots guardando el último de cada semana.
 --keep-monthly n, mantiene n snapshots guardando el último de cada mes.
 --keep-yearly n, mantiene n snapshots guardando el último de cada año.
 --keep-tag tag, mantiene todos los snapshots con la etiqueta indicada.
 --keep-within duración, mantiene todos los snapshots hacia atrás el tiempo indicado
 ex: 2y5m7d mantendrá los snapshots realizados antes de 2y5m7d desde el último snapshot.
NOTE: Before executing commands that delete snapshots, it is recommended to do it with the –dry-run parameter to show us what it is going to do.
ID        Time                 Host        Tags        Paths
------------------------------------------------------------------------
df975885  2020-02-25 09:08:33  RX4                     /home/restic/work
0dd2c06a  2020-02-25 09:24:31  RX4                     /home/restic/work
5cf720c5  2020-02-25 09:25:08  RX4                     /home/restic/work
0424e81b  2020-02-25 09:39:47  RX4                     /dump.sql
59e93273  2020-02-25 09:45:58  RX4         MYSQLDUMP   /dump.sql
194533ab  2020-02-25 10:00:53  RX4         MYSQLDUMP2  /dump.sql
eb0045b8  2020-02-25 10:05:45  RX4         MYSQLDUMP   /dump.sql
------------------------------------------------------------------------
repository 17def041 opened successfully, password is correct
Applying Policy: keep the last 1 snapshots snapshots
snapshots for (host [RX4], paths [/dump.sql]):
keep 1 snapshots:
ID        Time                 Host        Tags        Reasons        Paths
-------------------------------------------------------------------------------
eb0045b8  2020-02-25 10:05:45  RX4         MYSQLDUMP   last snapshot  /dump.sql
-------------------------------------------------------------------------------
1 snapshots

remove 3 snapshots:
ID        Time                 Host        Tags        Paths
----------------------------------------------------------------
0424e81b  2020-02-25 09:39:47  RX4                     /dump.sql
59e93273  2020-02-25 09:45:58  RX4         MYSQLDUMP   /dump.sql
194533ab  2020-02-25 10:00:53  RX4         MYSQLDUMP2  /dump.sql
----------------------------------------------------------------
3 snapshots

snapshots for (host [RX4], paths [/home/restic/work]):
keep 1 snapshots:
ID        Time                 Host        Tags        Reasons        Paths
---------------------------------------------------------------------------------------
5cf720c5  2020-02-25 09:25:08  RX4                     last snapshot  /home/restic/work
---------------------------------------------------------------------------------------
1 snapshots

remove 2 snapshots:
ID        Time                 Host        Tags        Paths
------------------------------------------------------------------------
df975885  2020-02-25 09:08:33  RX4                     /home/restic/work
0dd2c06a  2020-02-25 09:24:31  RX4                     /home/restic/work
------------------------------------------------------------------------
2 snapshots
To update the binary, simply run:
writing restic to /usr/local/bin/restic
find latest release of restic at GitHub
restic is up to date
Backup monitoring can be done in the backup script itself. There are some commands that allow output in JSON format, such as the list of snapshots. If we take the snapshots after the backup and parse the dates, we can know if everything is in order or if it has failed.
We install the jq tool to parse the JSONs:
To get the output in JSON, we must specify the –json option:
[
  {
    "time": "2020-02-25T09:08:33.133725964+01:00",
    "tree": "bb4f59228062d10744ed264faef9885665054cc2b7a9a565e2e192ec72cb0775",
    "paths": [
      "/home/restic/work"
    ],
    "hostname": "RX4",
    "username": "restic",
    "uid": 1004,
    "gid": 1004,
    "id": "df9758853f76a6ab34c30f2235f0437ff583e299965d490253d75d1d02f312dd",
    "short_id": "df975885"
  },
  {
    "time": "2020-02-25T09:24:31.60798947+01:00",
    "parent": "df9758853f76a6ab34c30f2235f0437ff583e299965d490253d75d1d02f312dd",
    "tree": "bb4f59228062d10744ed264faef9885665054cc2b7a9a565e2e192ec72cb0775",
    "paths": [
      "/home/restic/work"
    ],
    "hostname": "RX4",
    "username": "restic",
    "uid": 1004,
    "gid": 1004,
    "id": "0dd2c06afd43c4887cff65e4272685bea0f336088ac39384b69983fdf8b79c02",
    "short_id": "0dd2c06a"
  },
  {
    "time": "2020-02-25T09:25:08.029555517+01:00",
    "parent": "0dd2c06afd43c4887cff65e4272685bea0f336088ac39384b69983fdf8b79c02",
    "tree": "e2c27a6608162f37683543d2f387f0989f30cf5cfbb092b942f794d3bbafab94",
    "paths": [
      "/home/restic/work"
    ],
    "hostname": "RX4",
    "username": "restic",
    "uid": 1004,
    "gid": 1004,
    "id": "5cf720c54226ef0777248c43819c31bbaf88359ae472101c434907648de72516",
    "short_id": "5cf720c5"
  },
  {
    "time": "2020-02-25T09:39:47.189660055+01:00",
    "parent": "5cf720c54226ef0777248c43819c31bbaf88359ae472101c434907648de72516",
    "tree": "7c47d858d305bd52e87fc2a60621e966f2e091faea90a974a356ed154476d773",
    "paths": [
      "/dump.sql"
    ],
    "hostname": "RX4",
    "username": "restic",
    "uid": 1004,
    "gid": 1004,
    "id": "0424e81b2e8c93a8a1a7d607a5d432b9429502f8232ac5db381430c46a104d7a",
    "short_id": "0424e81b"
  },
  {
    "time": "2020-02-25T09:45:58.501015101+01:00",
    "parent": "41f32b15861e7fc5b831f7b6c5bee556891f4cd92d760e75a04fc3e218fdca1f",
    "tree": "2815575e89be143230ac007e0e6c8d66b0fbff87785a31461fa08f23980f3ca4",
    "paths": [
      "/dump.sql"
    ],
    "hostname": "RX4",
    "username": "restic",
    "uid": 1004,
    "gid": 1004,
    "tags": [
      "MYSQLDUMP"
    ],
    "id": "59e932730b2152f16040bde3628220b9bb700fcc3a38bd32f2b5877cdb09e49d",
    "short_id": "59e93273"
  },
  {
    "time": "2020-02-25T10:00:53.224338735+01:00",
    "parent": "59e932730b2152f16040bde3628220b9bb700fcc3a38bd32f2b5877cdb09e49d",
    "tree": "71188ad64f4ec0fa21a9a358e5d4d37f806b1dda3fe920d2afe44fdf74b44ea9",
    "paths": [
      "/dump.sql"
    ],
    "hostname": "RX4",
    "username": "restic",
    "uid": 1004,
    "gid": 1004,
    "tags": [
      "MYSQLDUMP2"
    ],
    "id": "194533ab50641d55aa91a9738bf23b0964f2f98b7d5a7a346f48db35e2971e5d",
    "short_id": "194533ab"
  },
  {
    "time": "2020-02-25T10:05:45.896647702+01:00",
    "parent": "194533ab50641d55aa91a9738bf23b0964f2f98b7d5a7a346f48db35e2971e5d",
    "tree": "5b6420bf946faed29e452d36a67b0f6e0a75eb55c909c479238c6c9180d66f70",
    "paths": [
      "/dump.sql"
    ],
    "hostname": "RX4",
    "username": "restic",
    "uid": 1004,
    "gid": 1004,
    "tags": [
      "MYSQLDUMP"
    ],
    "id": "eb0045b835292f7528cb192698e09e32ed756de4ef8035266e8d003d1a91e8be",
    "short_id": "eb0045b8"
  },
  {
    "time": "2020-02-25T12:39:07.288277607+01:00",
    "parent": "5cf720c54226ef0777248c43819c31bbaf88359ae472101c434907648de72516",
    "tree": "826f0ce90202612a7d961cd5a26b132dbea9efb7f6cc7de4d83d944449e6959c",
    "paths": [
      "/home/restic/work"
    ],
    "hostname": "RX4",
    "username": "restic",
    "uid": 1004,
    "gid": 1004,
    "id": "c905cdff6e951cbdf02f93ea1e970face6430b371631dc7f10d3fdcb3aba2816",
    "short_id": "c905cdff"
  }
]
Using jq we parse the time field of the json:
"2020-02-25T09:08:33.133725964+01:00"
"2020-02-25T09:24:31.60798947+01:00"
"2020-02-25T09:25:08.029555517+01:00"
"2020-02-25T09:39:47.189660055+01:00"
"2020-02-25T09:45:58.501015101+01:00"
"2020-02-25T10:00:53.224338735+01:00"
"2020-02-25T10:05:45.896647702+01:00"
We create a bot with botfather to receive alerts when backups fail:
/newbot
Use this token to access the HTTP API:
XXXXXX:YYYYYYYYYYYY
We program a message sending script:
import requests
import sys

apiKey = "XXXXXX:YYYYYYYYYYYY"
url = "https://api.telegram.org/bot{}/sendMessage".format(apiKey)
msg = sys.argv[1]
print msg

userId = "ZZZZZZ"
data = {"chat_id":userId,"text":msg}
r = requests.post(url,json=data)
We assign the necessary permissions:
Now we proceed with the backup script:
#! /bin/bash
HOSTNAME=$(hostname)

# Make backup
echo -e ">> Making Backup"
restic -v backup ~/work2

# Make backups manteinance
echo -e ">> Keeping last 7 backups and prunning old backups"
restic -v forget -\-keep-last 7
restic prune

# Check last backup time
echo -e ">> Checking last backup time"
TIME=$(restic --json -v snapshots|jq '.[-1].time')
TIME=$(echo $TIME | tr -d '"')
#echo Processing: $TIME
YEAR=$(echo $TIME | awk -F "-" '{print$1}')
#echo YEAR: $YEAR
MONTH=$(echo $TIME | awk -F "-" '{print$2}')
#echo MONTH: $MONTH
DAY=$(echo $TIME | awk -F "-" '{print$3}' | awk -F "T" '{print$1}')
#echo DAY: $DAY
HOUR=$(echo $TIME | awk -F "T" '{print$2}' | awk -F ":" '{print$1}')
#echo HOUR: $HOUR
MINUTE=$(echo $TIME | awk -F "T" '{print$2}' | awk -F ":" '{print$2}')
#echo MINUTE: $MINUTE
SECOND=$(echo $TIME | awk -F "T" '{print$2}' | awk -F ":" '{print$3}' | awk -F "." '{print$1}')
#echo SECOND: $SECOND
DATESTRING="$MONTH/$DAY/$YEAR $HOUR:$MINUTE:$SECOND"
#echo dateString: $DATESTRING
EPOCH=$(date -d "$DATESTRING" +%s)
#echo EPOCH: $EPOCH

EPOCHNOW=$(date +%s)
# One day in s, we add some time because of job is cronttabed, we prefer not to count 24h exactly:
# 24*60*60=86400+3600
TRESHOLD=$(echo "scale=3;$EPOCHNOW-86400+3600" | bc)
#echo TRESHOLD: $TRESHOLD

if [ $TRESHOLD -gt $EPOCH ]; then
        #echo -e "ERROR: Last day backup NOT detected!!"
        #echo -e "Last correct backup: $TIME"
        python ~/.scripts/tg.py "ERROR $HOSTNAME: Last day backup NOT detected -> last correct backup: $TIME"
fi
We assign the necessary permissions:
NOTE: We only check the last backup, if it fails it will notify us daily of the failure.
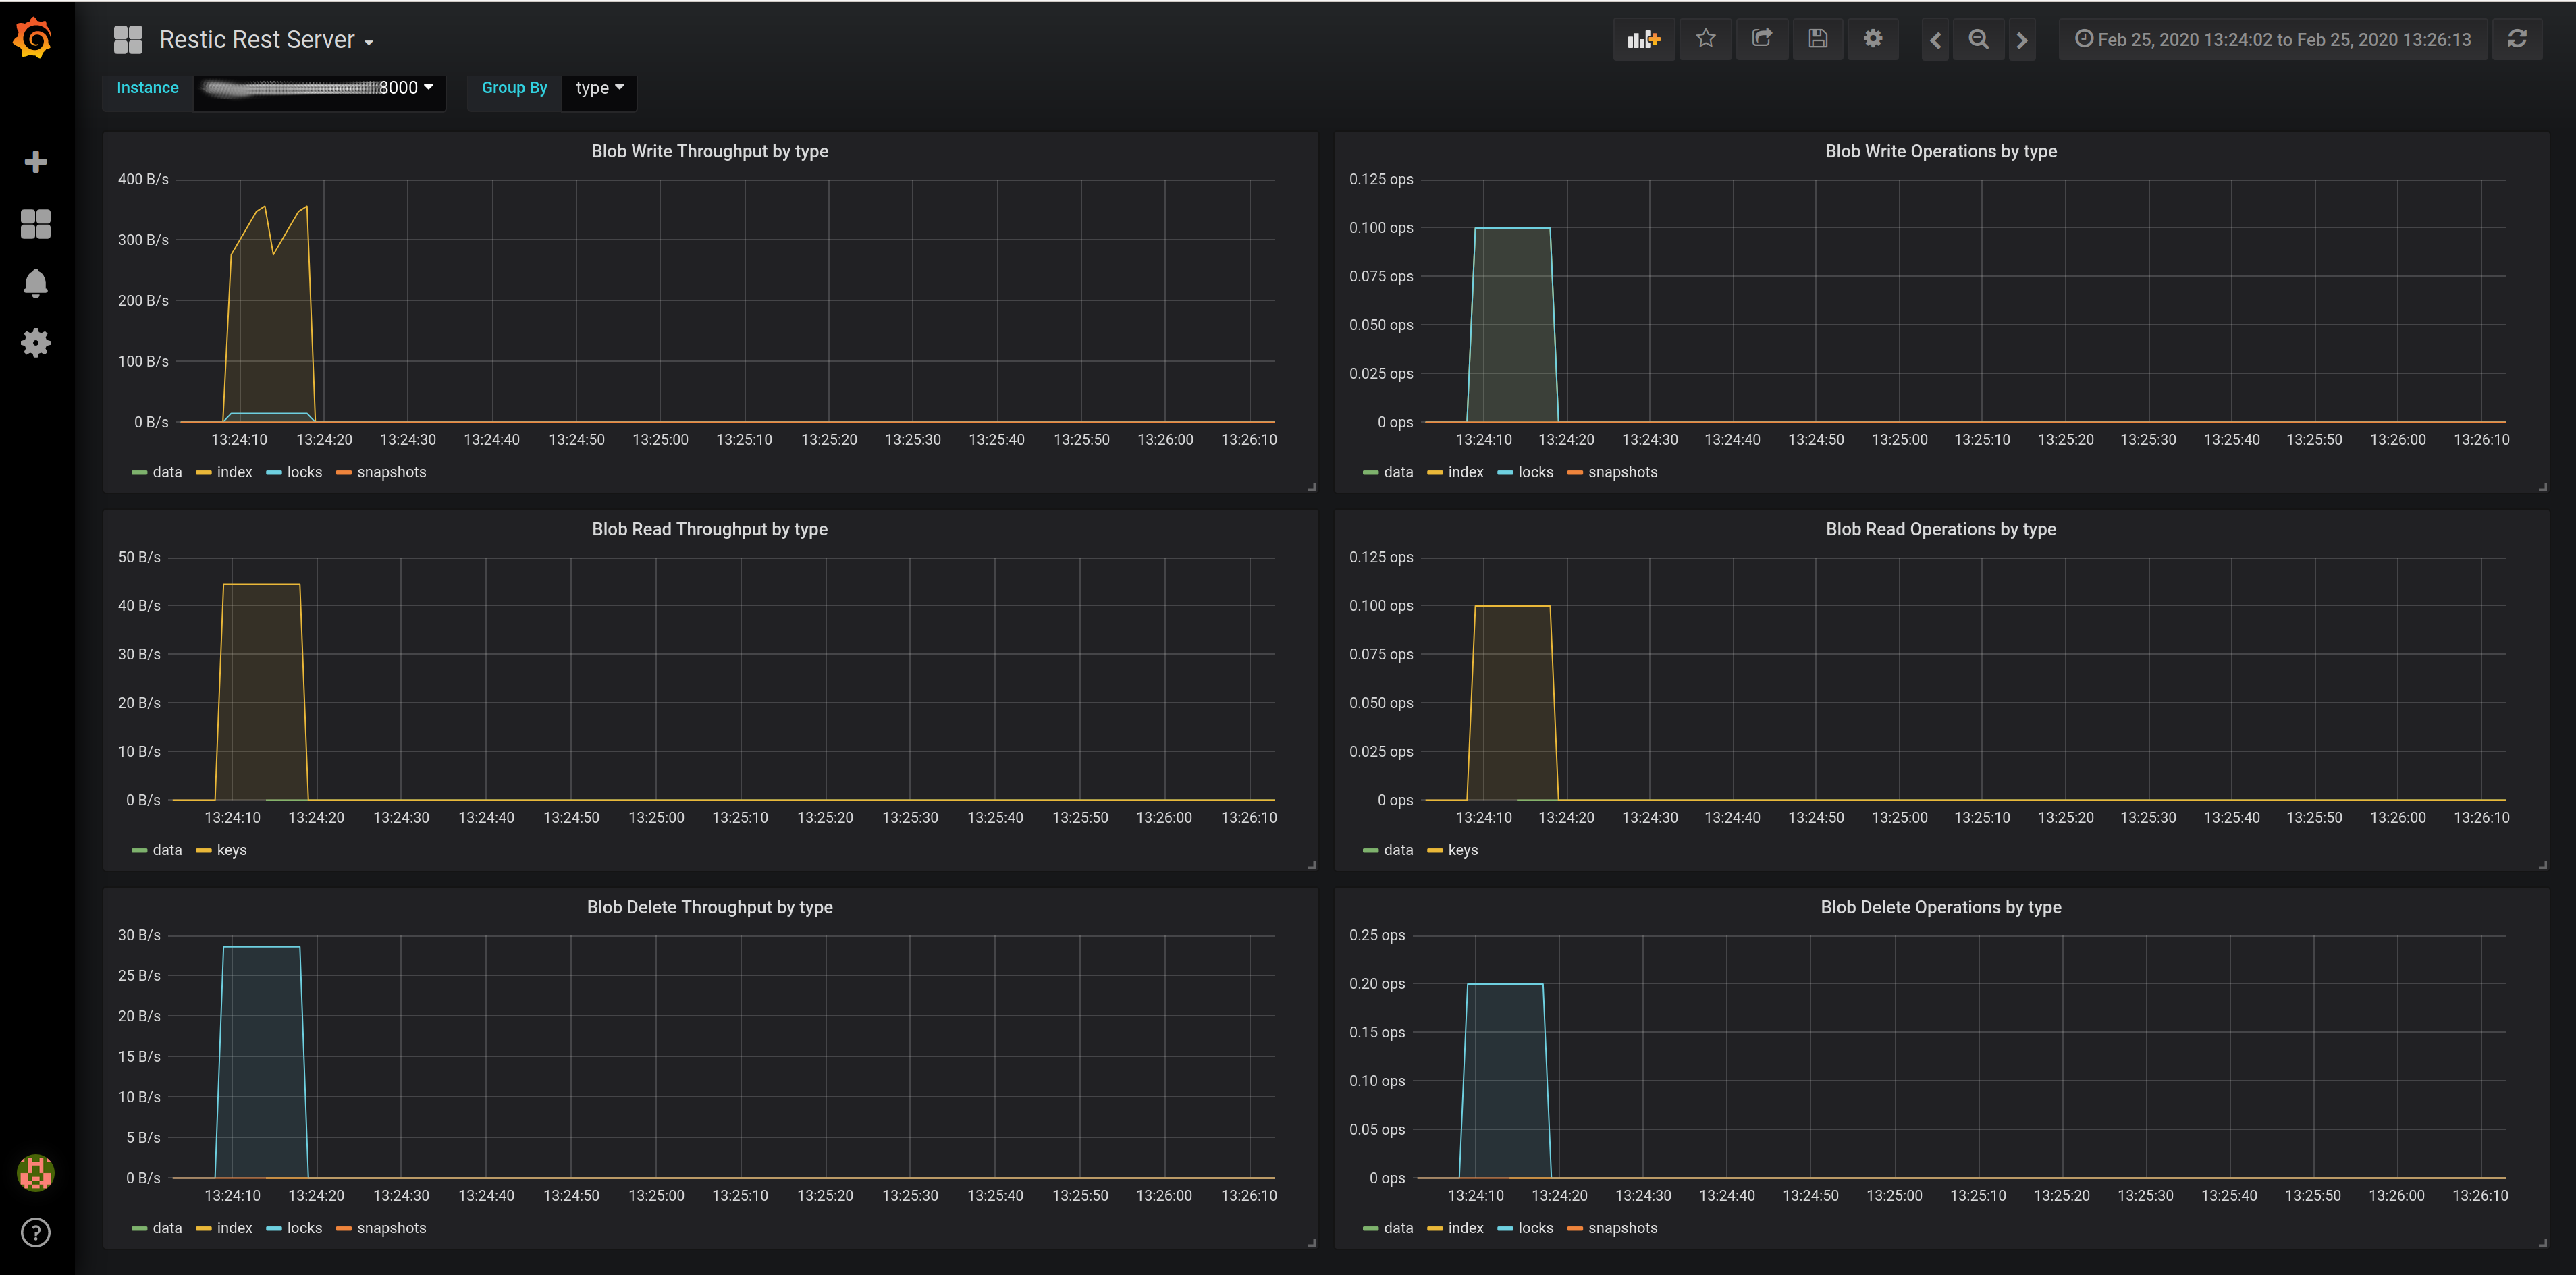
Restic allows exporting metrics through Prometheus, for this we start the rest-server with the --prometheus parameter:
We can access the metrics manually using curl:
rest_server_blob_delete_bytes_total{repo="kr0m",type="locks",user="kr0m"} 334
rest_server_blob_delete_total{repo="kr0m",type="locks",user="kr0m"} 2
rest_server_blob_read_bytes_total{repo="kr0m",type="keys",user="kr0m"} 894
rest_server_blob_read_total{repo="kr0m",type="keys",user="kr0m"} 2
rest_server_blob_write_bytes_total{repo="kr0m",type="data",user="kr0m"} 920
rest_server_blob_write_bytes_total{repo="kr0m",type="index",user="kr0m"} 354
rest_server_blob_write_bytes_total{repo="kr0m",type="locks",user="kr0m"} 334
rest_server_blob_write_bytes_total{repo="kr0m",type="snapshots",user="kr0m"} 318
rest_server_blob_write_total{repo="kr0m",type="data",user="kr0m"} 1
rest_server_blob_write_total{repo="kr0m",type="index",user="kr0m"} 1
rest_server_blob_write_total{repo="kr0m",type="locks",user="kr0m"} 2
rest_server_blob_write_total{repo="kr0m",type="snapshots",user="kr0m"} 1
The Prometheus scraping configuration would be as follows:
scrape_configs:
- job_name: rest_server
  scrape_interval: 5s
  scrape_timeout: 5s
  metrics_path: /metrics
  scheme: https
  static_configs:
  - targets:
    - RESTICSERVERIP:8000
  basic_auth:
    username: kr0m
    password: PASSWORD
  tls_config:
    ca_file: /usr/local/share/ca-certificates/resticKey.crt
    insecure_skip_verify: false
NOTE: We must install our trusted CA in Prometheus:
scp root@RESTICSERVERIP:/home/restic/ssl/public_key /usr/local/share/ca-certificates/resticKey.crt
update-ca-certificates
There are already created dashboards ready to import in Grafana, in my case I had to edit each of the graphs because the source was Prometheus and in my installation it is called Prometheus:
https://github.com/restic/rest-server/tree/master/examples/compose-with-grafana/dashboards
The final result is this:
Troubleshooting
Locks
There are times when the repository gets locked, if we see the following message when performing backups:
Fatal: unable to create lock in backend: repository is already locked by PID 28679 on RX4 by restic (UID 1005, GID 1006)
We must clean it up by running:
restic -v rebuild-index
restic -v check
restic -v prune
Ignored backup policy
When we run the forget command, Restic groups by path by default. This means that if the backed-up path changes, for example, a file that has a different hash name in each backup, the forget command will identify each backup as unique.
This will cause the keep-last X to not be respected since each backup is independent and the indicated backup policy will not be followed. If this is not detected in time, we run the risk of filling up the hard drive.
To solve the problem in the forget command, we must group by host instead of path:
--group-by host