We will try to explain with a brief and simple example how to connect for the first time to a Cisco router. We will not perform any configuration, we will only describe the process of turning on a Cisco router. We will use a typical Cisco router, the 1841, as an example. It is a router that Cisco has already stopped selling, but it serves as a perfect example of what a Cisco router is. We will do it from Packet Tracer, but in real life, it is exactly the same. Cisco1841
The router itself looks like this:


The Cisco console cable has an RS232 connector on one end, which we connect to the PC, and an RJ45 connector on the other end, which we connect to the router in the port indicated as Console. The RS232 port is increasingly difficult to find on current PCs and laptops, but a USB to RS232 adapter can be purchased to use the console cable.
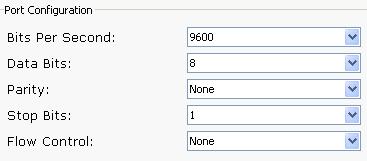
In addition to the console cable, we will need software on our PC. Assuming we are using the PC’s RS232 port (or the USB adapter –> Kernel compilation with support for this), there are different alternatives such as Putty, minicom, etc… In any case, to connect by console, the configuration will be the same and will be as follows:
Once connected to the router, when we turn it on, the boot process will begin, and among other things, we will see the following:
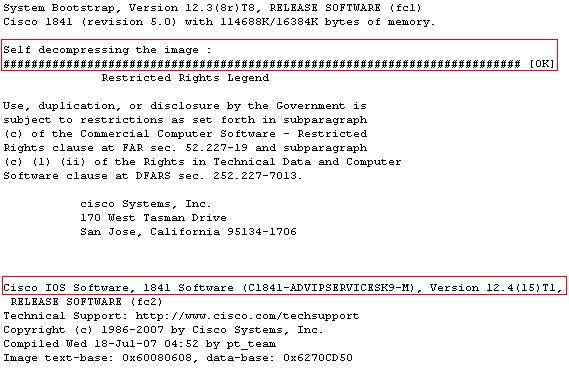
We can see the IOS version we have, in this case C1841-ADVIPSERVICESK9-M in Version 12.4(15)T1.
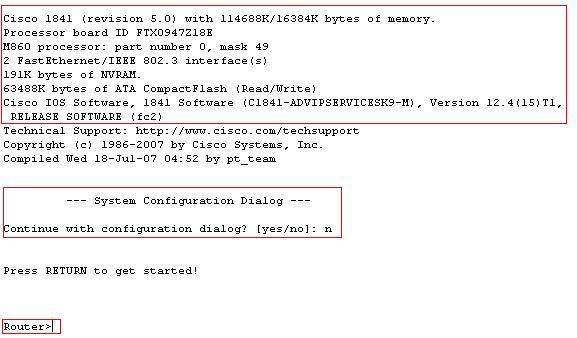
We can also see basic information about the router such as the model, the memory it has both RAM and NVRAM and Flash, the model of the motherboard, and the interfaces.
Regarding the memories, the following can be noted:
- RAM: This is where the router configuration is loaded while we use it (running-config).
- NVRAM: This is where we save the configuration and where it will be every time we turn on the router (startup-config).
- FLASH: This is where the router’s IOS is located.
Once the boot process is complete, it will ask us if we want to use the configuration wizard, we will answer NO, and we are almost ready to start configuring our router. At this point, we will be in non-privileged mode (Router>). From this mode, we can use commands only to obtain information or perform connectivity tests, but we cannot configure anything.
For example, the command:

This command is to obtain information about the router. The first thing we see is the IOS and the version we are using. We also see that the last restart was “by power-on,” meaning that it was turned off and on electrically. It does not distinguish between unplugging the power cable or using the button (if it has one), so we will not know if it was a power outage or a voluntary restart. Here we will also see how long the router has been on. If the router had restarted due to some problem, it would be reflected here.
It shows information about the router’s memory and the interfaces it has. In this case, we have two FastEthernet interfaces. Finally, it shows the Configuration Register Byte in hexadecimal, which we will discuss when explaining how to carry out a Password Recovery.
Another interesting command is:
It shows information about the status of the fans, power supply, etc.
To finish, when writing commands, it is very useful to know that the router will automatically complete the commands as we type them using the tab key. It is also not essential to memorize all the commands, as we can type a question mark (?) and all the possibilities will be displayed with a brief description.