There are several types of multiplayer gaming: from the Link Cable used by the GameBoy, to consoles with multiple controller ports, consoles with LAN network capabilities, and finally consoles with access to the Internet. In this article, we will explore the different multiplayer options available on ArkOS for the R36S.
The article consists of several sections:
- NetPlay Compatibility
- NetPlay: Same LAN
- NetPlay: Different LAN
- NetPlay: Different LAN, Relay Server
- NetPlay: Different LAN, Custom Relay Server
- NetPlay: Private Match
- NetPlay: Adhoc Mode
- NetPlay: Spectator Mode
- Game Share
- Ports/Consoles LAN
- Systems >= 32 bits
- PSX
- Nintendo64
- DreamCast
- Tests
- Debug
NetPlay Compatibility:
NetPlay
is the multiplayer system used by RetroArch, allowing us to emulate having two controllers connected to the console over the Internet.
When using NetPlay, it’s important to consider the following system requirements and limitations:
- A stable internet connection is required, so avoid downloading from
Torrents, streamingYouTubevideos, etc. Save statesare not supported.NetPlayis only available for certain combinations ofEmulator/Core. You can check the supported emulators and cores in theArkOSdocumentation.
Then you’ll need to verify if that specificEmulator/Coresupports netplay.- The systems on both consoles must match in terms of
ArkOS,RetroArch,RetroArch core, andROM version. If using a non-RetroArch emulator, its version must also match.
In my case, I will focus on Genesis/MegaDrive, NES, SNES, and CPS3. The following emulators are available for these systems:
-
- RetroArch: genesis_plus_gx , genesis_plus_gx_wide , picodrive
- Mednafen
-
NES :
-
SNES :
- RetroArch: snes9x , snes9x2010 , snes9x2002 , snes9x2005
- Mednafen
-
CPS3 :
- RetroArch: fbneo , fbalpha2012 , fbalpha2016, fbalpha2018
3D consoles like N64, Dreamcast, PS1, etc. are excluded from NetPlay, as they use their own multiplayer systems if available.
ArkOS version:
Start -> Distro Version
| R36S | R36H |
|---|---|
RetroArch version:
Retroarch -> retroarch   -> Information -> System Information -> RetroArch Version
Retroarch -> retroarch32 -> Information -> System Information -> RetroArch Version
| R36S | R36H |
|---|---|
RetroArch core:
Start the game
Press: SELECT + X (RetroArch) / SELECT + START + R1 + L1 (RetroArch32)
Press: B
Information -> Core Information -> Core Version
| R36S | R36H |
|---|---|
If the versions don’t match, update RetroArch on both consoles:
Retroarch -> retroarch   -> Online Updater -> Update Installed Cores
Retroarch -> retroarch32 -> Online Updater -> Update Installed Cores
| R36S | R36H |
|---|---|
ROM version:
When starting a NetPlay match, the joining player can see the ROM version. However, I haven’t found a way to check your local ROM version directly. You can only verify that both match by trying to join the game without triggering an error:
Start the game
Press: SELECT + X (RetroArch) / SELECT + START + R1 + L1 (RetroArch32)
Press: B
Netplay -> Refresh Netplay Host/LAN List
Navigate to the game and press SELECT
Preliminary Configuration:
A key aspect is setting your username, as this will be used to identify hosted games:
Retroarch -> retroarch   -> Settings -> User -> Username
Retroarch -> retroarch   -> Configuration File -> Save Current Configuration
Retroarch -> retroarch32 -> Settings -> User -> Username
Retroarch -> retroarch32 -> Configuration File -> Save Current Configuration
| R36S | R36H |
|---|---|
NetPlay: Same LAN
If both players are on the same local network, the connection will be direct (better performance). You can verify this using SSH (after
enabling services
) and running a tcpdump:
tcpdump -ni wlan0 port 55435
00:14:52.195324 IP 192.168.69.206.52630 > 192.168.69.208.55435: Flags [S], seq 3310496430, win 29200, options [mss 1460,sackOK,TS val 225288 ecr 0,nop,wscale 7], length 0
Connection process:
Start the game
Press: SELECT + X (RetroArch) / SELECT + START + R1 + L1 (RetroArch32)
Press: B

Player1: Netplay -> Host -> Start Netplay Host
Player2: Netplay -> Refresh Netplay LAN List
NetPlay: Different LAN
If you’re not on the same LAN, RetroArch will try to open the port using UPnP IGD. If that fails, you can forward the port manually via your router settings.
Verify this using SSH and tcpdump:
tcpdump -ni wlan0 port 55435
00:49:30.275473 IP 79.117.65.106.41566 > 192.168.69.208.55435: Flags [P.], seq 536:556, ack 8595, win 1424, options [nop,nop,TS val 744804 ecr 743766], length 20
Connection process:
Start the game
Press: SELECT + X (RetroArch) / SELECT + START + R1 + L1 (RetroArch32)
Press: B

Player1: Netplay -> Host -> Start Netplay Host
Player2: Netplay -> Refresh Netplay Host List
You can verify port forwarding using
this website
(port 55435).
NetPlay: Different LAN, Relay Server
If port forwarding still doesn’t work, use a public Relay Server, which acts as an intermediary between the players.
A relay connection shows this network traffic:
tcpdump -ni wlan0 port 55435
01:05:54.009817 IP 34.140.160.20.55435 > 192.168.69.208.42310: Flags [P.], seq 161:181, ack 7299, win 1002, options [nop,nop,TS val 3474243896 ecr 989709], length 20
Connection process:
Start the game
Press: SELECT + X (RetroArch) / SELECT + START + R1 + L1 (RetroArch32)
Press: B

Player1: Netplay -> Network -> Use Relay Server
Player1: Netplay -> Network -> Relay Server Location: Western Europe
Player1: Netplay -> Host -> Start Netplay Host
Player2: Netplay -> Refresh Netplay Host List
NetPlay: Different LAN, Custom Relay Server
If public relays introduce latency, you can host your own server on the Internet (not on your LAN).
Create a user:
adduser relay
Clone the repository:
su -l relay
git clone https://github.com/libretro/netplay-tunnel-server.git
Install the SystemD service:
su -l
cp /home/relay/netplay-tunnel-server/retroarch_tunnel_server.service /etc/systemd/system/retroarch_tunnel_server.service
chmod 664 /etc/systemd/system/retroarch_tunnel_server.service
systemctl daemon-reload
Test it manually:
python3 -OO /home/relay/netplay-tunnel-server/retroarch_tunnel_server.py
[*] Tunnel server listening on: ::|55435
[*] Tunnel server listening on: 0.0.0.0|55435
Enable and start the service:
systemctl enable retroarch_tunnel_server.service
systemctl start retroarch_tunnel_server.service
Verify the socket is listening:
netstat -nputa | grep 55435
tcp        0      0 0.0.0.0:55435           0.0.0.0:*               LISTEN      4055287/python3
tcp6       0      0 :::55435                :::*                    LISTEN      4055287/python3
NOTE: You may want to restrict access to the port using iptables.
Connection process:
Start the game
Press: SELECT + X (RetroArch) / SELECT + START + R1 + L1 (RetroArch32)
Press: B

Player1: Netplay -> Network -> Use Relay Server
Player1: Netplay -> Network -> Relay Server Location: Custom
Player1: Netplay -> Network -> Custom Relay Server Address: IP
Player1: Netplay -> Host -> Start Netplay Host
Player2: Netplay -> Refresh Netplay Host List
NetPlay: Private Match
Hosted games are publicly visible on
this site
:

To make a game private, you can either set a password or disable public announcement.
Password protect the game:
Start the game
Press: SELECT + X (RetroArch) / SELECT + START + R1 + L1 (RetroArch32)
Press: B

Player1: Netplay -> Network -> Server Password: PASSWORD
Player1: Netplay -> Host -> Start Netplay Host
Player2: Netplay -> Refresh Netplay Host List
Removing password from console has rendered useless. To remove the password, edit the config file via
SSH
:
vi ~/.config/retroarch/retroarch.cfg
netplay_password = ""
Don’t announce the game:
If not announced and players are on different networks, you’ll need to share your
WAN IP
or domain name.
Start the game
Press: SELECT + X (RetroArch) / SELECT + START + R1 + L1 (RetroArch32)
Press: B

Player1: Netplay -> Network -> Publicly Announce Netplay:: No
Player1: Netplay -> Host -> Start Netplay Host
Player2: Netplay -> Connect to Netplay Host: WAN_IP/DNS
NOTE: Local games will still appear in Netplay -> Refresh Netplay LAN List, even if announcement is disabled.
AdHoc/GameShare Pitfalls
It is possible to create
Adhoc
game sessions that don’t require an external AP for players to connect, as one of the consoles will create an AP (Access Point) for the others to join. This is the same mechanism used in
GameShare
mode.
This system has a critical requirement: the Wi-Fi chip must support AP mode, or it will fail. In my case, I have the R36S with a USB dongle using the
Realtek RTL8188
chip and the R36H with the
MediaTek MT7601UN
.
The Realtek RTL8188 chip can be configured in AP mode, while the MediaTek MT7601UN cannot.
NetPlay: Adhoc Mode
Using ArkOS’s Adhoc system, we can set up an internal AP on one of the consoles for other players to connect to — removing the need for an external router/AP. This happens automatically. The only requirement is that the Wi-Fi chip must support AP mode.
Here’s the procedure:
Player1: The console acting as AP starts the game.
Player1: Right as we press A to launch the game, hold down the X button.
Player1: 1 - Host an adhoc Netplay Session

Player2: Start the same game as Player1.
Player2: Right as we press A to launch the game, hold down the X button.
Player2: 2 - Connect to an adhoc Netplay Session
This video shows how the mode works and the AP that the console sets up:
| AdHoc mode | AdHoc AP |
|---|---|

|
NetPlay: Spectator Mode
ArkOS’s Spectator mode allows players to join sessions in RO (Read-Only) mode. That means the joining player can only watch the session — not interact with it. This works with all connection modes, but the process differs between Normal and AdHoc modes.
Normal modes:
Connection procedure:
Start the game.
Press: SELECT + X (RetroArch) / SELECT + START + R1 + L1 (RetroArch32)
Press: B

Player1: Netplay -> Host -> Start Netplay Host
Player2: Netplay -> Network -> Netplay Spectator Mode: Yes
Player2: Netplay -> Refresh Netplay LAN List
In the first video, even when multiplayer is selected, Player2 is only a spectator and cannot move the character.
| Spectator mode: Multi | Spectator mode: Single |
|---|---|
AdHoc:
As with AdHoc mode, the Wi-Fi chip must support AP mode.
Procedure:
Player1: The console acting as AP starts the game.
Player1: Right as we press A to launch the game, hold down the X button.
Player1: 1 - Host an adhoc Netplay Session

Player2: Enter RetroArch
Player2: Right as we press A to launch the game, hold down the X button.
Player2: 3 - Spectate an adhoc Netplay Session
However, it seems the session is never found, even though the AP is created.
| Spectator mode: Adhoc | Spectator AP |
|---|---|
|
In both Normal and AdHoc modes, it’s possible to assign a password for Spectator access. If you do, the password has the same issue as in standard netplay sessions: it cannot be removed once set. You’ll have to connect via
SSH
and edit the file ~/.config/retroarch/retroarch.cfg:
vi ~/.config/retroarch/retroarch.cfg
netplay_spectate_password = ""
Game Share
Game Share
in ArkOS lets you share a game with your co-player, using an AdHoc game session.
The only restrictions are:
- Players must be physically near each other to connect to the AP.
- The game must be a single-file (no multi-disc games).
- The Wi-Fi chip must support AP mode.
Procedure:
Player1: The console acting as AP starts the game.
Player1: Right as we press A to launch the game, hold down the X button.
Player1: 4 - Game Share Mode
Player1: 1 - Share current game with Client

Player2: Enter RetroArch
Player2: Right as we press A to launch the game, hold down the X button.
Player2: 4 - Game Share Mode
Player2: 2 - Share game from Host
Unfortunately, I couldn’t get this working at all. It always throws an error, and the client freezes. However, the AP does appear on mobile devices.
| GameShare mode | GameShare AP |
|---|---|

|
Ports / LAN Consoles
All PC games ported through
Ports
with LAN multiplayer support, as well as consoles that support LAN multiplayer, should work on the R36S. However, the R36S doesn’t have enough power to emulate consoles from those generations well — so we’ll focus on Ports.
You can find a list of PC games with LAN multiplayer support
here.
A good example is Half-Life, which is available as a Port. Installation instructions are available
in this previous article.
This video shows a LAN game in action:
We tried using tools like ZeroTier or Hamachi to tunnel LAN traffic over the Internet — multicast/broadcast traffic was enabled, and routes were pushed — but it was all in vain.
Systems ≥ 32-bit
As mentioned earlier, NetPlay is only available with specific Emulator/Core combinations. The list of supported cores/emulators is in the official
ArkOS emulator documentation.
You’ll then need to verify whether that Emulator/Core supports Netplay.
ArkOS allows launching games via RetroArch and its associated Core, or using a StandAlone emulator. Some emulators are available both as RetroArch cores and as StandAlone executables.
For Nintendo 64, in addition to the Core/Emulator, you’ll also find several Video plugins. These don’t affect NetPlay, but they’re worth mentioning to clarify the options ArkOS/EmulationStation presents.
It’s worth noting that most emulators run faster in StandAlone mode but are harder to configure, as each has its own system, interface, or configuration files.
PSX:
NetPlay support on PSX:
| Emulator | Core | NetPlay | RetroArch Shortcut |
|---|---|---|---|
| RetroArch32 | pcsx_rearmed | No | SELECT + START + R1 + L1 |
| RetroArch | duckstation | No | SELECT + X |
| RetroArch | swanstation | Unknown | SELECT + X |
| DuckStation | NULL |
No | NULL (SELECT + START: Exit) |
There is a modified version of DuckStation with NetPlay support, but
HeatXD’s implementation
is tightly coupled with the Qt graphical interface. In other words, it’s built into the GUI and not integrated into the emulator backend or nogui mode.
There is also a
frontend for DuckStation
currently in Alpha stage, but it suffers from the same limitation as the modified version: it requires a graphical server to be running.
Nintendo64:
NetPlay support on Nintendo 64:
| Emulator | Core | NetPlay | Video Plugins | RetroArch Shortcut |
|---|---|---|---|---|
| RetroArch32 | parallel_n64 | No | Glide64 , Gln64, Rice , Angrylion | SELECT + START + R1 + L1 |
| RetroArch | parallel_n64 | No | Glide64 , Gln64, Rice | SELECT + X |
| RetroArch | mupen64plus_next (GLES3) | No | Glide64 | SELECT + X |
| RetroArch | mupen64plus (GLES2) | No | Glide64 | SELECT + X |
| Mupen64plus/Rice | NULL |
No | Rice | NULL (SELECT + START: Exit) |
| Mupen64plus/Glide64mk2 | NULL |
No | Glide64mk2 | NULL (SELECT + START: Exit) |
| Mupen64plus/GlideN64 | NULL |
No | GlideN64 | NULL (SELECT + START: Exit) |
If we choose to change the Video plugin, remember to save changes and restart the game for them to take effect:
Core Options -> Manage Core Options: Save Game Options
Depending on how the game is launched in RetroArch, the relevant configuration option varies:
RetroArch32: parallel_n64     -> GFX Plugin
RetroArch:   parallel_n64     -> GFX Plugin
RetroArch:   mupen64plus_next -> RDP Plugin
RetroArch:   mupen64plus      -> RDP Plugin
NOTE: When running Mupen64plus in StandAlone mode, we always execute Mupen64plus, but pass a --gfx argument to specify the video module.
There have been attempts to implement NetPlay in Parallel, but deterministic behavior was never achieved, so the idea was ultimately abandoned. As for Mupen, although it can be compiled with the
NETPLAY flag
, this mode is extremely basic—lacking any lobby system, connection management, or meaningful usability.
There is an
Android version
that appears to support NetPlay, but it likely implements all the missing parts of the protocol stack manually.
DreamCast:
NetPlay support on DreamCast:
| Emulator | Core | NetPlay | RetroArch/RetroRun/Flycast Shortcut |
|---|---|---|---|
| RetroArch32 | flycast32_rumble | Yes* | SELECT + START + R1 + L1 |
| RetroArch32 | flycast_xtreme | Yes* | SELECT + START + R1 + L1 |
| RetroArch32 | reicast_xtreme | Yes* | SELECT + START + R1 + L1 |
| RetroArch | flycast_rumble | Yes* | SELECT + X |
| RetroArch | flycast | Yes* | SELECT + X |
| RetroRun32 | flycast32_rumble | Yes* | SELECT + X |
| RetroRun32 | flycast_xtreme | Yes* | SELECT + X |
| RetroRun32 | reicast_xtreme | Yes* | SELECT + X |
| RetroRun | flycast_rumble | Yes* | SELECT + X |
| RetroRun | flycast | Yes* | SELECT + X |
| FlyCast | NULL |
No | SELECT + START + R1 + L1/SELECT + START/SELECT + X |
DreamCast supported two multiplayer modes:
- Multiplayer: Two controllers connected to the console.
- Internet game: A phone number was dialed via modem to access the Internet.
RetroArch is capable of hosting online matches, but not through the NetPlay system—instead, it uses the modem configuration of the game itself. This system is quite unstable because the public servers perform poorly (this doesn’t happen with our own server as shown below). In my experience, I was only able to get it to work a couple of times, and the experience was unbearable.
In this video, you can see the typical behavior: it rarely connects, and if it does, it’s unplayable due to lag and disconnections:
NOTE: The connection parameters are the default ones, except for the name and prefix which I believe only need to meet the condition of being two digits. I ensured both consoles had an acceptable connection speed and that I joined the same game room on both.
Starting with Flycast >= v2.5, it includes
DCNet
, which works much better and supports
over 30 titles
. Unfortunately, the version bundled with ArkOS is from 2025-03-16, while DCNet was added on 2025-05-07.
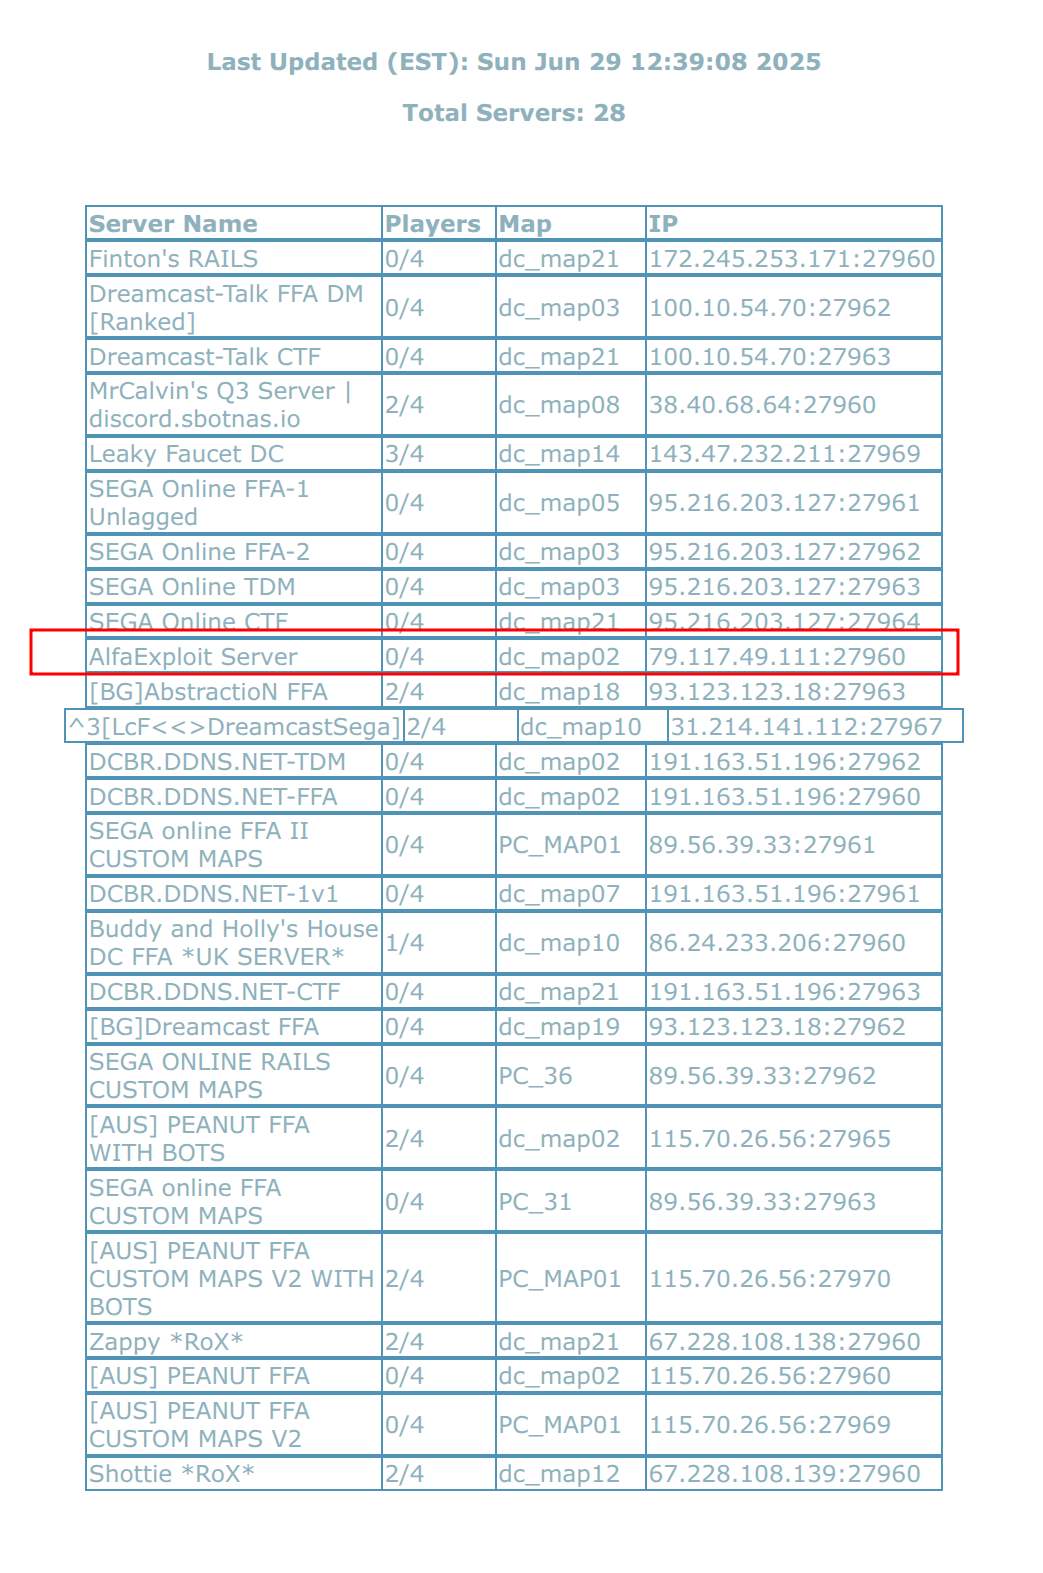
It’s also possible to host our own server, but each game requires its own. In my case, I’m setting one up for Quake3.
We add a user to run the process, set a password, and change the shell to bash for convenience:
useradd -m gameserver
passwd gameserver
chsh gameserver
Download the server:
cd /home/gameserver
wget dc.loc-os.com/quake3dc-server.tar.xz
tar xvf quake3dc-server.tar.xz
cd quake3dc
chmod 700 q3ded
Install dependencies:
cat dependencias.txt
apt install lib32z1-dev screen
Edit the configuration file. Depending on the type of matches you want to host, you’ll edit one file or another:
vi baseq3/ffa.cfg
set sv_hostname         "AlfaExploit Server"
set g_motd              "Welcome to AlfaExploit-DC Server"
Specify the IP to bind to:
vi ffa_server.sh
net_ip="192.168.69.4"
Change owner and group of the directory:
chown -R gameserver:gameserver /home/gameserver/quake3dc
Depending on the type of match, launch the appropriate startup script:
su -l gameserver
cd quake3dc
chmod 700 ffa_server.sh
./ffa_server.sh
Trying to start Dedicated Quake III Arena Server/n/n
Date     : date '+%m.%d.%y' /n
Basepath : /home/gameserver/ /n
IP       : 192.168.69.4 /n
Port     : 27960 /n
###################################### /n
To Attach the screen use $ screen -list/n
$ screen -r PID.q3a-ffa/n/n
To detach press ctrl + a + d/n
or for qwertz strg + a + d
Check the screen session where the server was launched:
screen -ls
There is a screen on:
	1416429.quake3dc	(29/06/25 18:03:45)	(Detached)
1 Socket in /run/screen/S-gameserver.
If we attach to it, we can see the server startup log:
screen -x
------ Server Initialization ------
Server: dc_map02
Loading dll file qagame.
Failed to load dll, looking for qvm.
Loading vm file vm/qagame.qvm.
VM file qagame compiled to 1500845 bytes of code
------- Game Initialization -------
gamename: baseq3
gamedate: Mar 14 2000
Warning: cvar "dedicated" given initial values: "1" and "0"
------------------------------------------------------------
InitGame: \.Admin\N/A\g_needpass\0\gamename\baseq3\gamestartup\06-29-2025 18:34:00 \bot_minplayers\2\sv_allowDownload\0\sv_privateClients\0\mapname\dc_map02\protocol\43\sv_keywords\dreamcast\version\Q3 1.16n linux-i386 Mar 14 2000\capturelimit\10\g_maxGameClients\4\sv_floodProtect\1\sv_maxRate\3000\sv_hostname\AlfaExploit Server\timelimit\30\fraglimit\0\dmflags\0\g_gametype\0\sv_maxclients\4
Warmup:
0 teams with 0 entities
12 items registered
-----------------------------------
-----------------------------------
***** Finished Parsing \maprotation\ffa.cfg *****
***** Finished parsing ffa.cfg *****
Hitch warning: 632 msec frame time
Resolving master3.idsoftware.com:27950
master3.idsoftware.com:27950 resolved to 192.246.40.56:27950
Sending heartbeat to master3.idsoftware.com:27950
Resolving dc.dreamcast-talk.com:27950
dc.dreamcast-talk.com:27950 resolved to 100.10.54.70:27950
Sending heartbeat to dc.dreamcast-talk.com:27950
Resolving master.ioquake3.org:27950
master.ioquake3.org:27950 resolved to 192.241.238.177:27950
Sending heartbeat to master.ioquake3.org:27950
Resolving dpmaster.deathmask.net:27950
dpmaster.deathmask.net:27950 resolved to 107.161.23.68:27950
Sending heartbeat to dpmaster.deathmask.net:27950
Resolving master.onlineconsoles.com:27950
master.onlineconsoles.com:27950 resolved to 167.114.173.38:27950
Sending heartbeat to master.onlineconsoles.com:27950

Ctrl+a+d
Check if the port is bound:
netstat -nputa|grep 27960
udp 0 0 192.168.69.4:27960 0.0.0.0:* 1443553/q3ded
Forward port 27960/UDP on the router (if the server is hosted at home), and after a while you should see your server listed at:
https://dc.dreamcast-talk.com/q3/q3masterlist.html
If the console connects from the same network as the server, it may cause issues due to hairpinning . In that case, either connect the console through another network or host the server elsewhere.
If both consoles share the same Internet connection, that can also be problematic. You can use mobile WiFi tethering for one of them as a workaround.
In my case, with the server hosted locally and both consoles sharing Internet access, I had no problems.
As shown in the following video, the result is infinitely better than with public servers. It still performs poorly, but at least now it manages to connect:
An alternative would be to use
Flycast Dojo
, but it’s not natively supported on ArkOS and likely depends on a graphical environment to run, so it’s not viable on the R36S.
There’s also this
frontend for Flycast
, but it’s in the Alpha stage and requires an active graphical session.
Tests:
In the previous explanations about the use of NetPlay, only Contra/NES was used as an example. In these videos, we will see several games from different platforms working with NetPlay.
| Genesis | NES |
|---|---|
| SNES | CPS3 |
|---|---|
Debug:
RetroArch:
If you’re having trouble connecting to matches, you can check if they have been published on the website
lobby.libretro.com
You can also check the redirection of port 55435 on your router.
You can even connect to the consoles via
SSH
and analyze the traffic using tcpdump:
tcpdump -ni wlan0 port 55435
A very useful feature during testing is enabling NetPlay details:
Settings -> User interface -> On-screen notifications -> Notification visibility:
  Display netplay ping
  Extra netplay notifications
If you join an AdHoc match but selected a different game than the console acting as the AP, you will see something like this:
If the AdHoc connection has many issues, it may be because the AP was created on a saturated WiFi channel. You can access the assistant that detects which channel is less congested and apply that channel to the AP configuration for future use:
Removing the password from a NetPlay match is not possible through the interface; you must access via
SSH
and edit the ~/.config/retroarch/retroarch.cfg file:
vi ~/.config/retroarch/retroarch.cfg
netplay_password = ""
The same applies to the spectator password:
netplay_spectate_password = ""
DreamCast:
If your custom DreamCast server has issues, you can attach to the Screen session to check for possible errors:
screen -ls
screen -x
If the console connects from the same network where the server is hosted, it may cause problems due to hairpinning . In that case, either connect the consoles through a different network or host the server on an external service.
If both consoles are accessing the Internet through the same connection, that could also cause issues. In that case, you can use Wi-Fi tethering via a mobile phone for one of them.